As you may know that this lesson about digital photos or related to product photography always essential factors for photographers. Great apparel images is one of important factors what contribute the success of product and the effective of budget. To creat beautiful apparel images, we should use many factors such as: colors, garment, model or mannequins,… Of course , lighting is indispensable element. Great apparel images are produced when lighting flatters your product. Shiny products like jewel, glass or metal can be tricky to photograph owing to their highly reflective nature. However, to control shape light, eliminating reflections and any unbecoming distractions can not be easy as take a normal cameras.
In this post, we will present three tutorial guide to setup natural lighting that can flatter your shiny product.
Window Lighting
Natural resources are an efficient lighting setup for your polished and highly reflective product. Using natural light as the only light source meant they were just starting out, were too poor to afford lights. It were not smart enough to figure out lighting. To ensure the space is not cramped up. For perfect product images, it is important to provide adequate space for your photography equipment without compromising on your comfort.

Once you set up your equipment, it should be easy to tear down and repeat if needed. Or leave your equipment in place if you have the space to do so.
Firstly, find a large window that filters plenty of light into the room at a 90-degree angle in relation to your product. If the light streaming through the window is rather harsh, try hanging up a sheer, white sheet.
Secondly, it is to create the ideal backdrop for your product. You don’t have to make it too wide, but ensure there’s adequate space above and around your subject so as to fill your frame. A stand may come in handy in holding your backdrop intact in its rightful place. Keep in mind that a white background always helps shiny products to stand out free of distractions, giving your imagery a clean and highly professional look. If you find that you still have too much shadow on the opposite side to the window, then try using a reflector.
Enclosed Lighting System
One of the best ways to photograph a shiny product is the use of an enclosed lighting system. The benefits are many. The enclosed system wraps even and balanced light around the entire product you’re photographing. The advantages include an even distribution of light, consistent natural lighting, elimination of glare, illumination of hard to reach spots.
Generally, the use of flash photography produces hot spots and glares. But continuous natural lighting will help to accurately and evenly reproduce all the stunning colors in the various elements of your shiny product photography.
Diffused Lighting

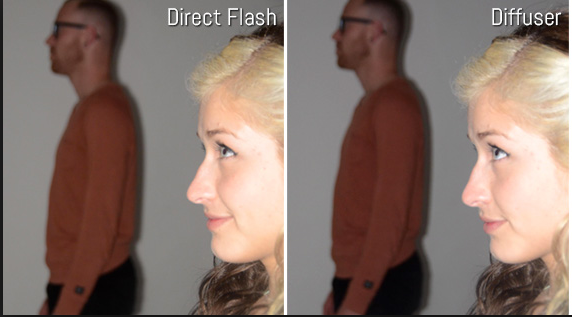
When illuminating s shinny product photography, you have to make sure never to expose it to light directly, as direct light will be reflected on the shinny product, and will create hot spots and shadows. What you need to do is expose jewelry through diffused lighting, which is light that has passed through some sort of light diffuser. The diffuser evenly spreads the light, and eliminate all hot-spots, shadows and reflections. Remember, that all of our product photography lighting systems already include natural daylight. It is exposed through the boxes’ thermoplastic housing that acts as light diffusers.
White balance
It is a vital element of outstanding product photography. Be sure to adjust the white balance settings on your camera. Although many cameras will come with pre-program options or presets you need at least one custom white balance option. This means that the camera can “read” and self-adjust itself to be able to take pictures under many light conditions. This feature is very important. White balance means that the camera needs to adjust itself to the ambience light you are using. This give you accurate and true colors of the items being photograph.
Avoiding unnecessary shadows and reflections

When photographing shiny product, there are certain shadows and reflections that might be necessary to create a three-dimensional look. Yet, there are other reflections and shadowsthat are unnecessary and that you want to avoid in order to have a photograph that presents your shiny product in the best way possible. The first thing you need to understand about reflections and shadows. You should know how they are produced and why they appear or exist and then work on lighting to have the desired effect.
These some tutorial guides will get you well on your way to creating product photograph of shinny that really make an impression with prospective customers.