Categories
Support Tips & Tricks

Perfect Product Images with Reflection Shadow

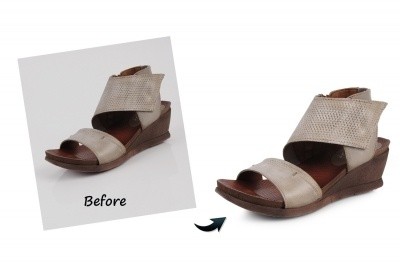
Reflection shadow is a graphic outcome that is one of necessary factors to create perfect product images. A beautiful images is one of the important factors to decide and build the success of the online shopping website. Create a beautiful images is not easy but is not difficult. You need to use suitable colors, accordant garment, light,… and shadow too. Shadows can obscure a beautiful product and make product photography look unprofessional. And  a reflection shadow service makes your images appear to be as though it was captured on a reflective shell like a mirror. It can make your images more visually attractive and form a sense of environment. So they don’t seem as though they’re floating in air. Reflection shadow service can be astonishing, which will help your image emerge from your rivals in multi-channel sectors. It is particularly effective for items like jewelry that are commonly sold in stores with brightly lit glass counters.

Create the reflection shadow

fotosolution-Perfect-Product-Images-with-Reflection-Shadow-01

How can you create a reflection shadow? Below is some ways what help you learn how to create a reflection shadow using Photoshop.

  1. Start with a layer for your product and then add a layer with a white fill background behind that image. Select the white area around your product image to mask out the product from the background. Now refine your edges so there is a smooth transition.
  2. Duplicate your product layer and transform your layer vertically so it is a mirrored image of your original. Position it directly below your product so it matches up to the bottom.
  3. Add a faded gradient mask to your reflection layer so it looks as though it is fading off into the ground. Now add a little blur to your reflection layer so it isn’t as sharp as your product layer.
  4. Finally, to make your product look even more realistic, add a tiny shadow below the bottom of your product by adding a feathered selection curve and making it darker. This will make your product feel grounded

When done correctly, a reflection shadow will put your product on display and increase its value in the eyes of your customer.

Check video to know how to create reflection and shadow for your product

If you’d like to learn about other shadow options, like natural shadow and drop shadow, read our post about shadow styles. Learn how to enhance your furniture and accessories product images with shadows. If you can’t capture a natural shadow, and if your product doesn’t seem like a good fit for reflection shadow, try using drop shadow. See how we apply natural shadow and drop shadow to the same product image, or read on to see a drop shadow added to a perfect product image. So, using reflection shadow will contribute to the success of images or perfect product images photograph.

Categories
Support Tips & Tricks

Free and Open Source eCommerce Platform

Nowadays, eCommerce SEO is more and more popular in modern social network. eCommerce product photography is one of the aspects of web design that enhances the value and raise the effective sales. This platforms are constantly evolving to meet the needs of retailers entering. From corporate giants to small shops, many ecommerce store owners are turning to open source eCommerce platform. It is simply and convenient reasons including: cost effective, save valuable times, easy to set up online platform to manage.

Meeting the need of trade market as well as of big and small corporation, there are numerous open source eCommerce in the market. As far as we know, the development of open source eCommerce inadvertently become difficult issue to choice the most appropriate solution for business. To tackle this challenge, we will show viewer that the advantages and some useful open source eCommerce platforms.

First, we will answer the question why eCommerce become strong development in the market?.  Simply, only 3 criterias make open source eCommerce attractive including:

  • The onlie store can be set up with few simple click.
  • The store can be set up without paying or funding the big capital
  • These platform have a large community of development to help in case of technical issues.

Second, we will share some hot trend open source eCommerce platforms that are believed and popular in the market.

Magento Community

With the result of survey in consumption market, Magento Community is one of the most popular open source eCommerce platform available. It is considered as great choice for eCommerce store. With flexible features, this open source eCommerce software allows business owners to modify the source code, add best features. It is easy to integrate with different application to customize website styling. It also create a beautiful website for even the largest of retailers.

fotosolution-free-and-open-source-ecommerce-platform-1

In addition, Magento also built attractive features: search engine optimization for better visibility on search engines to promote the targeted product and effective sales.

Woo-Commerce

With the survey more than 1,6 million dowloads, Woo-Commerce is easily become one of the most poplular open source eCommerce solution that business owners are believed and satisfied. WooCommerce is the open source plugin that helps store owners can use to turn their site into a store.

fotosolution-free-and-open-source-ecommerce-platform-4

In fact, the flexibility over all of WooCommerce is rather limited. However, we also denied the advantages or the effect of WooCommerce typically as integrate easily a blog with a fully functional website. Especially, WooCommerce have to help business check out the statistic about total sales, customer stats and total orders that are presented in easily understandable graphs.

PrestaShop

PrestaShop is a rather unique open source solution that may business are well liked by developers and users. It is used to build and maintain an online store free of cost. With more than 300 features including beautiful promotion banners, product quick views. It is customizable product layout and centralized backend for analytics that allow business owners to show and promote their product.

fotosolution-free-and-open-source-ecommerce-platform-3

In addition, PrestaShop’s code is available for free download and customize easily mobile responsive themes. Presta shop are poplular in the market and prove that this open source ecommerce platform extends to more than 200 countries. For instant, it has been translated into 65 languages.

Open Cart

Open Cart is a rather new solution available with more than  2700 hot themes . It is in the top 1 million sites on Alexa.com. This is considered as a big success of open source eCommerce platfom to attract the attraction of business owner.

fotosolution-free-and-open-source-ecommerce-platform-2

One feature many OpenCart users enjoy is the turnkey nature of this open source ecommerce platform. Moreover, Open Cart allows business to adjust image resizing, templates, in-built backup. In additional, it restores modules and unlimited products, their categories and information pages.

ZenKart

Zenkart is a free open source shopping cart and friendly for users. Strong points of Zenkart including the installation, updating of products that are easy and does not require HTML coding. Using this open source eCommerce software will help store owner control and edit the product information from the dashboard. Morever, Zenkart has also many other features as: quick integration with multiple payment gateways. So, it is easy to update catalog of products and find functionality to search products by name, description, meta-tags and price.

fotosolution-free-and-open-source-ecommerce-platform-5

With the development of technique era, the number of industries opting for eCommerce software solution have also hiked up. For example, Zen Cart is not difficult to find one of appropriate solution for business. Finally, here is a list of 5 amazing open source eCommerce software solution available for you. If you know other open source eCommerce, let’s share and us know in the comments below!.

Categories
Support Tips & Tricks

DSLR & Mirrorless Which is great and appropriate choice for you?

DSLR & Mirrorless are two famous cameras lines that are interested in and popular for photographer. The competition between DSLR or Mirroless has never ended because of the development of them. It is difficult to find and answer DSLR or Mirroless which is the best for users due to depending on many factors. But the first step we have to know and understand the basic knowledge about DSLR and Mirroless.

DSLR is a digital camera that uses mirrors to direct light from the lens to the viewfinder. When you press the shutter button, the mirror flips up, a shutter opens and the light falls onto the image sensor. A mirrorless camera is a digital cameras without using mirrorless, light passes through the lens.  When you take the photos,  you need to focus on LSC screen or put your eyes in the electronic viewfinder (EVF).

Today, nobody including famous specialistes and photographers can confirm that DSLR or Mirrorless which is the better or the best for users. Each camera line has the own advantages and the important thing we are interested in the quality of images. Here we will share some advantages and disadvantages of DSLR and Mirrorless.

Size and Weight

fotosolution-dslr-and-mirrorless-which-is-great-and-appropriate-choice-for-you-2

The easiest thing we can mention that the size of Mirrorless is smaller and lighter than DSLR because basic principles of Mirroless don’t use mirroless. So its body are slimmer. For DSLR, its body are comparatively larger, because it includes mirror and a prism. If you need to choice a camera for travel, for portrait shooting,.. mirrorless will a great companion for you.

Autofocus Speed

Autofocus speed is viewed as the most obvious differences of two camera lines. In term of technique angles, the autofocus speed of DSLR are better and faster than Mirrorless. Mirrorless cameras were restricted to a technology called contrast detection, which uses the image sensor to detect the highest contrast. That’s the reason why the contrast detection is slower than DSLR. But, Mirroless camera has some camera lines as: Sony A6000 or Niko V3 that have a big development step on autofocus speed.

However, when you shoot some images as: sport athletes, birds flying in the sky, the deer herd, herd of horses running in the woods .. using DSLR with tele lens and automatic autofocus speed will great and effective solution.

The quality of image

Generally, both types of camera can take high – quality pictures and similar resolution. If Canon’s 5D with resolution passed  50.6 MP , Sony’s A7 line of cameras use the even larger full-frame sensor type found in the best professional DSLRs. To summary, with equivalent sensors and image processors, we can confirm that both camera types can take great photos with high – quality color as well as resolution.

Video quality

fotosolution-dslr-and-mirrorless-which-is-great-and-appropriate-choice-for-you-3

Both types of camera are together owning the best modern camera with the effective 4D video quality. However, principles of DSLR are that use mirrorless and this is one of weak points. So, when photographer choice DSLR, they have to use the slower, less accurate, contrast-detection focus method. This leads to the familiar blur-blur look in the middle of a video when the camera capture for the right focus.

Mirrorless use hybrid autofocus mechanism (hybrid AF) that help them avoid the restriction like DSLR. With superior autofocus in most models, mirrorless cameras provide the best results for most filmmakers. In addition, the duration of Mirrorless video is better than DSLR’s duration because of the overheating of DSLR. This make the duration of DSLR dropped sharply, only from 15-20 minutes in while Mirrorless video are from 30-40 minutes.

Lenses and Accessories

The early appearance and the development of DSLR help it own many various lenses comparison with Mirrorless. Choosing a DSLR gives you access to a plethora of lenses from a number of manufacturers, ranging from cheap and satisfactory to professional and wildly expensive. Mirrorless models are more restricted, offering access to a small number of lenses from the camera maker.

fotosolution-dslr-and-mirrorless-which-is-great-and-appropriate-choice-for-you-5

Recently, many manufactories like Zeiss, Samyang, Laica and voigtlander,…are published list of products to meet the needs for Mirrorless cameras. This is lighting point will help Mirrorless’s lenses have to catch up the development of DSLR.

In conclusion, depending on the purpose of users to help them find the best cameras that approriate with invidual preferences. If you are photographer who like shooting the flying birds, wildlife or are sport photographers, DSLR fullframe are great choice for you. And if you are person who love traveling, like to shooting portrait, landscapes,.. Mirrorless camera will are right for your project because of its convenience.

What do you think about this? Please share your thoughts below!.

Categories
Support Tips & Tricks

Tutorial Guide For Product Photography of Shiny

As you may know that this lesson about digital photos or related to product photography always essential factors for photographers. Great apparel images is one of important factors what contribute the success of product and the effective of budget. To creat beautiful apparel images, we should use many factors such as: colors, garment, model or mannequins,… Of course , lighting is indispensable element. Great apparel images are produced when lighting flatters your product. Shiny products like jewel, glass or metal can be tricky to photograph owing to their highly reflective nature. However, to control shape light, eliminating reflections and any unbecoming distractions can not be easy as take a normal cameras.

In this post, we will present three tutorial guide to setup natural lighting that can flatter your shiny product.

Window Lighting

Natural resources are an efficient lighting setup for your polished and highly reflective product. Using natural light as the only light source meant they were just starting out, were too poor to afford lights. It were not smart enough to figure out lighting. To ensure the space is not cramped up. For perfect product images, it is important to provide adequate space for your photography equipment without compromising on your comfort.

SONY DSC

Once you set up your equipment, it should be easy to tear down and repeat if needed. Or leave your equipment in place if you have the space to do so.

Firstly, find a large window that filters plenty of light into the room at a 90-degree angle in relation to your product. If the light streaming through the window is rather harsh, try hanging up a sheer, white sheet.

Secondly, it is to create the ideal backdrop for your product. You don’t have to make it too wide, but ensure there’s adequate space above and around your subject so as to fill your frame. A stand may come in handy in holding your backdrop intact in its rightful place. Keep in mind that a white background always helps shiny products to stand out free of distractions, giving your imagery a clean and highly professional look. If you find that you still have too much shadow on the opposite side to the window, then try using a reflector.

Enclosed Lighting System

One of the best ways to photograph a shiny product is the use of an enclosed lighting system. The benefits are many. The enclosed system wraps even and balanced light around the entire product you’re photographing. The advantages include an even distribution of light, consistent natural lighting, elimination of glare, illumination of hard to reach spots.

Generally, the use of flash photography produces hot spots and glares. But continuous natural lighting will help to accurately and evenly reproduce all the stunning colors in the various elements of your shiny product photography.

Diffused Lighting

fotosolution-Tutorial-Guide-For-Product-Photography-of-Shiny-1

When illuminating s shinny product photography, you have to make sure never to expose it to light directly, as direct light will be reflected on the shinny product, and will create hot spots and shadows. What you need to do is expose jewelry through diffused lighting, which is light that has passed through some sort of light diffuser. The diffuser evenly spreads the light, and eliminate all hot-spots, shadows and reflections. Remember, that all of our product photography lighting systems already include natural daylight. It is exposed through the boxes’ thermoplastic housing that acts as light diffusers.

White balance

It is a vital element of outstanding product photography. Be sure to adjust the white balance settings on your camera. Although many cameras will come with pre-program options or presets you need at least one custom white balance option. This means that the camera can “read” and self-adjust itself to be able to take pictures under many light conditions. This feature is very important. White balance means that the camera needs to adjust itself to the ambience light you are using. This give you accurate and true colors of the items being photograph.

Avoiding unnecessary shadows and reflections

visibility_02_reflect_refract

When photographing shiny product, there are certain shadows and reflections that might be necessary to create a three-dimensional look. Yet, there are other reflections and shadowsthat are unnecessary and that you want to avoid in order to have a photograph that presents your shiny product in the best way possible. The first thing you need to understand about reflections and shadows.  You should know how they are produced and why they appear or exist and then work on lighting to have the desired effect.

These some tutorial guides will get you well on your way to creating product photograph of shinny that really make an impression with prospective customers.

Categories
Support Tips & Tricks

How To Take Camera Setting for Brilliant Product Images

How to take camera setting for brilliant product images are hot subject that anybody are interested in. If there’s one thing that’s true when it comes to ecommerce, it’s that the perceived value of your products and the trustworthiness of your business is often judged by the quality of your web design. And a big part of having an attractive website these days also means having high-quality, beautiful product photography. Sure thing; using epic images to showcase your products can make the difference between your conversions and no sales at all. So, you want to take camera setting that perfect product photography—sharply focused and perfectly lit so as to attract the attention of customers? Below is some tips to make brilliant product images.

Let’s check them out…

Camera mode

fotosolution-how-to-take-camera-setting-for-brilliant-product-images-1

Once you have your camera, tripod and product in place, you can start by selecting your camera mode. Most cameras offer a variety of settings but I usually stick to using three modes: Manual, Aperture priority and Automatic. As you can see, image taken with my manual mode looks much more pleasing to the eye. This is simply because you can be able to control all your image settings without worrying about the camera using the wrong automatic settings like aperture, flash, shutter speed etc.

ISO Settings

ISO Setting is one of the important factors to perfect product images. Now, let’s select our ISO setting based on the light in our studio. As a general rule, the better the light in the room, the lower your ISO value needs to be. By adjusting your ISO setting just right, you will be able to produce crisp and clean photos.

I would recommend first setting your ISO at 200 and using the viewfinder to evaluate its effect on the product image. If the image appears too dark, increase the ISO value to a setting that is more suitable. If your studio or space is too dark for shooting, raise the ISO value to a range between 600-1400.

ISO measures the sensitivity of the image sensor which takes your image. The lower the number the less sensitive your camera is to light and the finer the grain in your images. This means your image will have less grainy ‘noise’ or what I like to call speckles! Higher ISOs are generally needed in darker situations unless you are using a tripod.

Images Format

As we will be reviewing the manual mode in this post, let’s start by choosing our image format. If you have the option to choose your images as RAW, absolutely do so. You will have more flexibility afterwards in post production. If you do not have the RAW option, then we suggest that choose the largest image size & format that your camera will allow you to select, which in most cases will be a JPEG.

Aperture

fotosolution-how-to-take-camera-setting-for-brilliant-product-images-1

When you choose aperture, you’ll be putting up your exposure settings. For a home studio, F16 is considered ideal as you’ll need to have the whole product in focus so as to shoot clearer photos for your customers

The rule of thumb recommends the use of Aperture settings of more than F11 to ensure nearly (if not the whole) product is in focus. In essence, the higher your aperture gets the better for your images. If for some reason your camera will not reach as high, the highest aperture your camera will allow is perfect or you can even try the auto settings!

Light meter

Finally, ensure your camera automatically focuses on your product images. This allows your digital camera’s light meter to detect the amount of light reaching the product. This will help the camera’s internal light meter defect how much light is falling on the product. We can then adjust our settings (aperture & shutter speed) according to the light meter reading on the camera. Since we know we want to have a higher aperture like F16, set it to that. By using the light meter in your camera, this will then help you adjust your shutter speed.

There are lots of techniques for shooting successful product photography, we hope that some useful tips help you take perfect camera setting for brilliant product images. If you love images and a peson who photographs products everyday, this tutorial has been specifically crafted for business owners on a budget, and it’s been designed to be simple while producing excellent high quality results with most product types.

Thanks for watching!

Categories
Support Tips & Tricks

Color correction in Photoshop

Color correction is one of the important factors affect directly the result of images. If we have two pictures: white and black pictures and pictures with prominent color, which one do you prefer?. Beautiful images with stunning color will surely be a wonderful choice. So, color correction an image is one of the most common uses of Photoshop. If you don’t know the way about them in Photoshop,  here are guide video show you different ways on how to color correct on image.

In this video we’ll also take the time to talk about how color works in Photoshop. This is a complicated topic but I’ll try to simplify it so it’s easy to understand and able to color correction on your images. In addition, in this tutorial, we also show you how you can use Curves to color match an image to create a realistic composition.

You are interested in: http://bit.ly/2fpzBZk

Let’s download this video to find the best answer for your issues and free to express your thought  in the comment below. If you have questions or concerns, please do not hesitate to contact us today for a free consultation.

Color correction

Color correction in Photoshop from VRaySchool on Vimeo.

Categories
Support Tips & Tricks

Best Way to Photograph Glass Products For eCommerce

We shared an article about Mistakes Of DIY Footwear Product Photography to good experience. Today, we continue to show and make a new topic: a classy way to photograph glass products for eCommerce. To shoot reflective products like glass is notoriously challenging for DIY product photography. Your first attempts may result in images with your own reflection staring back at you, poorly defined edges, and invisible details.

However, don’t worry because this article will guide you best way to photography glass products for eCommerce. We believe that taking good quality pictures of glass or translucent objects can seem a great deal of fun for you.

Lighting

A best product photograph need to use many different elements and natural lighting is one of essential factors to create the success of glass product photograph. If you learn how to control light, you’ll be able to create beautiful images under almost any circumstances. There are two kind of lighting that photographers use to capture beautiful photos: natural light and artificial light. When you use an artificial light source, these can affect directly your product’s color. While using natural lighting for product photos preserves the natural color of the product.

fotosolution-best-way-to-photograph-glass-products-for-ecommerce-1

Topic’s today is for glass, metal, and jewelry especially glass products. Let’s make use of the benefit of lighting to turn into glass product become more attractive. There are three proven effective lighting setups for photographing reflective products. They are back lighting, side lighting, and double overhead lighting.

fotosolution-best-way-to-photograph-glass-products-for-ecommerce-2

If you’re not too familiar with lighting in product photography, you should read and review: the advantage and disavantage of lighting. It will help you find the right equipment for your shoot and avoid basic mistakes.

Camera Setting

A big part of having an attractive website these days also means having high-quality, beautiful product photography. Sure thing, using epic images to showcase your products can make the difference between your conversions and no sales at all. So, you want to take camera setting to attract the attention of customers?.

A great answer to adjust camera setting, you need to interest in: aperture, ISO, and white balance. They will provide the most detailed shots possible.

fotosolution-best-way-to-photograph-glass-products-for-ecommerce-3

ISO Setting is one of the important factors to perfect product images. As a general rule, the better the light in the room, the lower your ISO value needs to be. By adjusting your ISO setting just right, you will be able to produce crisp and clean photos. ISO measures the sensitivity of the image sensor which takes your image. The lower the number the less sensitive your camera is to light and the finer the grain in your images.

For adjusting your white balance to your light source. You can usually trust your auto white balance as you don’t feel comfortable setting it manually. Focus your camera on a clearly defined area, like details or the outer edges.

For aperture, as you choose aperture, you’ll be putting up your exposure settings. For a home studio, f16 is considered ideal as you’ll need to have the whole product in focus so as to shoot clearer photos for your customers

The rule of thumb recommends the use of Aperture settings of more than f11 to ensure nearly product is in focus. In essence, the higher your aperture gets the better for your images. If for some reason your camera will not reach as high, the highest aperture your camera will allow is perfect or you can even try the auto settings!.

Post – production processing

If you’re listing your product in multiple places, note that check out this product image for common eCommerce platform image requirements. You should understand that no matter how careful you are, sometimes smudges, reflections, and other flaws make their way into your image. You can remove them in post-production processing and perform other image edits to optimize your product images for the web.

fotosolution-best-way-to-photograph-glass-products-for-ecommerce-6

Nowadays, there are useful tools to support your post – production processing. Adobe Lightroom and Photoshop are two of many tools that can help streamline your workflow and perform image edits both in bulk. In addition, using Adobe lightroom, you will satisfied with your artwork. Adobe lightroom provides user friendly tools to perform common edits quickly and in bulk. It also has super helpful organizational features. You will completely feel safe and pleasure for your project with the big aim of Photoshop.

If you are interested in Photoshop tool, you can read and review this article. You don’t have the time, money, or desire to edit product images yourself. Let’s search google and find outsourcing service. Fotosolution provides powerful yet intuitive tools for defining order specifications for edited images.

So, if you don’t know how do you shoot photography glass products?. Or if you have useful tips or any difficulty, please do not hesitate to contact us today for a free consultation.

Categories
Support Tips & Tricks

How to Set Up Smart Object in Photoshop

Smart object is one of essential tools that always use to create Mock-up product and edit image for photographers. It is considers as a work that is indispensable in the process of their working. However, we do not always feel happy about this work or even, sometimes we have all felt the frustration of editing an image with many problems like either in Light-room or Adobe Camera Raw (ACR), only to remember that we forgot to adjust the white balance, or tweak the sharpening after we’ve spent hours of editing the image in Photoshop. So, today, we will bring to readers some basic tips: how to set up smart object in Photoshop, it help you improve these difficulties in your work.

With the recent introduction of Linked Smart Objects in Photoshop CC, Smart Objects have become much more powerful, and useful. This give you greater flexibility in your editing workflow inside Photoshop. In addition, the big reason for converting to smart objects is that you’re able to retain the original size of the image. If you don’t convert to a smart object, pixels will be lost when scaling up and down. Using or set up Smart objects is not too difficult because simply, you can create a Smart Object when opening your image from Lightroom or ACR into Photoshop, and you can also create Smart Objects later on in your editing process, which can be very helpful – especially when you are applying a sharpening or other filter. Below are some basic tips help you know how to create Smart object in Photoshop.

Smart Objects can be created in a number of ways, and typically, the type of Smart Object you create depends heavily on how and where you create them. Normally, the easiest way to create a smart object, right click on the layer and select “Convert to Smart Object.”

How to set up Smart Objects_admin.admin.admin.admin.admin.admin.fotosolution.com

Creating Smart Objects in Lightroom

Adobe Photoshop Light-room (Lr or LR) is a photo processor and image organizer developed by Adobe Systems for Windows. It allows viewing, organizing and retouching large numbers of digital images. Light-room’s edits are non-destructive. So, how to create Smart Objects in Light-room?.

First, let’s open Light-room and choose an image that you want to edit. Then, you go to the top menu and click: Photo > Edit In > Open as Smart Object in Photoshop…or you also click on the image you want to open in Photoshop. Then select Edit In > Open as Smart Object in Photoshop…

Linked Objects

Linked objects can be extremely useful tool for when you need to reference and update multiple documents at once. If a change is made on the original document, it will be applied to all of the linked documents when saved. All you have to do is go to File – Place Linked. Choose the file you’d like to use, and hit place. And the results is that your original image’s changes will appear on all of the linked files. That’s simple and helpful for your work.

A few notes with Smart objects

Creating a Smart Object in Photoshop, you have to open the image in Photoshop as a Smart Object, this will hep you have the same editing abilities in Photoshop.

If you have made adjustment layers with masks applied to them, we would suggest that you do not crop the image through the Smart Object. We think that you should crop all images before opening in Photoshop, or after you are finished in Photoshop.

Check out this video guide related subject: How to setup Smart Objects in Photoshop!

Smart Objects is one of the tool that is easy to make, and offer a massive amount of flexibility. If you are a person who always use Smart objects or need to Smart objects for your work, welcome to visit our site. This page will help you more understand about Smart Objects as well as it is useful lesson to improve and apply for your effective work. Or, if you have other way to create Smart Objects in Photoshop, let’s share with us in the comment below.

Thanks for watching!.

Categories
Support Tips & Tricks

Shadows and basic things you should know

Shadows are one of the necessary factors that make photos more soulful. A professional photographer or some viewer understand the important subtle details that can create the product photos you need. Adding shadows to product images is one of the greatest examples what help you can do to achieve great results. So, why is the shadows important?. How many shadows are photographers or designers use?.

Next step we will present the values or the important of adding shadows to make best product images.

When we take a  product photography, we need to appreciate truely the value of detailes what make perfect product. Adding shadows to product images is an excellent example of what you can research and learn. When we add the shadow in product photograph, this will create a powerhouse effect. That’s a reason why would we say that?. Simply, shadows can obscure a beautiful product and make product photography look unprofessional. However, we should know the difference of shadows on a product and shadows cast by a product. Product image editing lets you use shadows to your advantage. There are three types of shadow that you can refer and learn:

  • – Natural shadows
  • – Reflection shadows
  • – Drop shadows

Each types have the outstanding advantages what build the success of product photographs. Below is some guides that you can learn about each of them.

Natural Shadowsshadow-graffiti-03

Nothing will look more realistic than your product’s real shadow, it is called Natural shadow. When we take natural shadow during the shooting process is almost always best, but we has not to be confirmed that all things is easy if we have never do it. The shape of your product and the challenge of lighting it properly may prevent you from capturing a perfect natural shadow, but one can still be added in post-production.

The best way to create natural looking shadows is to use a light source while shooting the product. Make sure that the light source, whether daylight or artificial, is positioned to the side of your subject. This factor enables it to cast the shadow at an angle from your product and give it a more three dimensional look. You should combine natural light with a white background, it will help you make the natural shadow look nice

To understand more about natural shadows, then here’s some tips what help you learn how to add the natural shadow.

  • Open your photo what you’re preparing in Photoshop, then you need to create a new layer with the white fill-in background, which is underneath the product image layer. Choosing a white area around the image to mask out your product from its background. Don’t forget to refine the edges so it establish smooth transitions.
  • Select the areas under the toe and behind the heel to create a curved layer mask.  Feather the curved mask
  • You should use the adjustment or the curve tool to create curves layer mask. This way make the simulation shadow even more effective.
  • Carefully brush out areas of your shadow layer manually to achieve the desired look. To achieve translucency, you may need to focus on certain areas over others. This make it look more realistic.
  • Finally, tweak your images layer mask by reducing its opacity a little so it doesn’t look so harsh against your shadow. This helps your product images to soften the created shadows against the real ones.

How To Apply Reflection Shadows

Reflection shadows are great ideas to make your product look nice if  was photographed on a reflective surface. It can make your product images more visually appealing and create a sense of environment, so they don’t look like they’re floating in space. It’s particularly effective with products what is combined with bright lights and reflective surfaces. Jewelry and sunglasses is good examples for combination.Reflection-Shadow

However, to creat perfect reflection shadows and to know how to manage light to eliminate reflections are not simple. Light spots can also be a problem.

If you want to know more about reflection shadows , here are some basic steps for you:

  • You need to create a new layer and fill it by using a white background.
  • Then you move your newly created white layer to the bottom of your layer stack.
  • You should create 2 product layers by duplicating the product layer
  • Create a tight selection around your product, and then efine your selection’s edges to make it less harsh.
  • Rotate your duplicate product layer 180 degrees with different angles, then you need to create two products between your two layers: one right side up and one upside down.
  • Align the bottom of your product together, which will make the upside down product looks like a reflection of the other pair.
  • Then adding a mask to the upside down images layer with the gradient tool
  • Add a mask to the upside down sunglasses layer and use the gradient tool until you get the desired look. You’ll want the opaque portion to be nearest to the eye frames of the glasses that are right-side-up. This will help to create a perfect natural reflection to get away from your subject
  • You have your sides and top brushed out around the reflected images’ base. You also need to continue to brush out or add your reflection to make your photos look natural
  • Have the layers flattened.

How To Apply Drop Shadows

Drop shadows like natural shadow or reflection shadow help the impression of sunlight coming from above. The usage of drop shadows is popular and effective with a wide variety of products. Below is some useful ways about adding drop shadow for your photograph.

You need to choice the white background of your chair image by using selection tool. then, you can refine the edge of your selection by smoothing out your transition.

  • Make a layer mask on your image layer and invert your selection, so you will just see photograph and no background.
  • Make a new layer, fill with white, and placing it as the background layer behind the image layer.
  • Adjust your chair to center it and allow for room for your shadowing. Have anything else in the background masked out.
  • You can duplicate this image layer with your new mask selection.
  • Have your bottom image layer with mask, transformed through vertical flipping. It should now look upside down.
  • Transforming and turning your product photos to make the back angles line up to its matching one.
  • Using your gradient tool, you’ll begin tapering the angles from more distinctive to less visible. You can continue with it to  find the right opacity and gradient.
  • Using your brush to tweak out your mask and brush out all of the other angles and needless items in your frame, other than that one angle.
  • Play with the opacity and brushing out to make it seem more natural..
  • You should duplicate this layer before moving it to your other back angle of your photos
  • Using your straight selection tool to create a diamond shape under your chair between the angles’ points..
  • Lots of feathering along the edge of your product will create a nice gradient. Brushing in some of your sides to allow for a nice fall off under your photos
  • Make a slim V-shaped selection on your front two angles, and then refine the edge to begin feathering your selection
  • You can create a curves layer and darken it so it looks like a shadow. This should be done for both legs at the front.
  • Flatten your layers and create your new file and save.

As you can see, shadows in product photos is a useful and convenient tool. After learning how to apply shadow in product photos with many different ways, how do you feel about it?. Which one is right for you? This depends on your product and your photography setup.  We hope that you will choose the most effective types to make your perfect product photos.

Categories
Support Tips & Tricks

How to make Beauty Retouching Photoshop Tutorials

Beauty retouching is one of the most popular application  areas in which Adobe Photoshop that contribute to make beautiful images. The basic problem with most of the Photoshop techniques we’ve experimented with over the years (burning & dodging individual pores, Surface Blur filter, Dust and Scratches filter, etc.) is they waste times but the effect of images is not good like they expected.

In this article we are going to show you a beauty retouching techniques we regularly use that results in beautiful, smooth skin that still looks totally real. Beauty-retouching is a quite deceptive art. This will help your image become more stunning but no less real photos.

Let’s challenge yourself with beauty retouching application now and below are How to make beauty retouching Photoshop tutorials attached video tutorials.

Beauty Retouch

Beauty Retouch from Lindsay Adler on Vimeo.

  • Step 1: Choose one favourite photos that make beauty retouching. You should use a high – quality image and especially a close up face photography.
  • Step 2: First, we can begin with the basic skin retouch by using Spot Healing and Patch tool. The first step is that click double Ctr+J and give the name for two new layer with name “ Blur” and “ Texture”.
  • Step 3: Starting with “Blur” layer by choosing Filter-> Blur-> Gaussian blur and choose approriate number for Radius. Next, press “ Texture” layer and choose Filter->Other-> High Pass and click “ Ok”.  Then pressing “ Normal” and click “ Liner Light” that is one of important elements for beautiful images. We’re now set to smooth tones in the skin and start removing blemishes.
  • Step 4: Press “ Image” -> Apply Image, this box will be appeared including necessary information. Choosing Layer “Blur”,  Blending “ Subtract”, Scare “ 2” and Offset “158”, then click “ Ok”.
  • Step 5: Smoothing Skin for image by using Lasso Tool to delineate the points on the skin to edit. You can use Zoom tool to avoid omission of limited points.
  • Step 6: Now is time for final skin color. Edit and improve the colors on your image as much as you can with curves and hue/saturation corrections tools.

This tutorial is all about beauty retouching and how to use adjustment layers, lighting, dodging and burning, and frequency separation to create stunning skin tones and textures for a true beauty photography retouch. We hope that this article will a great lesson for your Photoshop learning. Let’s post an image of your setup and a final image so everyone can see what you did. We would be really grateful if you upload and share your photos in comment below.