Categories
Tips & Tricks

6 Tips Help You Have A Better Bathroom Photos For Your Listing

Bathroom is considered as the most intimate room in the house. Let’s choose best angle to make a confortable space for your bathroom. Therefore, how to create best bathroom photos for your listing?. Let’s check out this article below.

If anything, ugly bathroom photos can work against your listings for more reasons than just bad décor. When parts of the house look great and others don’t, buyers or your custormers might start to wonder the reason why?. Maybe because how you makeup or mainly way to take bathroom photos.

fotosolution-6-Tips-Help-You-Have-A-Better-Bathroom-Photos-For-Your-Listing-07

But buyers are also trying to see what a home is all about and that includes the private spaces like bathrooms.The best photos of bathrooms give buyers a sense of size, depth and shape, along with possibility. Is it a room of utility or that spa-like oasis every people dreams about? Great photos tell the tale. And you can make all you want thank for 6 tips to have better bathroom photographs below.

fotosolution-6-Tips-Help-You-Have-A-Better-Bathroom-Photos-For-Your-Listing-16

Here are 6 ways to get better photos of bathrooms for your listings:

  • Make it spotless. Why are we talking like this?. When the bathroom in the photo is clean, your customers can judge the space, surely they will feel pleasure.
  • Make it sparkle. Bathrooms typically are spaces full of shiny or reflective surfaces. Photos will look better if those surfaces are clean. Spots on the mirror and the shower door will show.
  • Remove all extra details products. This includes toothbrushes, bars of soap (unless truly decorative and unused), shampoos, razors and anything that touches the body. Especially removing the trash can because they can make your bathroom photos troubled.
  • Put new light bulbs in all the fixtures and, if possible, make sure all the bulbs are the same kind. One bulb whose light is a different hue (temperature) sticks out and creates an unwanted distraction.
  • Take advantage artification light to decorate your bathroom photos listing. Thank for lighting will help your photos become more sparkling and spacious.
  • Hire a oursoucing digital photography services for your listings. Bathrooms can be the most difficult rooms to shot and fix well. The experienced pro knows how to get a sparkle on all those shiny surfaces, instead of just glare. Pros also know how to compose the shot just right – to capture the essence and appeal of the space, whether large or small.

If you have questions or know other tips for shooting bathroom photography, let’s share your experiences in the comment below.

Categories
Tips & Tricks

Image Retouching For Hotel

Image retouching for real estate especially house is more popular in the real estate marketing. So, do you enjoy image retouching for hotel?. Hotel retouching services is one of new services that help hotel owners show best own hotel photos just few professional clicks.

Retouching and post-production on images can be quite a necessary task. Let’s image that it’s a very satisfying feeling to work on an image and finish with a more beautiful product than when you started. This will help hotel owners show best product and capture the attention’s online customers.

Image Retouching For Hotel

fotosolution-Image-Retouching-For-Hotel-07

If you are newbie in term of hotel photography, you need to time to practice as well as have experiences. Simply, hotel photography can be challenging on a number of levels and as you work through those challenges you grow pretty quickly. Specially, you need to have a firm grasp on method of photographing architecture and hotels. Generally, you need to check the rooms and watch the light on the building to schedule eastern facing rooms for the afternoon, western facing rooms in the morning. This will help you balance the light pouring into the rooms to ensure the success of hotel image. These are the first steps that you own beautiful hotel photography with best angles to attract the customers in the first times.

Next, you can use your Photoshop skill and how to use those pieces in Photoshop appropriately to get a decent result. In other words, how to realize image retouching for hotel.

fotosolution-Image-Retouching-For-Hotel-06

Firstly, how to retouch hotel image you need to do. The hardest thing to grasp about these angles of hotel’s rooms will probably be the pre-visualzation skills required to know what to light, how to light it.

Secondly, you need to check the rooms including  brick, carpet, upholstery, door curtain, furniture,…to create impression. You have to focus on lighting issues and stains on the carpet and how to soften the shadows a bit on the bed. Retouching techniques will allow you to adjust and change everything.

Thirdly, you need to attend color and contrast in hotel image. Depending on what your customers photos need, you are interested in color and contrast adjustments. Let’s deal in perspective correction in the room to eliminate distortions that result from dimensional building views. You also need to focus on eliminating and toning down color cast on your images to attain a perfect color balance including manipulation and spot removal.

Below are some image example to enjoy the differences between before-after hotel image retouching.

fotosolution-Image-Retouching-For-Hotel-08

fotosolution-Image-Retouching-For-Hotel-09

fotosolution-Image-Retouching-For-Hotel-10

References: Real Estate Retouching

If you need to support to image retouching for hotel, let’s contact us. Our professional team will work with you every step of the way to ensure that we are fulfilling your exact needs.

Check out to more information: How to retouch a Hotel Photo in Ten Minutes – Mike Kelley

https://www.youtube.com/watch?v=4v5hyOiKfi0

Categories
Tips & Tricks

Make Everything Easier with Furniture Stagging Tools

Let’s make everything easier with Furniture Stagging Tools.

Our team have mentioned the topic: Virtual Stagging tools – a useful tools will allow you to select, add, remove or arrange furniture and decorations and without arranged labors. And today, we will present you Furniture Stagging tools – an innovative way for promoting, selling and designing furniture in house.

In the high-technology period, the detailed sketch of house are too popular. It is not a the best choice for contruction companies or designers as showing their products. Understanding the high demande of current customers, we can make everything easier with Furniture Stagging Tools.

We understand how challenging it is to imagine an unfurnished apartment might look without furniture. However, this challenges is not a problem anymore. Customers can see a 3D Model of the furniture through Furniture Stagging Tools. With the aim of  Stagging Tools, we can also help with drawing high quality 3D Models for your furnitures. Our experienced architect and designer team will help you to build your model from sketch. We will add contemporary furniture to your photos creating attractive and appealing environments. It allows buyers to visualise themselves in the home. Especially, according to the survey, 90% of buyers start looking online where you only have a few moments to catch and create impression with them.

Advantages of Furniture Stagging Tools

  • Professional Image Products
  • Enhancing your property sales
  • Increasing sale prices
  • Creating impression with customers
  • Upgrading the look and feel of your brand and website

Here are some image product using Furniture Stagging Tools that allows you to have comprehensive look. If you have questions or need to support, let’s contact us. Our professional team will work with you every step of the way to ensure that we are fulfilling your exact needs.

In addition, Click here to go to our website for more amazing virtual furniture examples.

Categories
Support Tips & Tricks

Why professional photography boost marketing rental properties

Why is it important to include pictures for marketing rental properties?. According to several surveys, the online customers are 80% more likely to inquire about property listings that contain over 20 photos. It helps them save their times. The rental market has become a very competitive space especially in modern technology age . You have just seconds to grab a potential tenant’s attention as they filter through online listings.

Here’s why we always encourage our customers to engage in professional photography, or at the very lease get the images edited, and inform their clients of the benefits. It will help us save time and own benefit faster.

Properties with professional photos rent faster

Owning a rental property is a business, the longer it remains vacant the more lost rental income. Professional photos draw more attention to a listing, generating more enquiries and inspections, high quality photos mean the difference between losing a week rental income and securing the next tenant faster.

fotosolution-Why-professional-photography-boost-marketing-rental-properties-02

In fact, rental properties have a big numerous in the marketing. Your mission are that creating an great impression in the first time and your difference. If you are using poor photos, your listing will quickly blur into all the others out there. Therefore, let’s catch potential tenants interest early with professional photos.

Professional photos show the value of your property

Poor quality photos with bad lighting decrease the value of your property. A skilled real estate photographer will use lighting and composition to make your property look fresh. Wide angle lenses show more of the features and layout of the property. In addition, if you know about the real estate editing services, they will help you polish all details as well as look after your image. It play a big role for your success.

fotosolution-Why-professional-photography-boost-marketing-rental-properties-04

Not only do professional photos look better, they attract better quality tenants, and help owners to achieve higher rent. Therefore, let’s use quality photos to drive interest to the property listing, this allows property managers to be more selective on who to recommend as a tenant.

Professional Photos are an Investment

It’s difficult to find a rental property with full furniture. That’s a reason why we should have professional photos. Especially, this can be very useful if a landlord objects to having photos taken and displayed showing their belongings. Professional photos are a tax deductible expense. If the property doesn’t change then the photos can be used well into the future.

Professional photos can be crucial point at the time of sale

If you have any intention of selling the property at the time of sale, a set of professional photographs showing the house at its best can be used. Professional photography isn’t a luxury anymore, it’s a necessity, with research suggesting that professionally photographed properties receive far greater levels of enquires. Therefore the easiest way to boost marketing rental properties is the professional photography as well as real estate editing services.

At Fotosolution team, we offer property managers 24 hour turn around on professional photo editing. Your mission is that upload your photos, we will provide you the best quality photos with appropriate cost for each production package. Therefore, please do not hesitate to contact us to receive free test sample.

Categories
Support Tips & Tricks

How to change Eye Color in Adobe Photoshop CS5

Want to learn Photoshop lesson?.  If you are newbie who are interested in Photoshop as well as your Photoshop skill, let’s learn how to change Eye Color in Photoshop.

In this tutorial, you know how choose color which you want to use or you just want to play around and experiment. A Hue/Saturation adjustment layer makes changing eye color easy and easy to use. Here we will explain every step as we go so you can easily follow along no matter what your current skill level. There are many kind of Photoshop to support you to change Eye color. We will show you how to make Eye color in Photoshop CS5.

fotosolution_How_to_change_Eye_Color_in_Adobe_Photoshop_CS5

  • Step 1: Choose image what you need to change color in Photoshop
  • Step 2: To make this process easier, we need to zoom into focus on eyes. Select the zoom tool and click to enhance the area around the first eye that you want to modify.
  • Step 3: Create a new layer above this image layer by going to Layer> New layer. Select the ‘Hard round brush’ 100% opacity. Adjust brush size according to the size of the iris in the image. You can use any color to start with as we are going to adjust color later on
  • Step 4: Then change the Blending mode of this layer to ‘Color
  • Step 5: Now to experiment with different colors, firstly press Ctrl+ the thumbnail of the layer of eye shape which we’ve formed in step 2. This will form a selection around the iris.
  • Next, click on the icon of ‘Layer >Adjustment and select the option of ‘Hue/Saturation’. Check the colorize box in the ‘Hue/Saturation’ window. Play with the settings to get the desired color.
  • Step 6: Once again press Ctrl+ the thumbnail of iris shape layer to make selection around the iris and then click on the icon of ‘Create new fill or adjustment layer’. Choose the option of ‘Color balance’ this time. Using “Color balance” will give you a better chance to achieve the desired shade.
  • Step 7: Finally, I’ll increase the contrast a bit. For that, make selection around the iris shape and open the adjustment layer of ‘Brightness/Contrast’. And you will have the final image.

These steps can be used to improve a person’s natural eye color or to make a more unrealistic change to their appearance as seen in this tutorial. If you have other tips or the more amazing way, let’s share your experiences below.

Categories
Support Tips & Tricks

5 Mysteric of Real Estate Photography

They say that amazing chance will be come to us in the single time if we catch it. When we mention to real estate photography, this statement appears to be especially true. Any experienced house owner or real estate professional would agree that photos can either bring to good result or break your property listing. High-quality pictures can make the world of difference to your entire rental experience.

fotosolution-5-Mysteric-of-Real-Estate-Photography-02

While there is no shortage of articles on real estate photography, the world obviously runs short of tried and tested recommendations on this topic. We decided to challenge the status quo and solve the problem once and for all. Let’s try to experience and learn the best practices of real estate photography.

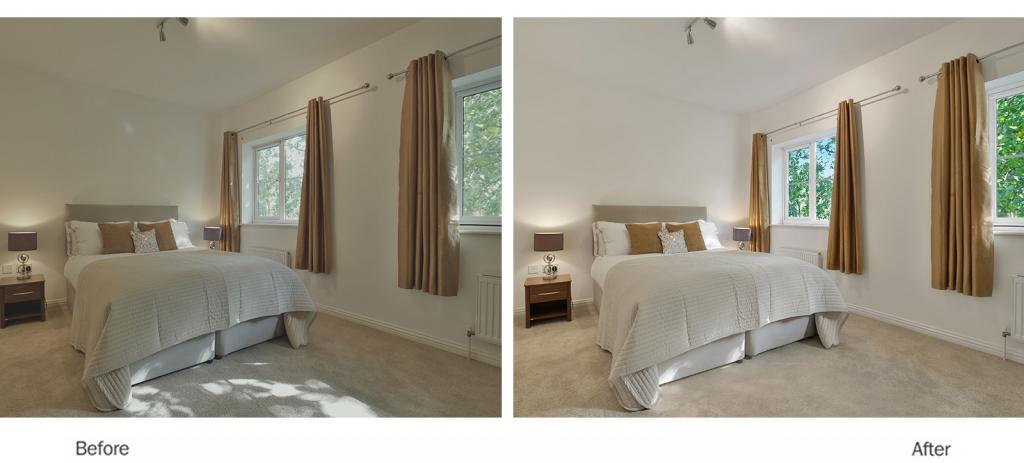
Why does quality photos matter?

Beautiful real estate photograph plays a important role that help you attract your customer’s first impression special in the online era. For example, a simple house with normal design may be difficult to grab to your customer’s eyes. But high – quality photos will save it. Or vice versa, a luxury house with modern designe but poor quality image will reduce the quality of the house. It will become a disadvantage that make your online customers disappointed.  Also the quality photos is one of essential factors to win all decision.

Get the right equipment

It all comes down to four things – camera, lens, tripod, and flash.

Camera. The good news is that you do not need to spend a fortune on your camera body. Compared to other photography niches, real estate photography is slightly less demanding on the camera. The only thing you should be concerned about is a good ISO performance. High ISO is crucial for night shooting, and you should not miss a chance to show your property lit up.

fotosolution-5-Mysteric-of-Real-Estate-Photography-07

Lenses. Wide angle camera lens will give each room in the home a true sense of depth. Additionally, wide lenses are an incredible way to display the whole room or exterior so that one can clearly see how it looks in detail. Furthermore, using wide angle camera allows you avoid unrealistic images, and at the same time, allows to zoom out and make a space look larger and more spacious.. There are no strict requirements, but be geared toward 10-22mm and 12-24mm for cropped sensor cameras, and 16-35mm for full frame ones.

Tripod. Unless you live on a planet with a permanent daylight and perfectly illuminated properties, using a tripod is an absolute must. Not only will this help you take crisp photos in low light situations, it will also let you conduct a late night photoshoot. When you take pictures with a long exposure, a proper stability of your camera is absolutely necessary. This is where a tripod comes into play.

Flash. When it comes to flash, all people fall into two camps. Those who avoid using flash at all cost, and those who believe that flash is the most important tool in a real-estate photography. What both camps seem to agree upon is that a regular DSLR’s flash can’t do the job. If you decide to use flash for your real estate shooting, you’d better think of an off-camera flash and wireless triggers.

Prepare the room

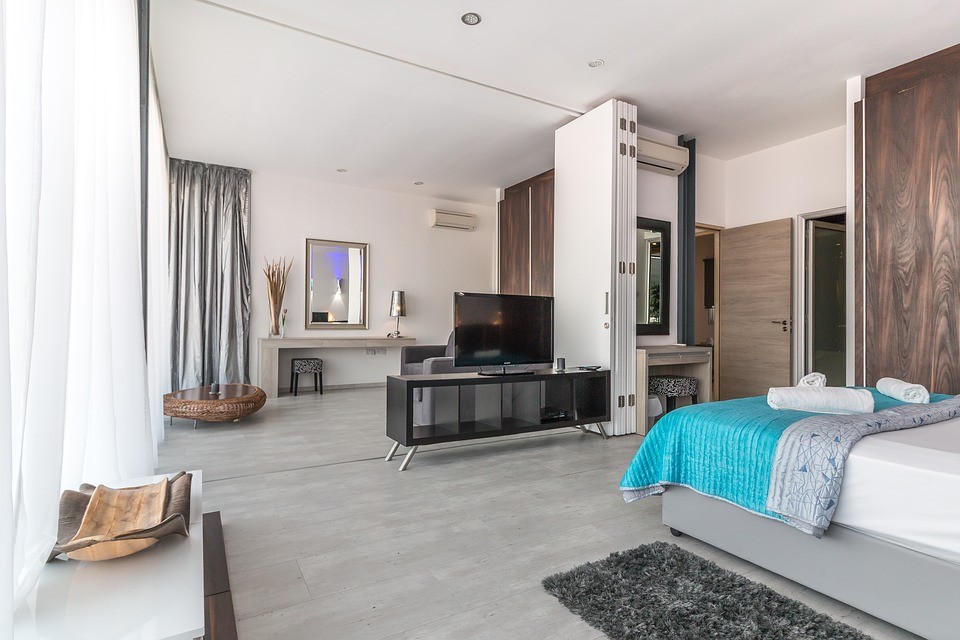
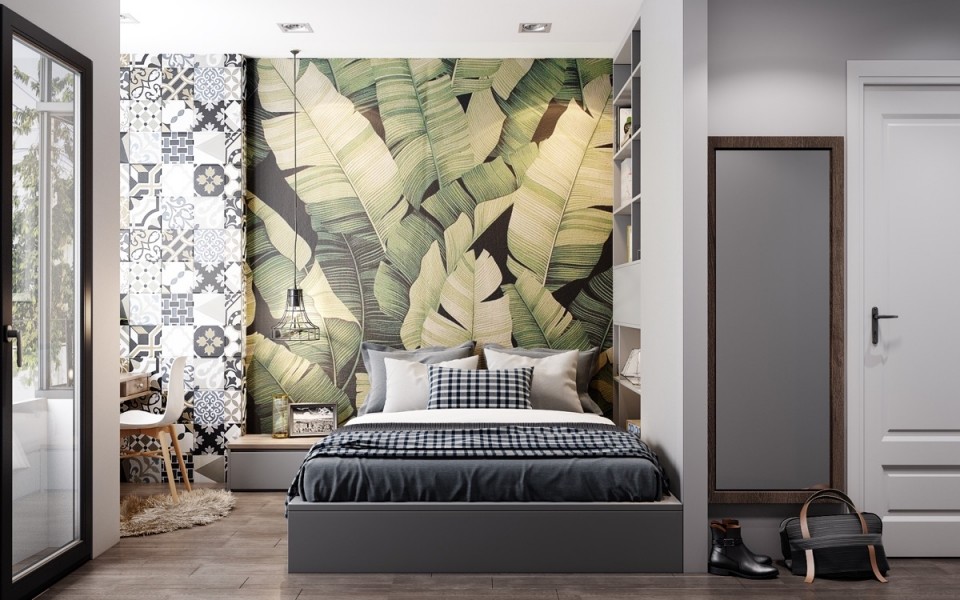
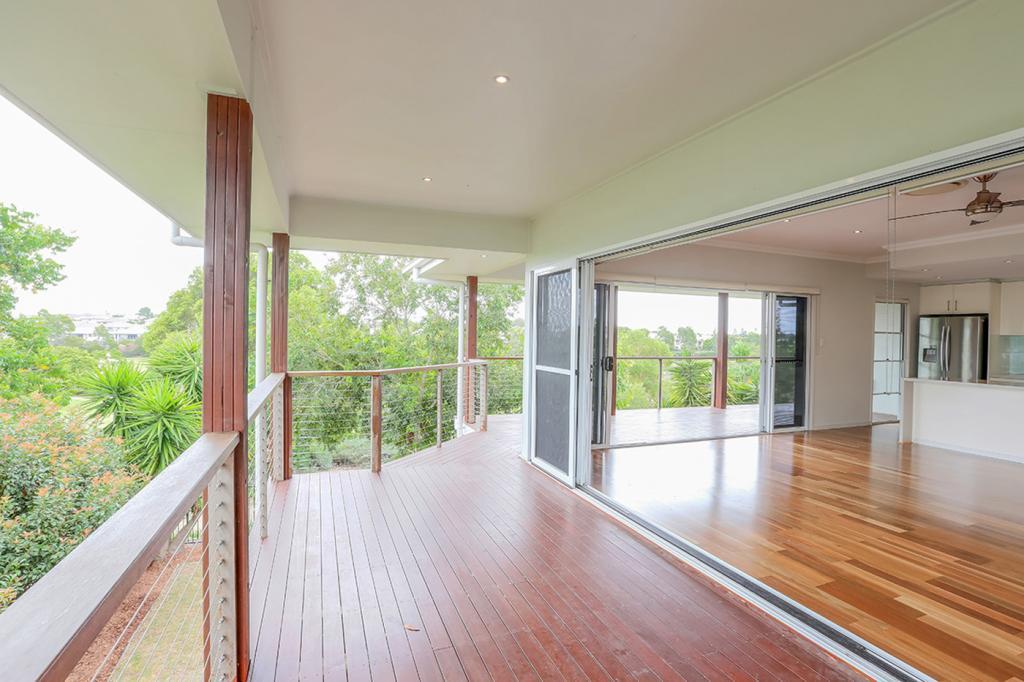
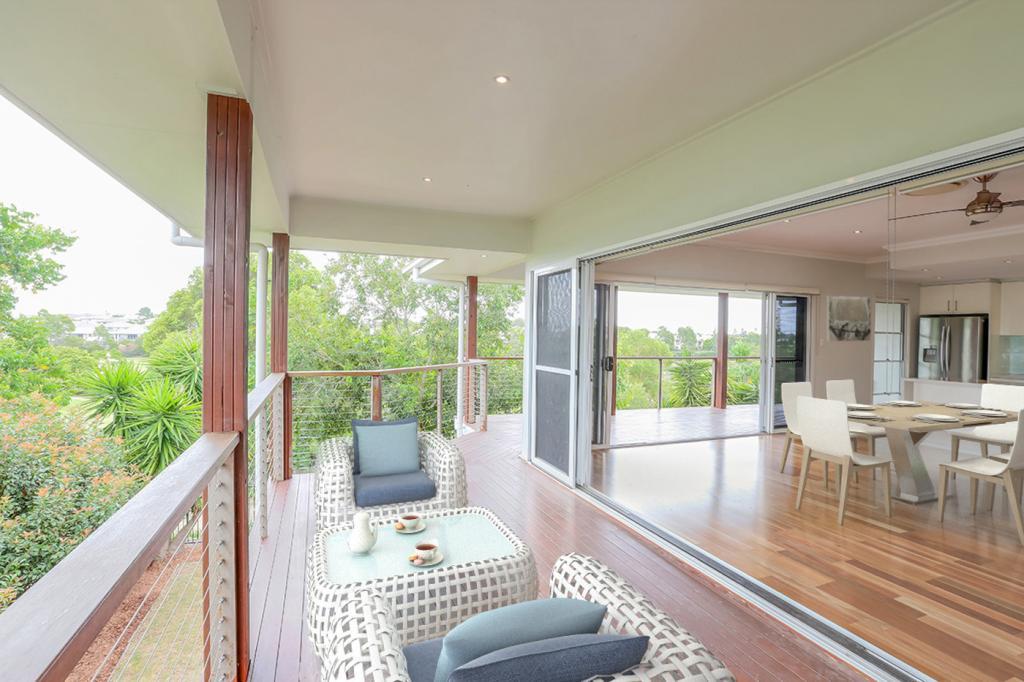
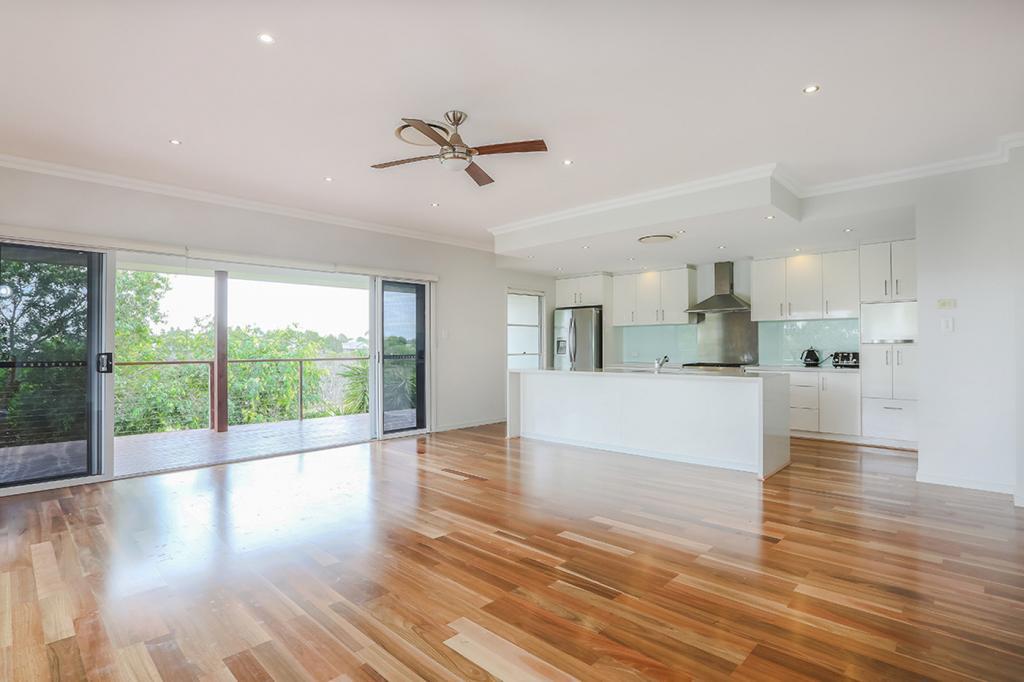
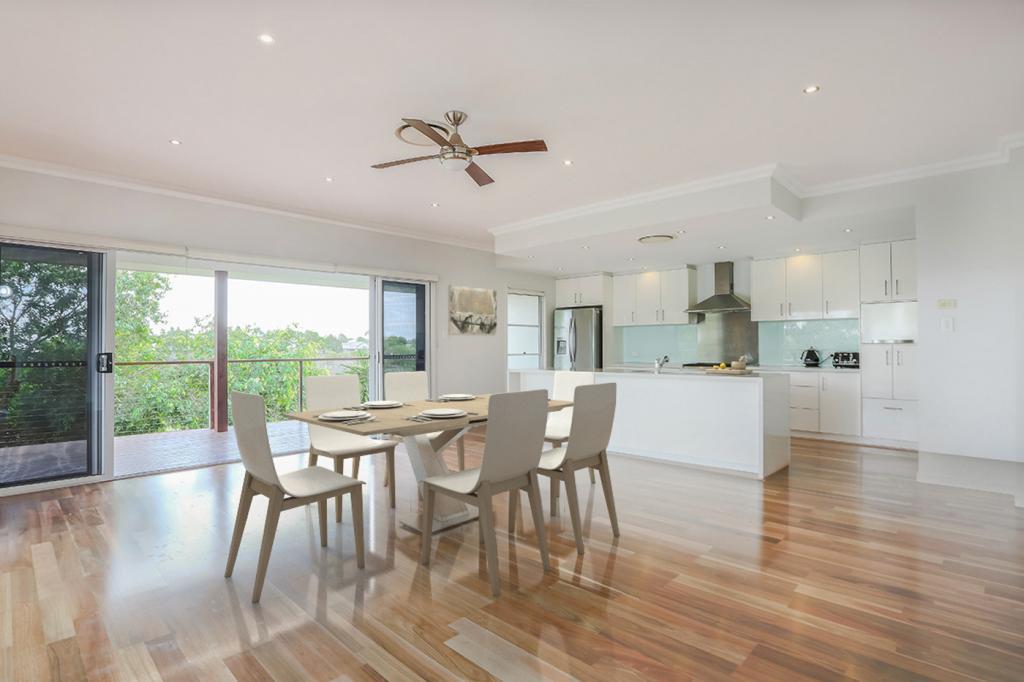
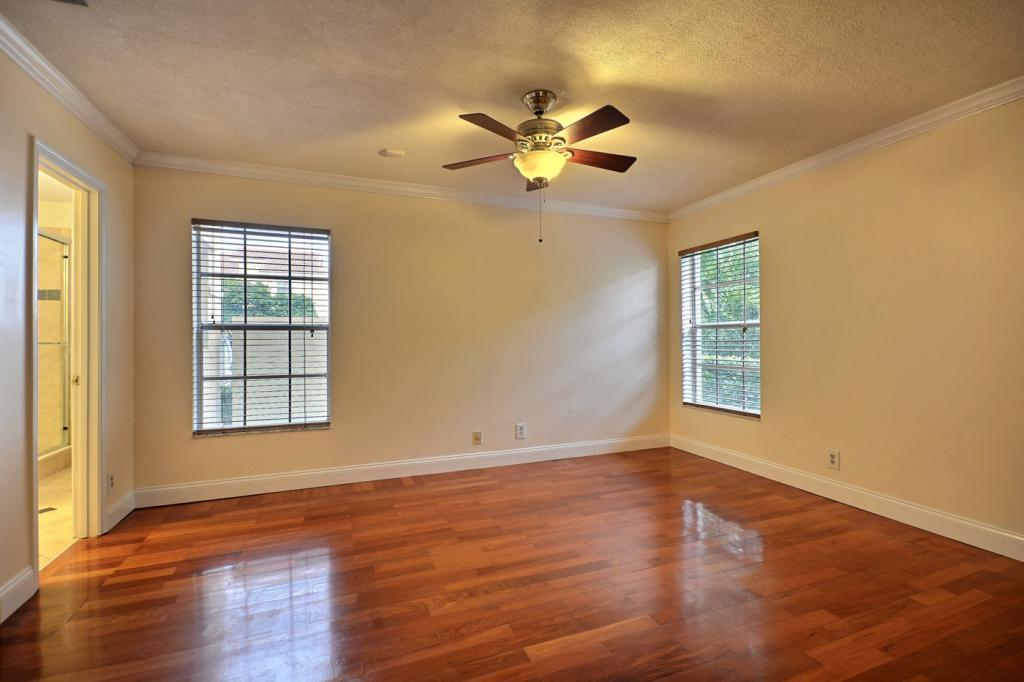
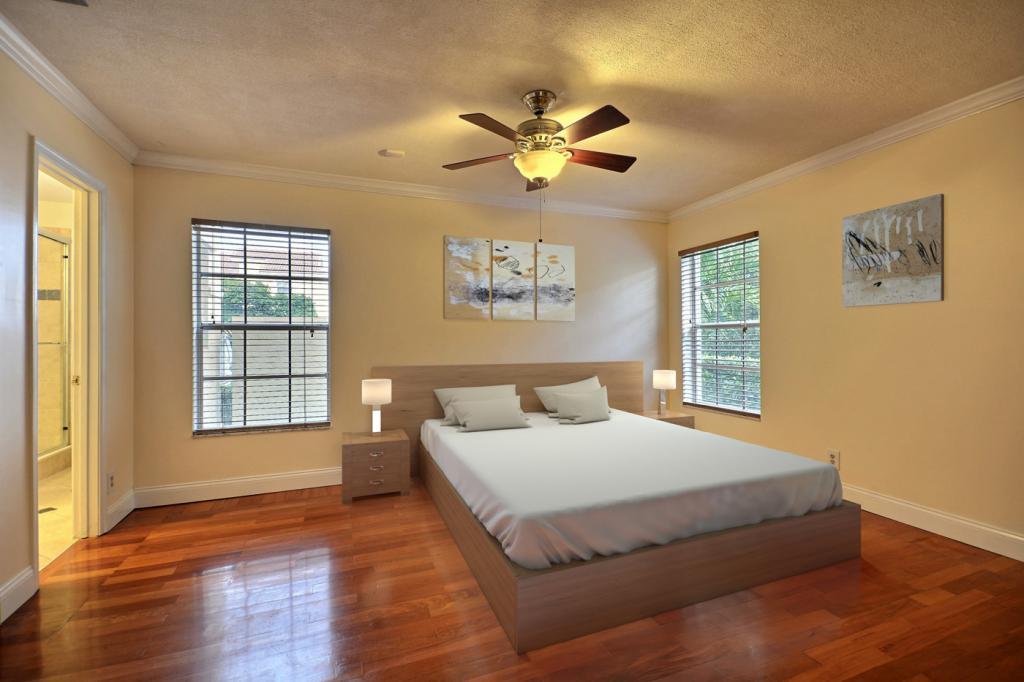
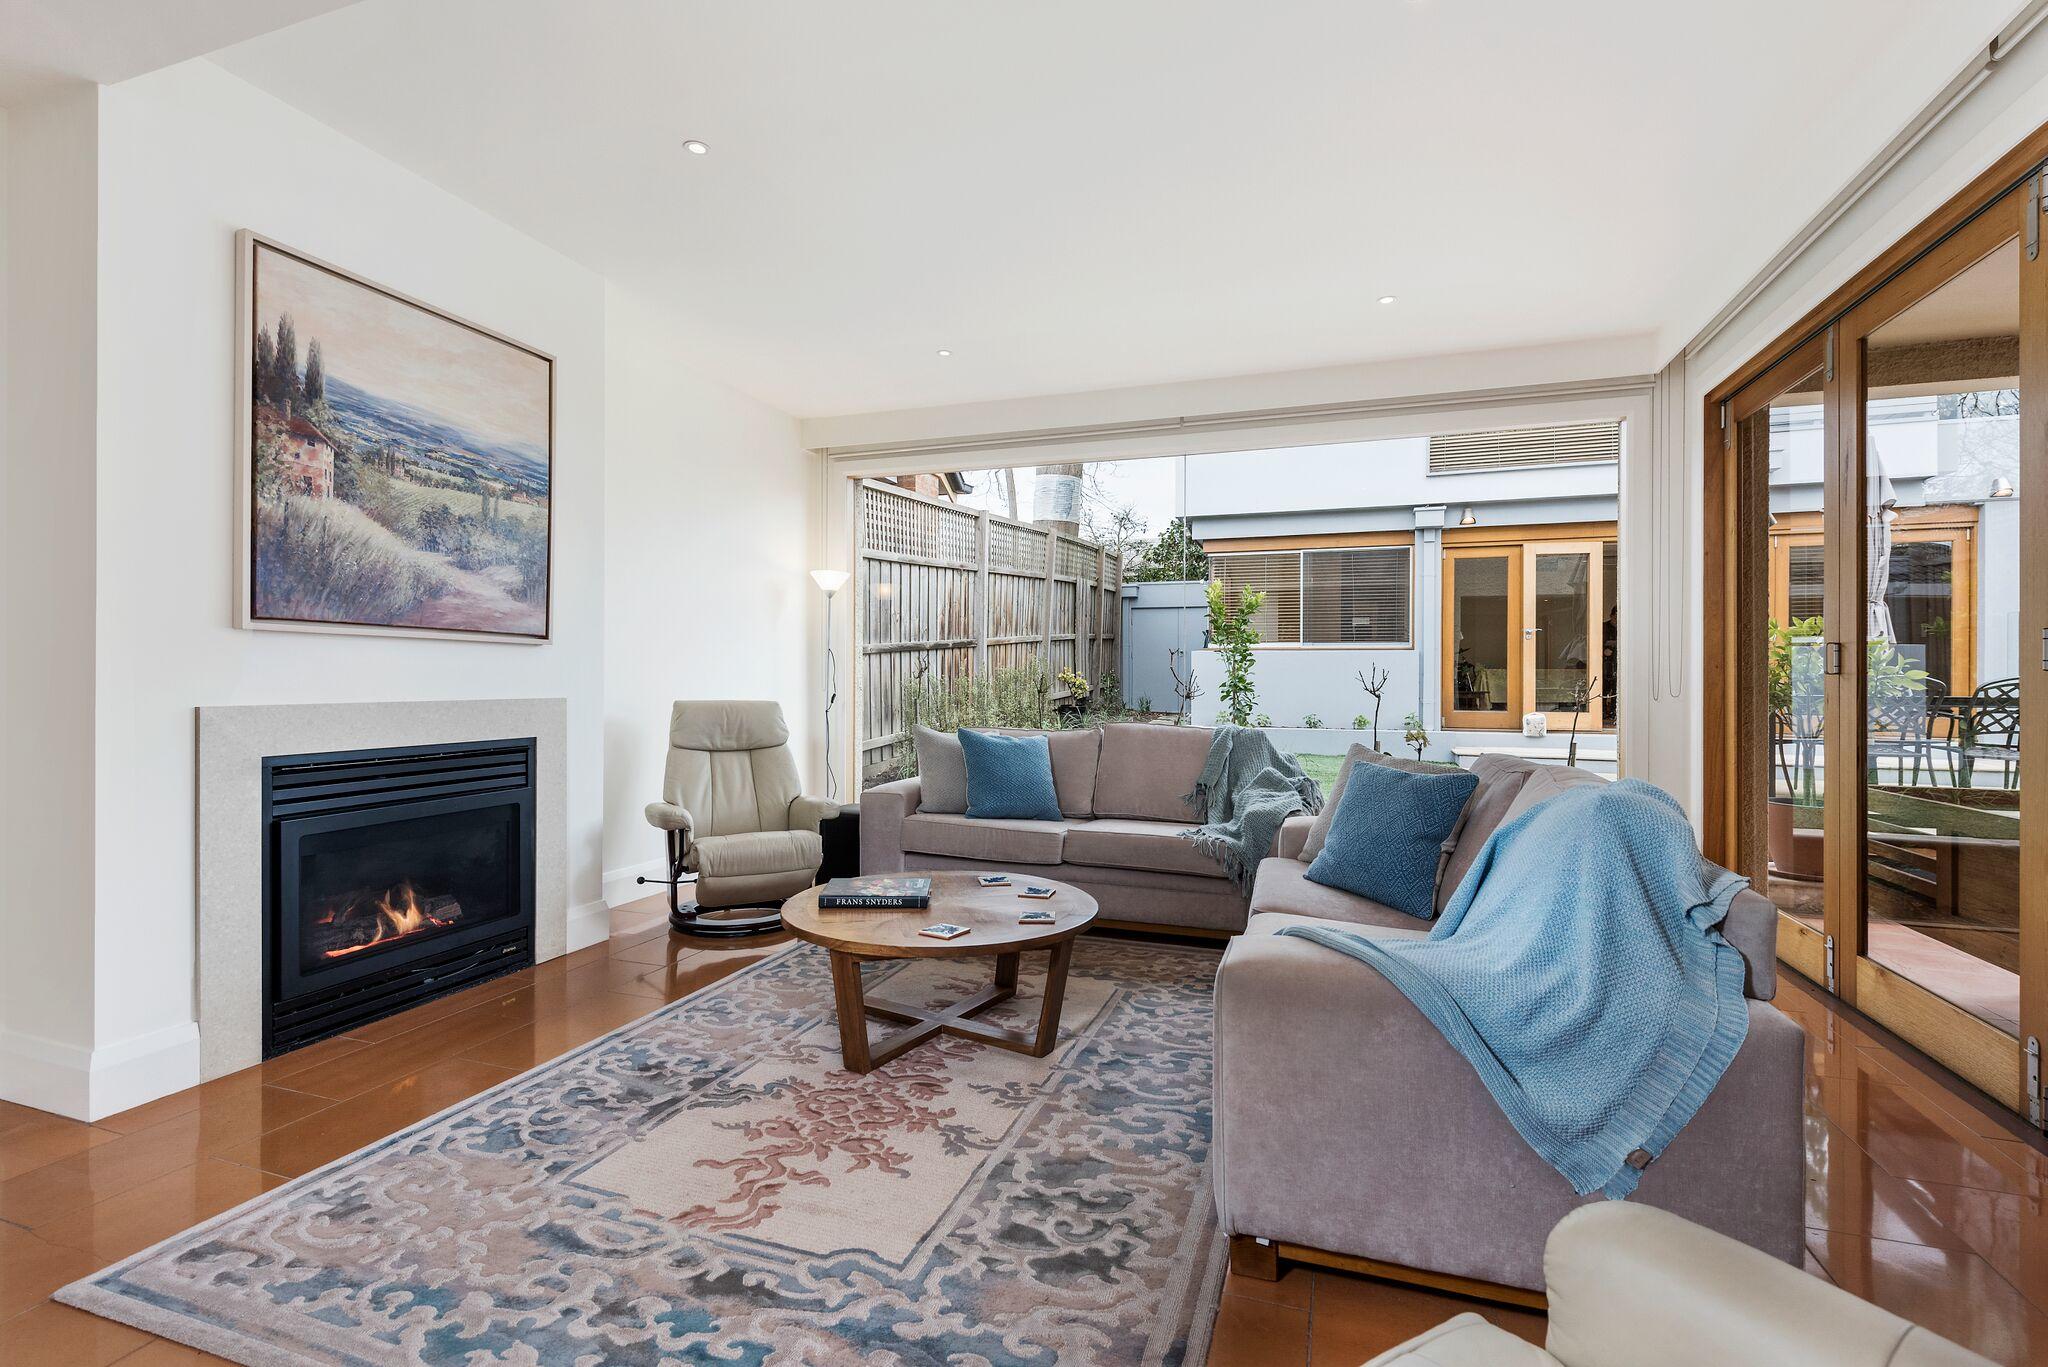
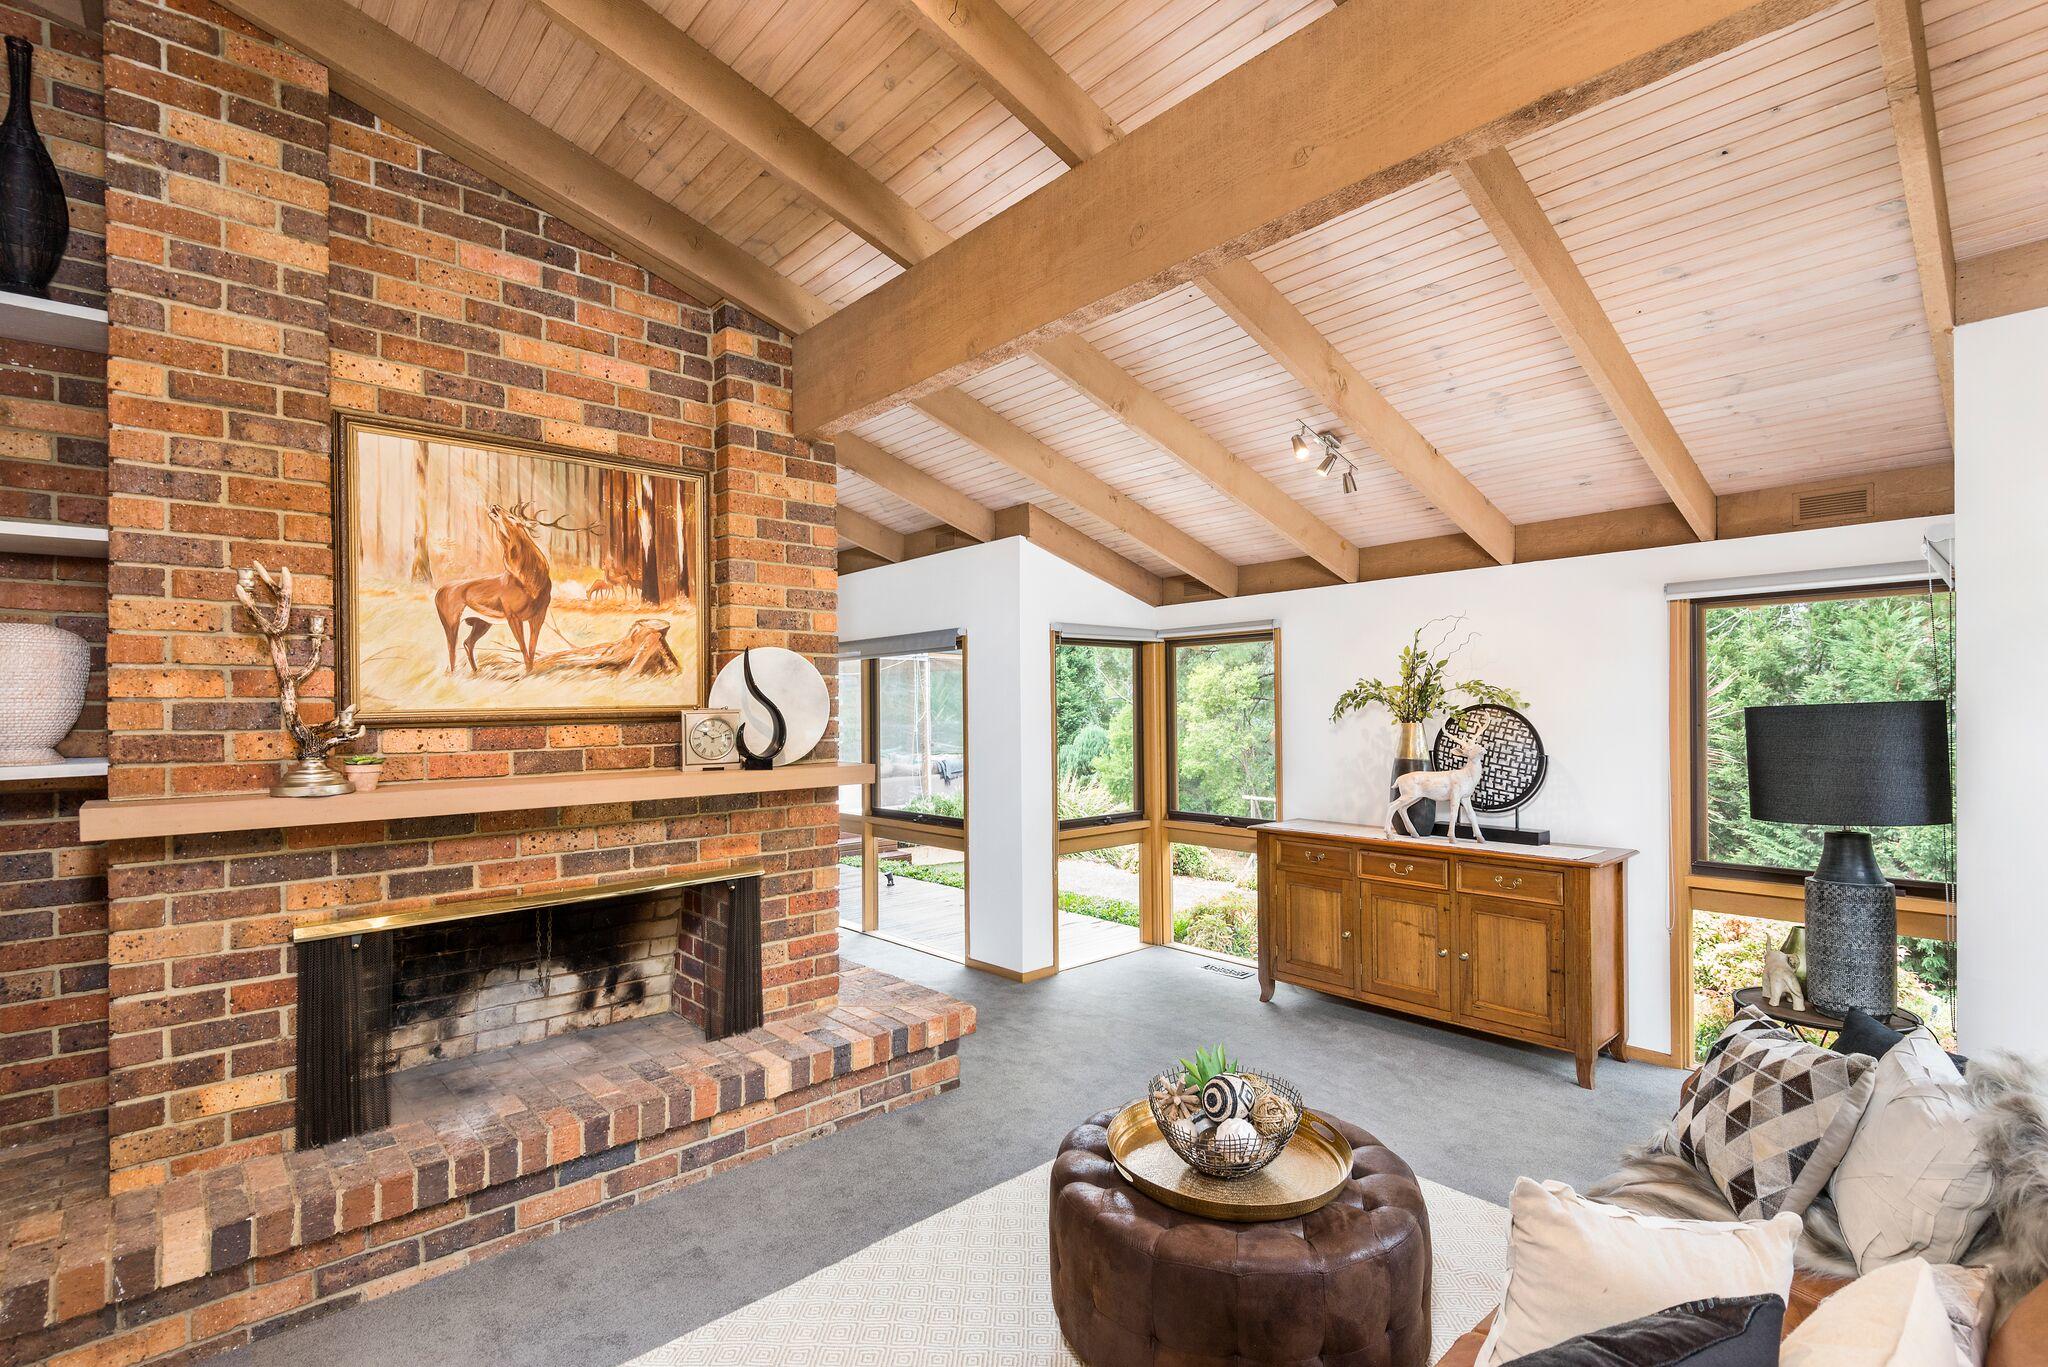
Homes come in all shapes, sizes, styles, and conditions. Here we send them a task list with our suggestions on prepping the home prior to the photo session. Once inside, you should set out to photograph the main rooms: the living room, kitchen, dining area, master bedroom, master bath, are all ‘must shoot’ rooms.

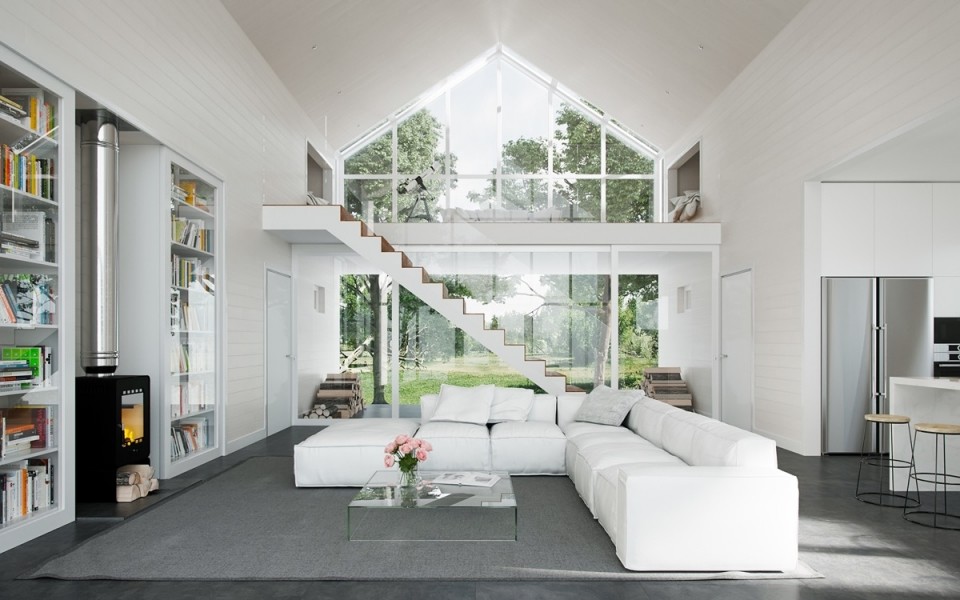
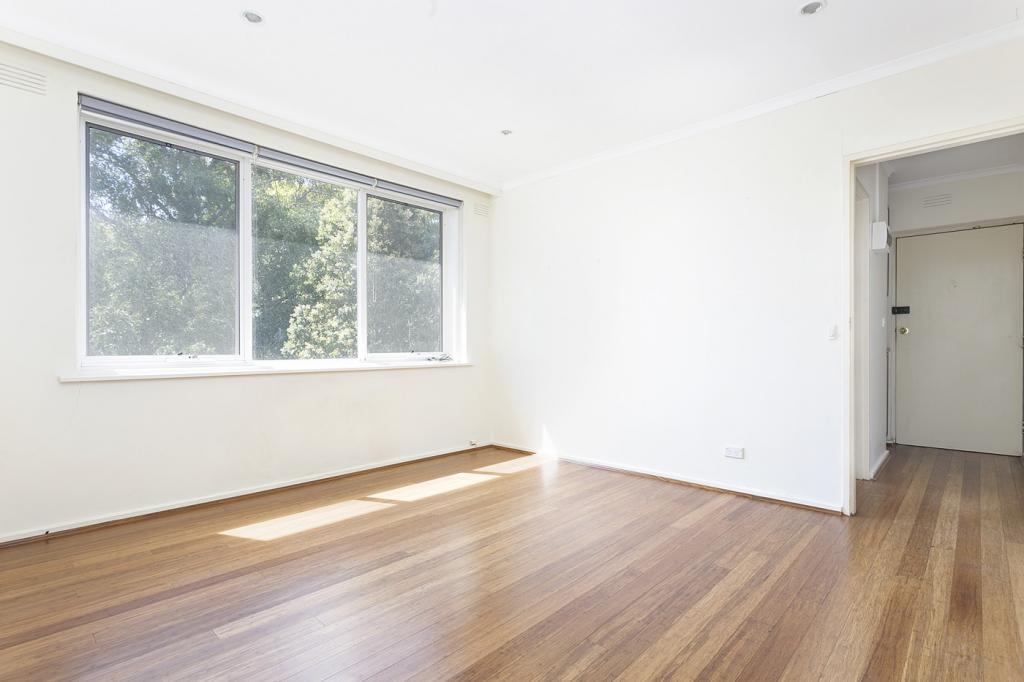
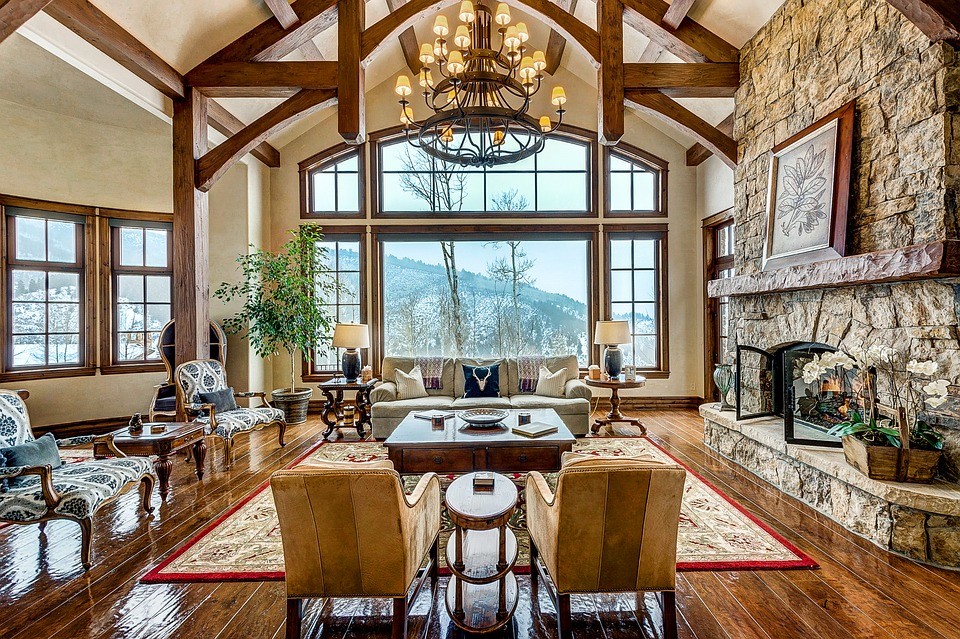
Living room. This is one of the most important pictures in your property listing, so make sure it looks relaxing and feel warm as your home. Spend some time to find the best angle for your shot to make the room look as spacious as possible.

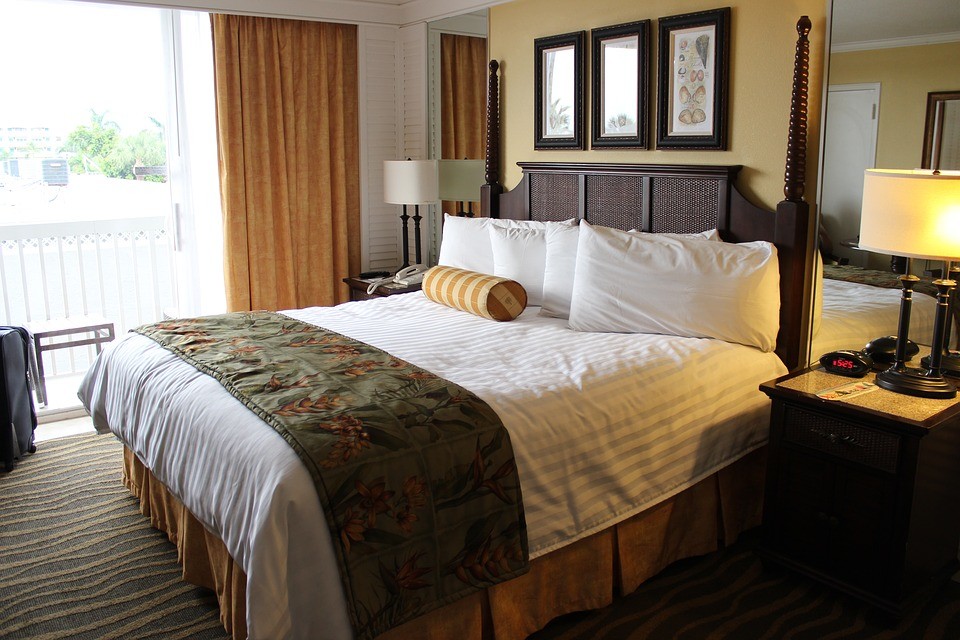
Bedroom. When shooting this part of a home, try to make it look cozy and bright. It is always a good idea to highlight some perks such as a stunning view out the window.

fotosolution-5-Mysteric-of-Real-Estate-Photography-05

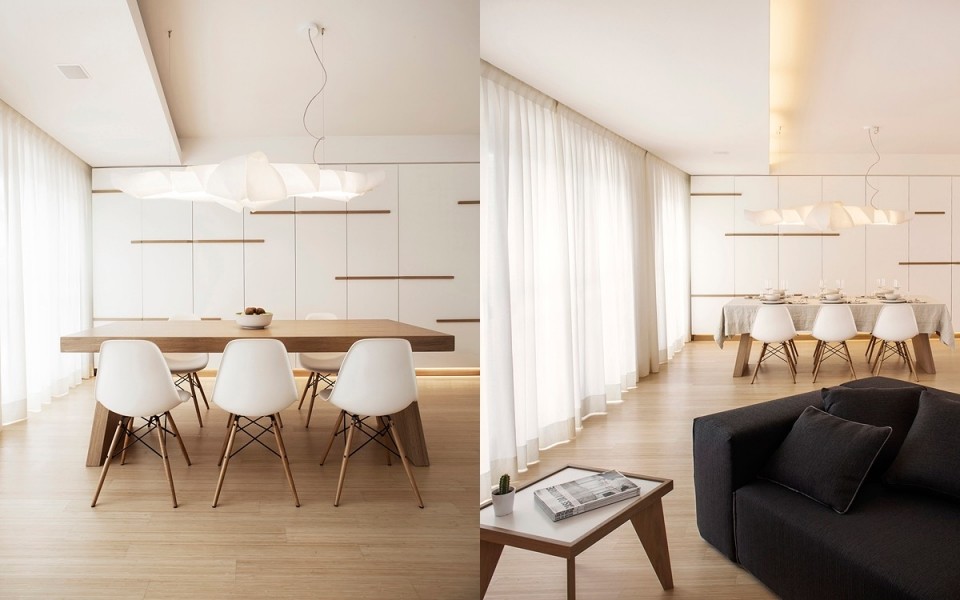
Kitchen and dining area. Before starting to shoot this area, ensure there is no trace of household cleaning products. Your primary goal is to make this room look tidy and functional.

fotosolution-5-Mysteric-of-Real-Estate-Photography-01

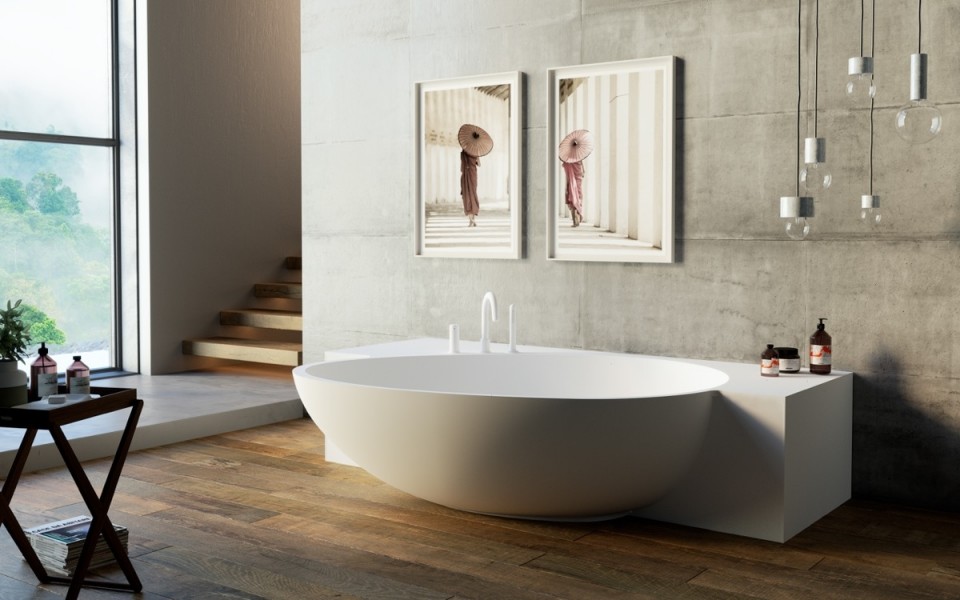
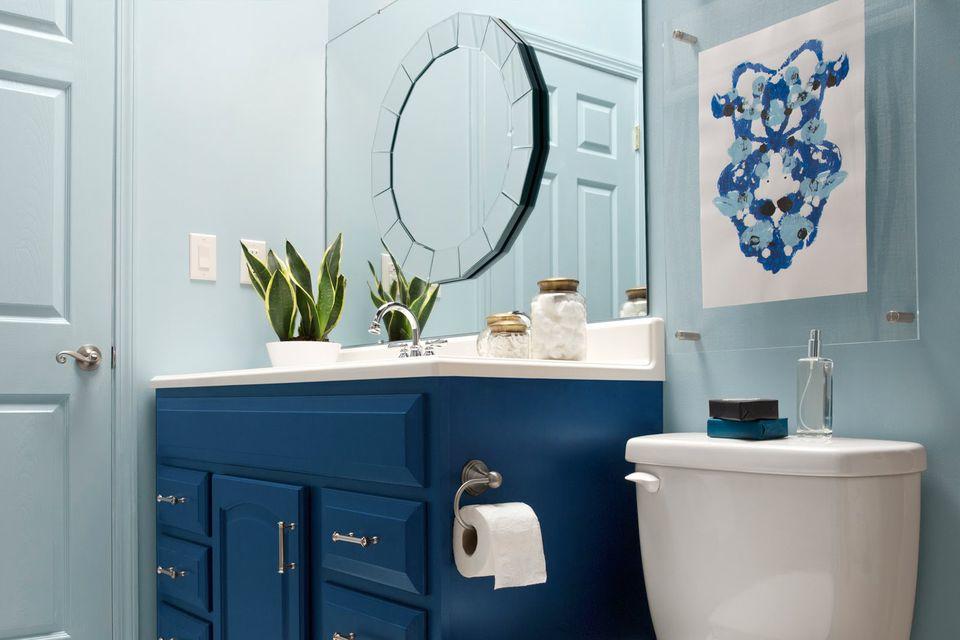
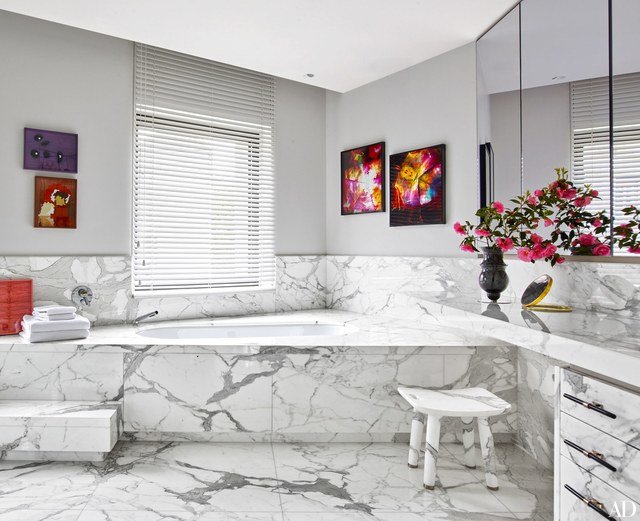
Bathroom. Since bathroom is usually the smallest room, you need to find the right corner for your shoot. It might be a challenge, but it is definitely worth it.

fotosolution-5-Mysteric-of-Real-Estate-Photography-04

Exterior. Most of people like to know how the property looks from the outside. That is why you should take some stunning pictures of the yard and the neighborhood. Schedule your shooting for a time that will let you benefit from the natural light. The best time of day to take photos of any outdoor object is the early morning where natural light is crisp and clear, or the early evening. In both instances, the light should come in from the side which highlights the house.

Learn how to set up cameras

Most photography experts would agree that all comes down to light. Just like there are no two properties with the same amount of lightning, there is no perfect choice for camera settings. Sadly, the one-size-fits-all approach is not the case with photography.

In order to make quality pictures, you need to become adept at capturing light. To make this happen, you should get familiar with the idea of the exposure triangle, which consists of a shutter speed, an aperture, and an ISO.

Shutter speed. Depending on the amount of natural light, it is advised to set a shutter speed between 1/60 and ½ a second.
Suggestion for a beginner: Basically, a shutter speed is the amount of time a camera shutter remains open for exposing light into the camera sensor.

fotosolution-5-Mysteric-of-Real-Estate-Photography-09

Aperture. Once again, there is no perfect choice, but most real estate photographers agree upon keeping an aperture between F8 and F11.
Suggestion for a beginner: Aperture determines how wide a lens is open when you take a picture.

ISO. Just like in any other photography niche, the principle of using ISO is simple: keep it as low as possible unless your goal is a picture full of noise and grain. Experts suggest going no higher than 400.

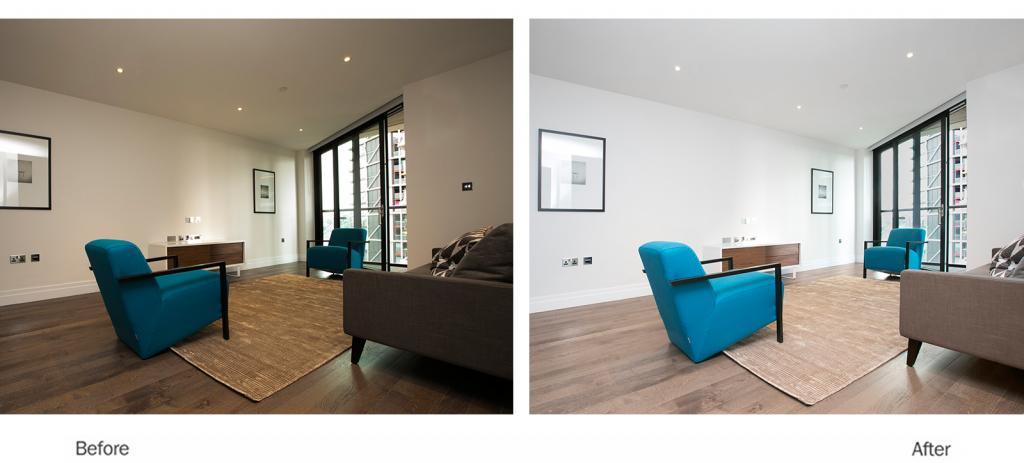
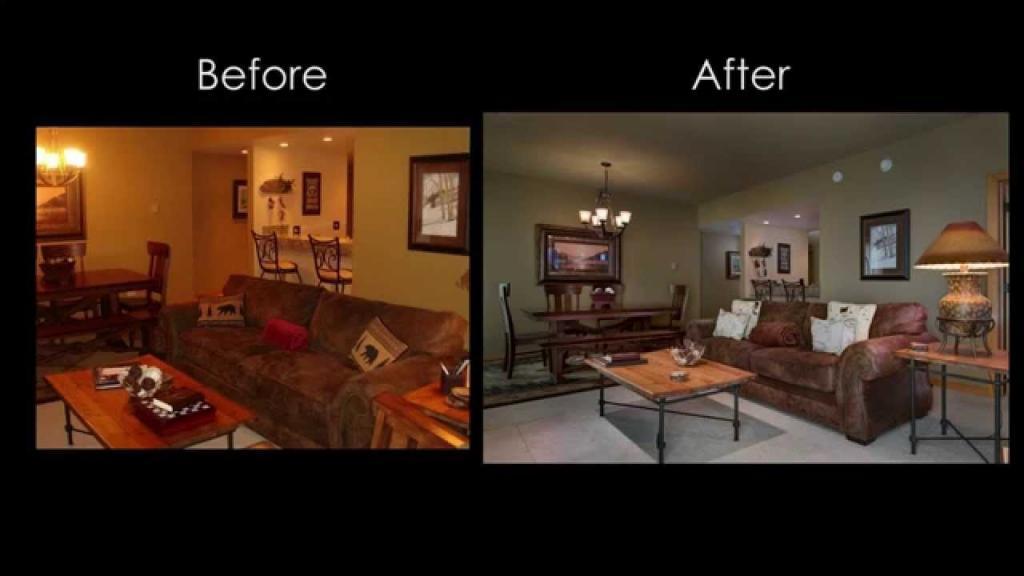
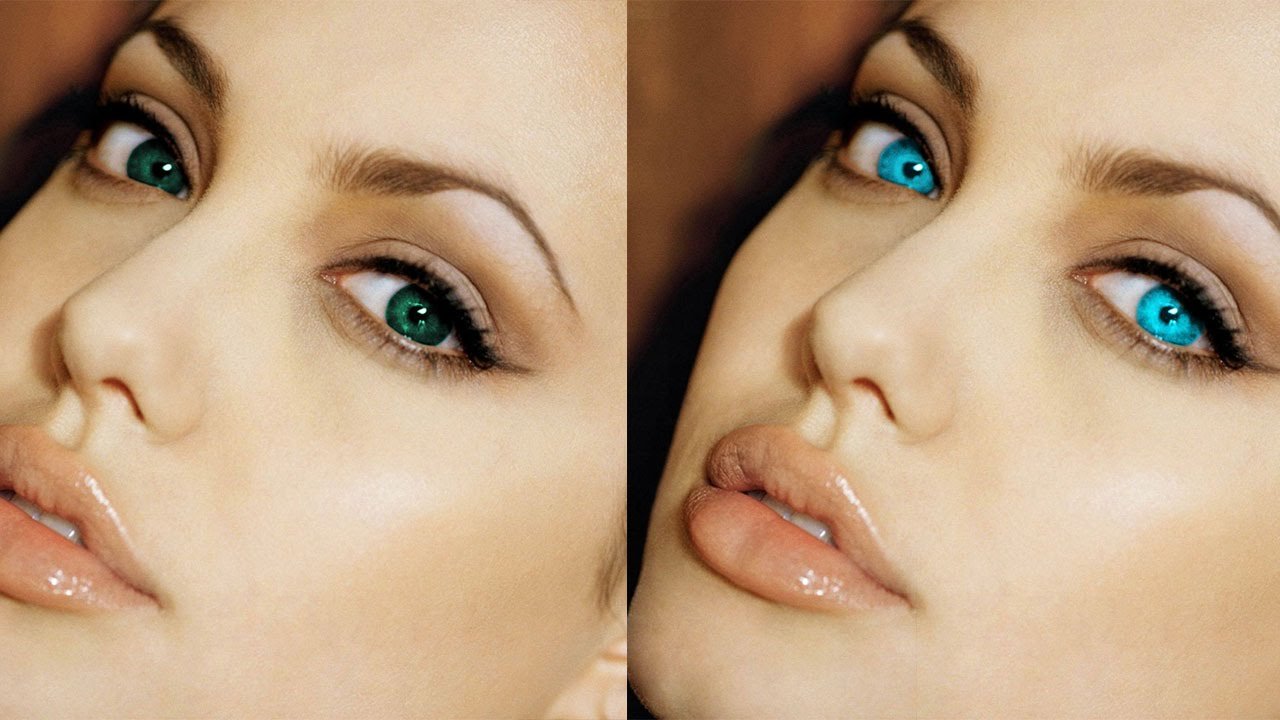
Take advantage of retouching

No matter how good your shot is, there is always a room for improvement. It is safe to say that taking pictures is only half the process. To make pictures truly eye-catching, a rational amount of retouch is necessary. Before you get lost in the variety of software available on market, you need to understand that your goal is to make pictures appealing while keeping them natural-looking.

There is a fair bit of software available, but if you want to save your time, feel free to rely on our choice. We suggest using Adobe Photoshop Lightroom or Photos for desktop, and VSCO or Snapseed for mobile.

There are many things you can do to your photos, but don’t get frustrated and focus on the following tasks:

Vertical correction. This is probably one of the most important things to do. All vertical lines must be vertical, this is an absolute must. Otherwise, walls will look unstable, and the whole picture will scream unprofessional.

HDR adjustment. Chances are that the majority of photos will have the areas with bright windows and the areas with dark corners. HDR treatment can help brighten up the darker parts of the picture without causing a negative effect on the well-lit parts.

Proper cropping. Feel free to crop unwanted sections from your pictures. Actually, you should always capture more than you think you need. This will give you more space for post-processing.

White balance settings. Although the best approach is to adjust a white balance on your camera in the first place, you can also tweak it to your taste later. Make sure the final version of your picture looks natural. Photos that look either too cold or too warm are not what you need.

Here are some tips to help you own best quality real estate photography. We hope that these tips help you work more efficiently with your clients and produce better-quality images. If you found this article useful, share them and your though in the comments below.

Categories
Support Tips & Tricks

9 Best Real Estate WordPress Themes For 2019

Do you want to create good website to grab your customer’s attraction?. No matter who you are or what business you invest, you also need to own greate website.

And the main topic for business project today is real estate wordpress themes. If you are investor and agency about real estate, this article will a great choice for your project. As you have a great website built using one of the best real estate WordPress themes will increase your chances of selling your property.

We have collected some of the most popular real estate WordPress themes to showcase your accommodations accordingly. So, let’s visit the best available real estate WordPress themes that you can use to create a powerful real estate website.

Realtor

Realtor has a nice look and feel that will appeal to those looking for an verified. In addition, it’s a great choice for promoting your real estate business. Using Realtor allow you get multiple options for how your listings are displayed. This covers a selection of different layouts, including lists and grid views. There’s also a handy search and filter tool that makes it easy for your visitor to find exactly what they are looking for.

fotosolution-9-Best-Real-Estate-WordPress-Themes-For-2017-01

Especially, this real estate theme includes Google Maps integration. In addition, this feature allows you to add your own pins to a Google Map, with each one representing a different property you have on your books. Inspecting a pin can bring up additional information about the listing, as well as a direct link to the property page.

DreamVilla

You can easily build a great real estate website thank to aiming to DreamVilla. It will help you promote a single property online.

Whether your property is for sale or available for rent, DreamVilla can be easily customized to meet your customer needs. This real estate theme is best suited to anyone renting out a property on a short-term basis.

fotosolution-9-Best-Real-Estate-WordPress-Themes-For-2017-02

Using DreamVilla, you have oppotunity to own great design of the homepage layouts. This will help your customer can find out everything what they want to know when checking out your property. This includes all the best features of the property, full-screen photos of the facilities, the location on an interactive Google Map, details of local attractions.

In addition, DreamVilla real estate WordPress Theme contains a selection of blog templates to help you attraction your customer’s interest. Thank to blog to your website, you can increase the visibility of your real estate and enhance the numerous traffic your website receives.

Javo Home

Javo Home is another WordPress theme to support your real estate themes listing. Adding Javo Home you have an amazing experience with beautiful and modern layouts that appropriate to web browser and device.

fotosolution-9-Best-Real-Estate-WordPress-Themes-For-2017-03

With Javo Home you’ll find the premium Revolution Slider plugin. This tool is great for adding animated slideshows to your content. These sliders can be an effective way of showcasing your best properties or simply displaying an attractive gallery of photos from a single listing.

Avada

Avada is a flexible WordPress theme with interesting features for your real estate website. The theme has a high-performance framework that will make you website easy to user and friendly with users.

fotosolution-9-Best-Real-Estate-WordPress-Themes-For-2017-04Zoner

The Zoner WordPress theme is innovative and attach to special features, various function, and layouts. It is a best choice for real estate agents, companies and private owners looking to sell or rent properties.

fotosolution-9-Best-Real-Estate-WordPress-Themes-For-2017-05

Especially Zoner WordPress have feature that is compatible with the most current WordPress versions and incorporates some of the best premium plugins such as the Visual composer and the Slider Revolution. The theme is effective and assort well with any browser, operating system, or device.

Home Questfotosolution-9-Best-Real-Estate-WordPress-Themes-For-2017-06

Home Quest is innovative WordPress theme for real estate agencies. It includes many diversity features such as: page templates, shortcodes, custom widgets and sliders. Especially, this theme attach to an extremely powerful search and filter module, allowing prospects to fine tune their search results in seconds and find just the property your customer were looking for. In addition, there’s also a powerful listings search feature that will make it so easy for your customers to browse your listings.

Real Places

Real Places is a hot off the press new real estate theme for WordPress users that will customize to suit your needs and create a niche-specific design to attract the attraction of customers.

It allows you to customize the home page modules whenever you want using the drag and drop feature. When setting up your website with this theme, you get three different variations to choose from. Each option gives you an original look and feel to work with, which can be applied to your website in just a few clicks.

fotosolution-9-Best-Real-Estate-WordPress-Themes-For-2017-07

With the special features allow you create and build an elegant and stylish design for your real estate website.

Agentpress Pro

AgentPress Pro is one of the popular premium real estate WordPress themes that contribute to improve your website. It actives on the famous Genesis theme framework. The theme features an AgrentPress listings plugin that lets you add a listings management system to your site.

fotosolution-9-Best-Real-Estate-WordPress-Themes-For-2017-08

AgentPress Pro contains many features include headers, custom widgets, backgrounds, four colour schemes, custom widgets, and theme options panel. Moreover, all these will help you create a powerful real estate website. It will improve stronger and meaningful participation of customers.

Oslo

Oslo is an dynamic and modern theme that’s been created specifically for building a real estate website with WordPress. It provides you with a selection of innovative homepage configurations and modern modules. This will allow you create the front-page layout and help your customers find exactly what they’re interested in.

fotosolution-9-Best-Real-Estate-WordPress-Themes-For-2017-09

When a visitor clicks through to an individual listing on your site, the design of the property pages gives you a great opportunity to boost your offerings. Each page contains a large header photograph, a checklist of the best features of the property, an interactive Google Map showing the location and a photo gallery displaying the rest of the property.

With the aim of the widgetized layouts, you can easily control and customize the elements that are displayed on your website.

Do you have other themes that could improve and enhance for this?. If you have questions or know other best real estate WordPress themes, let’s share your experiences in the comment below.

Categories
Tips & Tricks

How to whiten teeth in Photoshop CS5

Whiten teeth is one of factor part that make every people more perfect and more confident. But not all people own whiten teech and nice smile. So, how to improve and surmount weak point ?.

Photoshop is a dream machine that support photos to enhance and have best quality. Not only can you make any portrait look perfect, you can do it easily and make your photo collection good.

This article today we will show you how to whiten teeth in Photoshop CS5. Some of the more complicated techniques will be over the head for the novice, but you’ll be able to follow most of it. So drag a portrait into whatever Photoshop program you have.

  • Open your photo in Adobe Photoshop CS5. This article we will use CS5 to support.
  • Duplicate your layer by right clicking on the layer, choosing” duplicate layer” and name your new layer “ Whiten teech”
  • Choosing Zoom in -> “teeth” part to start.

fotosolution-How-to-whiten-teech-in-Photoshop-CS5-02

  • Click on Magic Wand Tool and move around teeth that you should whiten.

fotosolution-How-to-whiten-teech-in-Photoshop-CS5-03

  • Choosing “ Select -> Modify-> Feather ( press 5 pixel) -> Ok

fotosolution-How-to-whiten-teech-in-Photoshop-CS5-05

fotosolution-How-to-whiten-teech-in-Photoshop-CS5-06

  • Click Image-> Adjustment-> Hue/Saturation. Change the Edit option from Master to Yellows. The controls and options for the Hue/Saturation adjustment layer appear in Photoshop’s Properties panel. By default, Hue/Saturation will affect all colors in the image equally.

fotosolution-How-to-whiten-teech-in-Photoshop-CS5-07Click on the box where it currently says “Master”, then choose Yellows from the list.

fotosolution-How-to-whiten-teech-in-Photoshop-CS5-08

fotosolution-How-to-whiten-teech-in-Photoshop-CS5-09

  • Adjust The Saturation, Lighting and Level. We’re affecting only the yellows, we can reduce the amount of yellow in the teeth by lowering the saturation. To do that, click on the Saturation slider and begin dragging it to the left. The further you drag to the left, the more you’ll desaturate the yellow and the whiter the teeth will appear.

P/s: The setting you choose will depend on how yellow the teeth were to begin with. For my image, a Saturation value of around -90 works well. And a Lighting value of around.

  • Similar to Hue/Saturation, let’s click Image-> Adjustmen-> Level and adjust Level value. Below are level value we are setting up:

fotosolution-How-to-whiten-teech-in-Photoshop-CS5-10

fotosolution-How-to-whiten-teech-in-Photoshop-CS5-11

  • Finally, you ‘ll zoom out a little bit so we can see the final result. So far, so good. Let’s save your final result.

fotosolution-How-to-whiten-teech-in-Photoshop-CS5-12

Here are Photoshop tutorial to whiten teeth you can refer. Do you have other Photoshop that could you improve and whiten teeth?. If you have questions or know other best Photoshop, let’s share your experiences in the comment below. Thank in advance.

Categories
Support Tips & Tricks

How to make best selections tool in Photoshop

Let’s express your ability – simple cut-outs and masking task in Photoshop through three basic techniques below. As far as we know, basic cut-outs and masking task are your essential ability for designers. And you can everything more esier with three techniques what we share. In this post, I’ll run through three basic techniques for creating simple selections. Next to, you cover the layer mask options and how they work a little more in depth.

Here are: magic wand, pen tool and path selections, colour range tool and layer masks for creating simple selections tool in Photoshop.

Magic Wand

The Magic Wand is considered as key golden and the simplest way to make simple selections tool in Photoshop.  Using the Magic Wand Tool allows you choose areas of similar color. The region to be selected may be a single continuous shape or multiple separate areas.

fotosolution-How-to-make-best-selections-in-Photoshop-01

You can adjust to the Wand tool and then up the tolerance to 30 and click on the white area to make your selection. Now choose “ Shift+cmd+I” to invert the selection and click the ‘Add layer mask‘ button at the bottom of the Layers panel to mask off the product from the background.

P/s: Magic Wand choose pixel through colour and rhythm.

Pen tool and path selections

When you zoom into the bottom of your selected image, you can see the shadows have not been masked off from the background. Talking about more precise selections, Pen tool is surely a great choice for your project.

fotosolution-How-to-make-best-selections-in-Photoshop-02

First, let’s open by selecting the Pen tool and begin clicking it, holding and dragging to create paths and curves until you feel pleasure. Then, you click on the original point to close the path. And then, you can navigate to the Paths panel, “cmd+click” the path you’ve just created and a selection will be made.

Colour range tool and layer masks

The Colour Range tool is particularly best for selecting large areas that containing a similar tonal range. It’s is simple to navigate to the select menu and click to launch the Colour Range panel. Now grips  your image and you’ll notice an eyedropper appears. Choosing on the area you want to make a selection of the image within the panel will change.

Using the Colour Range tool allows you choose how you want to sample the colour on your subject. Then let’s click on the “Select list” and try one of the colour options.

There’s the option to increase the intensity of the selection using the ‘fuzziness’ slider. You can set range to 20% and Fuzziness to 100 to begin. There are also a number of standard options to choose from the drop-down menu, such as mid-tones, highlights, shadows and skin tones.

With a selection of just the colour, adjustment layers such as Hue and Saturation can be added via the Layers palette. Notice how the adjustment layer uses the selection for its mask, meaning that you can change hue of this colour only for a creative effect.

Here are three techniques that help you create and make simple selections tool in Photoshop. Do you have other techniques to make quick selections?. If you have other questions or know other tips, let’s share your experiences in the comment below.

Categories
Support Tips & Tricks

Tips to Improve Portrait Photography

Portrait photography is one of the most amazing topic that many readers are interested in. If you are new photographer, learning how to professionally capture portrait photography is one of the most important skills you can develop.

Do you know how to improve portrait photography?. Here are a few of Tips to capture best portrait photography.

Lighting is golden key

Lighting is one of best factors to describe and embellish faultless portrait photos. And the best light to shoot portrait is Rembrandt lighting. Rembrandt lighting use to capture photos in studio to increase the brightness of subject, especially it help you create holograms.This technique will create clear triangles on subject’s cheek. Keep in mind that let’s buid a 45-degree angle to straight line that link between cameras and subject.

fotosolution-Tips-to-Improve-Portrait-Photography-01

It’s that shoot portrait photography in studio, so if you take the portrait in natural light, how about that?. Shooting outdoor portrait photography, you have the best chance of getting a great look with the natural colors and skin tones. However, shooting outdoors may be tricky, because it’s difficult to control the light in most situations. Make sure that you don’t pose the subject right in front of the sun. This may cause unwanted brightness or deep shadow. Shooting in mid-day also should be avoided as much as possible. For best results, position the subject in such a way that sunlight falls on the face from the side. You may also use reflectors or an external flash to light up some parts of the face.

Building comfortable space

Background plays a vital role to a portrait. As you know, portrait is all about someone’s face. So it is important to have a background which is not interfering with the subject.

fotosolution-Tips-to-Improve-Portrait-Photography-02

Let’s build a comfortable space for taking portrait photography. You can use a long lens with long focal distance ( about 75mm) to create comfortable feeling for subject.

Focus aperture

A wide open aperture with a lower number will blur the background and make the subject stand out. A smaller aperture with a higher number will make the whole scene come into better focus. Typically f/2.0 to f/5.0 is good for portraits.

Get high or get low

Taking a portrait is not always shooting at the eye level. Positioning the camera high or low while keeping the focus on the eyes brings out interesting features and adds different flavors to the portraits. So make the model sit, stand up, climb up to the stool or ladder or stairs and shoot.

fotosolution-Tips-to-Improve-Portrait-Photography-03

Adjust Head and shoulder

As shooting subject, you need to attend head and shoulder of subject. Let’s tilt your head from time to time to limite to just our of chin and forehead.

Angle and Pose

Pose and the angle of the body and face play a key role. Looking straight at the camera with motionless expression can be boring. Try to flare up your portraits with some twist. Maybe it is an inviting smile, a sexy expression, a flamboyant look, tilting the chin down or up, turning the head back while walking forward, or sitting and looking up.

fotosolution-Tips-to-Improve-Portrait-Photography-04

Editing photos before posting

Let’s check out and remove unwanted detail after shooting portrait photography. Therefore, you should take time to edit photos through some digital software such as:  Photoshop and Lightroom to have best portrait photography.

Do you have other tips to improve portrait photography?. If you have other questions or know other tips, let’s share your experiences in the comment below or contact us: sales@admin.admin.admin.admin.admin.admin.fotosolution.com to get more information.