Categories
Tips & Tricks

How To Prepare For A Perfect Product Photoshoot

You are planning on taking your own product photoshoot, you want to make all things what appear in your online shopping or your personality page perfectly before the viewer’s eyes. Having a beautiful product photoshoot, you spend hours, days, weeks, months or years to develop product and to prepare all things in the studio. So, what will you do to have a perfect product photoshoot?. Here are some tips to help make sure you’re fully prepared.

Gather Inspiration

Inspiration is one of the most important factors to create product. Firstly, you have to know product  photoshoot what you need to make or do some research online to start pulling together images, which are along the lines of what you want to achieve. Obviously you don’t want to rip anyone off (please don’t just copy an image exactly!), but it’s a useful place to start. Think about backgrounds, props, layouts and combinations of products.

fotosolution-Tips-To-Create-Perfect-Apparel-Product-Photography-03


Create a shot list

Normally, you think that create a shot list is unnessary element but if you make this, it will be useful for your job. A shot list will help photographer note down the products you need to photograph and make sure to include any details if there’s certain parts of your product you really want to show off. You could even sketch out some of the shots if you have a specific idea in mind. Think about where the images will be used and what for, including group shots, and images for your social media profiles.

Background

Choose suitable background options they already have, or order specific coloured paper or textured surfaces ahead of your shoot. Think about what you want to use as a base or background for your shot, or try incorporating your brand colours. As long as it doesn’t distract the eye from your product, it can really help to create the feel for the shot and echo what your product is all about.

Choose Kind of Products

Garment or Apparel

fotosolution-How-To-Prepare-For A-Perfect-Product-Photoshoot-01


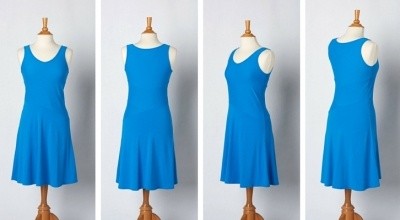
Your products should look their absolute best in your images. It’s an unfortunate fact of life that clothing can become wrinkled, creased, and begin to look worn from storage and transport. Preparing garments to be photographed is a crucial starting point for photographing apparel, yet many photographers skip this step and rely on Photoshop to fix wrinkles, stains, and other visible defects. Apparel should be shot on a model or mannequin to demonstrate shape. Use clips and pins to create a flattering fit. In addition, you should create a 3D effect known as the “invisible mannequin.”

This allows you to display your product with its natural shape and fit, while avoiding the distraction of a mannequin.

Jeweleryproductphotography31

If you’re shooting jewelry, polish and renew it. Style your product in a manner that is both useful and appealing to customers. You don’t overcomplicate with props; many products look their best on a plain white background, and using unnecessary props will distract customers.

Footwear

Like as shooting jewelry, you should spend time to clear and polish footwear before shooting. Check laces and straps for damage, and replace if necessary. Fix anything you can fix.

Create the illusion that footwear is being worn. Communicate shape and help boots stand alone by stuffing them with tissue paper or crumpled paper, or tie dental floss to shoe straps to hold them up in the frame.

Furniture

Clean and polish your items with multipurpose cleaner or furniture polish. If it’s secondhand, repair any damages – but be honest in your product listing. Find a spacious area with ample light and either a white or neutral background. Instead of wasting time adding props to style your product, you should focus on taking quality shots from multiple angles of the product itself.

Gather Prop

In the process of shooting product, you have to choose the right props for your photographs can be tricky, but consider including items that help tell a story, or ones that inject a pop of colour. The more props you have to choose from during your photoshoot, the better.

Times

Time spent on preparing your product will save you time in DIY post-production processing, as well as increase the overall quality of your product photography. If you want to save even more time and money.

Do you choose your own beautiful product you believe in. Lets spend a litte times to read upper guides and prepare your products with care. We believe that everyone else will see what you see.

Thanks for attention!

Categories
Tips & Tricks

Tips To Create Perfect Apparel Product Photography

What do you do when you go to shopping or purchase product? Look at the outfit’s colour, feel its fabric, checkout its prints and styles and then try out if it fits you? But if your customers visit your online store, they will not be able to do all this, so what will they do before buying your product. The first important factors what your customers will attract is product image or apparel product photography. High quality product photography is essential for apparel ecommerce. For many customers, your product images will determine whether or not they buy your product?.

One effective technique is by posting attractive apparel photographs on your online store. From product photography of the apparel to removing the background from the apparel photograph, there are loads of things you should do to enhance your quality product photograph.

You can shoot photographs flat or drape them over a mannequin to give a 3D effect. Many online apparel stores display their outfits flat. While this look is great for tees, baby outfits and lingerie, this technique may not be very effective when you’re displaying dresses or gowns. That’s reason why your products should look their absolute best in your images. It’s an unfortunate fact of life that clothing can become wrinkled, creased, and begin to look worn from storage and transport. Clothing samples face a particularly rough time of it, as they often cover a lot of miles and may not have been perfectly constructed to begin with. Besides, you can always use post processing techniques to remove the creases and the other elements, for best results remove those annoying creases even before you photograph the clothing product.

Choose accordant garment to be photographed. It is a crucial starting point for photographing apparel, yet many photographers skip this step and rely on Photoshop to fix wrinkles, stains, and other visible defects. Don’t do that. Photoshop isn’t magic: it takes time and expertise to master advanced editing techniques, and excessive editing risks compromising image quality.

Try to capture your garment in a state as close to perfect as possible and use Photoshop only to add final touches and color correction. Avoid harsh backlighting and other setups that cast shadows on the surface of the object. Keep the lights on the same side of the object as your camera, or slightly off to one side. In addion, during photograph accordant garment, we should pay attention to the light conditions. Flash or bright light can create a glare on the product, and the original colour of the apparel will not be clearly visible. Use soft boxes and umbrellas to diffuse light and soften it. Set the umbrella at around 45 degrees, so the light falls on the shoulder and spreads down the model enhancing the aspects of the apparel.

fotosolution-Tips-To-Create-Perfect-Apparel-Product-Photography-03


Now that you’ve got the outfit ready and the lighting setup, check out the background. Ensure the background is plain and clear, so your outfit is clearly displayed. In our opinion, you should use a white background, which is a recommended practice and even required by some marketplaces. You can take it a step further and completely eliminate possible distractions by removing the background. Removing the background will allow you more flexibility in web design and modestly decrease file size.

Preferably use a wide angle lens, which will allow you to cover more space. Set the camera high using a tripod for best results. The stability will eliminate camera shake and ensure your shots are consistent, while also freeing you to use your hands on other tasks. You don’t need to spend a lot of money on a tripod, but it’s essential that you use one. Morever, you should shoot the outfit from multiple angles, so you can show different views of the product on the webpage. Alternatively, while post processing, these multiple views can be stitched together to create a 360 degree view, an option that most online stores are going for now. Customers will be able to trust their impressions of the product if it’s backed up in multiple photographs from multiple angles.

After you’ve shot as many pictures of the clothing product you want, it’s time to place it under the editing scanner.This photo editing tool offers plenty of options to edit photographs before you post them online.

Color is an essential feature of post processing. careful attention to white balance, some colors—like neons, reds, and pinks—are difficult to photograph correctly in camera and often need to be tweaked in Photoshop. Let’s ensure that the colors of your garments are accurate. The bottom line is that you want the customer to see exactly what they will receive in the mail should they order your product. There are a number of ways to tweak colors, so get to know Photoshop’s offerings and choose your favorite tool. After you have fixed the colors, make sure to convert your images into SRGB format to make sure that different browsers, computer screens, and websites won’t change the accurate colors that you worked so hard to create for your customers.

Images have to be resized before they’re posted on the website. You can blow up the picture or reduce its size to create a thumbnail image. If you’re preparing a product catalog, then all the images should be cropped to the same size. Each ecommerce site has its own clothing optimal image size. If you’re planning to showcase your apparels on these marketplaces, then you should ensure that the apparel product image meets those specifications.

Mannequin or invisible man effect is another technique that a lot of online stores are using to display apparel. When you photograph clothing, you can use a mannequin or choose  a model who wear accordant product and help your product become more prominent.

Good apparel photographs will give your online store customer a great feel of the apparel, so they will be convinced of the quality and apparel style. Attract more customers to your online outlet with effective apparel photography and image editing. These some simple guide will get you well on your way to creating professional and consistent images that really make an impression with prospective customers. Hope that they will be useful for you.

Thanks for watching!.