Categories
Tips & Tricks

How to use product photograph on effective Ecommerce sites

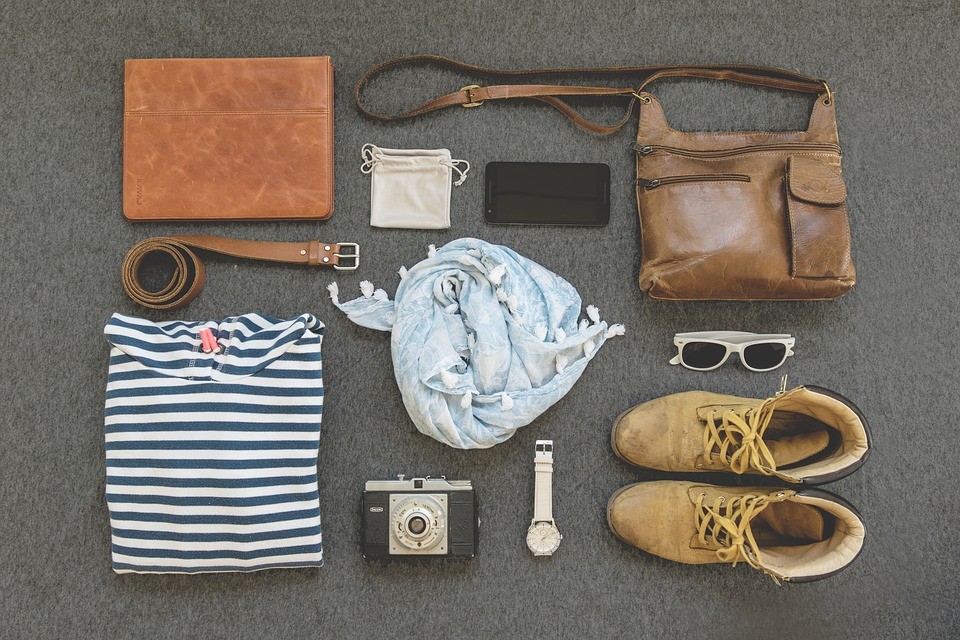
Ecommerce is more and more popular and develop in modern social.And Ecommerce product photography is one of the aspects of web design that enhances the value and raise the effective sales. And for store online, the best way to attractive many customers is the quality of images. Everyone complety understand that beautiful and high – quality pictures is one of the important factors for the success of website.

In this post, we will show you how ecommerce sites can use images and improve the effective sales.

Choose suitable size

fotosolution-How-to-use-product photograph-on-effective-Ecommerce-sites-01


The size images is one of important factors what we need to attent. If pictures are too small, our customers is difficult to find the beauty of product. If pictures are too big, the interface of the page will be affected. Therefore it’s important to make sure your pictures have a proper size to achieve great quality, high resolution images. In this era of technological development, almost people are using mobile phones and tablets than desktops to surf the web and relish the attributes of online stores. These will help people save much time and can use and check web at everywhere. And simple that just a smartphone what can provide you with high resolution images instead of using expensive digital cameras.

Zoom functionality

You can adjust images as well as the suitable size by using zoom tool. Detail is important, and zoom tools allow shoppers to gain a better impression of how a product looks. And it means a lot to your customers and is the great way help your customers understand more and know many informations of product.

fotosolution-How-to-use-product photograph-on-effective-Ecommerce-sites-02


Alignement

Creating align your product photograph  what help you improve and develop your ecommerce site. You will need to decide on alignment standards for your apparel photographs. Having the same alignment and white margin on product images, creates visually consistent product category pages, and results in a better shopping experience.

Below are 3 kinds of alignement including: top alignement, center and bottom alignement.
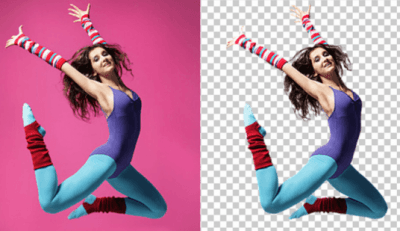
Background

Background is one of important factors in an image and choosing suitable background is a deciding element to make beautiful photos. The background is of fundamental importance in the composition of the image emphasizing the subject, improving the photography, or if not adequate, it may cause irreparable damage to the image, making it chaotic.

Suggestion: You should use white background what will make your product photograph become more natural.
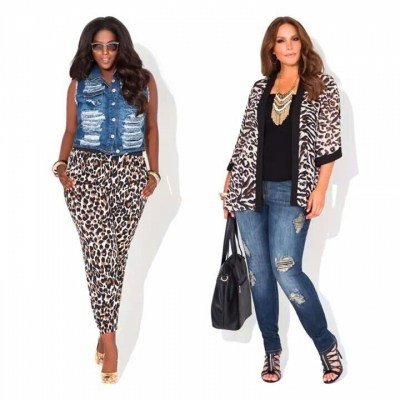
Colors

The color is another important feature during the online shopping experience. You should make sure your images show the correct color in order to show your customer exactly. Your product photograph will become more attractive if you add color into images. However, you need to use accordant colors to not fail product. Avoiding to using neons, reds, and pinks—are difficult to photograph correctly in camera and often need to be tweaked in Photoshop.

Choosing angles position

Choosing the camera angle is a important parts when you take the product photos with natural light. A photo can look much better just by approaching it in a different angle. Doing so can also help your customer understand the size of the item, and allow them to better visualize product details such as extra pockets, interior lining, special thread, etc. To cover a product well, shoot the front, back, diagonal, bottom, top, interior, and details of the product.

Shadow

fotosolution-How-to-use-product photograph-on-effective-Ecommerce-sites-03


Adding shadows to product images is one of the greatest examples what help you can do to achieve great results. When we add the shadow in product photograph, this will create a powerhouse effect. Shadows can obscure a beautiful product and make product photography look unprofessional. However, we should know the difference of shadows on a product and shadows cast by a product. There are numbers of different shadow types that you can use such as: drop shadow, cast shadow, natural shadow, reflection shadow. To understand more each types, you can refler: how to add shadow to your product photograph. Let’s choose these options to find the look most suitable to your product and site.

The number of images

Beautiful quality image can be decided the big success for sales but having a small thing what we always forget or miss, is the number image that you update your shopping online. If we just update one or two images of each product is simply but these are not enough to give customers an accurate feel for the cost-effectiveness and quality of your inventory. Therefore, it’s important to give customers as much information as possible about each product by uploading at least 3 images per product—and preferably 5-10. You should shoot photograph with many angles of your products as possible. The more images of your product that you upload, the more the customer will come to understand about the product.

Finally, there are essentials ways help you learn how use and optimize product photograph on Ecommerce sites. Our team can also help you optimize your image editing workflow such as: how to remove backgrounds, clip, crop, align, and retouch your product imagesand will save you a significant amount of time and money in the process. If you have the demand, let’s contact with us and give feedback for us.

Thank for watching!.

Categories
Tips & Tricks

The Important of Background To Make Beautiful Photos

Background is one of important factors in an image and choosing suitable background is a deciding element to make beautiful photos. The background is of fundamental importance in the composition of the image emphasizing the subject, improving the photography, or if not adequate, it may cause irreparable damage to the image, making it chaotic.

Most beginning photographers know to watch out for lamps or other objects seeming to grow out of people’s heads, but there is more to good captures than just avoiding the basic traps. Here are some ideas for interesting background ideas, help you make amazing photos.

Bokeh technique

Bokeh is a popular photography technique with photographer. It help you create an in-focus subject and a blurry background, and it is very easy to realize. It is used frequently for close-ups of flowers, or really anything small and detailed. You need many digital point and shoot cameras what have a Portrait setting. You will need to make sure there is space behind your subject and if the background is too close, it will still be in focus.

Acess to your subject, or you can also use the zoom button. Don’t forget to focus  your subject, and that there isn’t anything else between you and the subject (grass, sticks, etc.). if you do not pay attention, your intended subject will become the background and get the bokeh. Then take the photo, and checks at different angles to be safe. It’s not hard, and you’ll get the hang of it if you practiced hard.

Colours

Eye – Catching colours is an effective way to help your product photograph become more perminant. You can impale the backdrop with natural materials or with some coloured netting, and thus are able to choose a colour to work well with the colours your subject. It is not too hard but it requires a lot of effort and especially those looking for a “studio” style wildlife photo, it can look very nice. Sometimes it occurs naturally, and you simply need to try and post yourself so that a natural patch of colour appears behind your subject. Such colours could be created by flowers, bushes or trees. Any large patch of colour that is very out of focus will merge into one nice blend of colour.

Sometimes you can get the same effect from an extreme close. Use the MF setting and turn off the flash. You will get as close as possible to your subject. The less flat your subject the better, so you can get some parts in focus, with others blurred. Using a flash too close will excess the subject, but if you have enough ambient light it will be more effect.

The most important thing is to always be looking for something different. Don’t be hesitant to try different angles or lighting to make perfect background for your photograph.

Categories
Tips & Tricks

How To Prepare For A Perfect Product Photoshoot

You are planning on taking your own product photoshoot, you want to make all things what appear in your online shopping or your personality page perfectly before the viewer’s eyes. Having a beautiful product photoshoot, you spend hours, days, weeks, months or years to develop product and to prepare all things in the studio. So, what will you do to have a perfect product photoshoot?. Here are some tips to help make sure you’re fully prepared.

Gather Inspiration

Inspiration is one of the most important factors to create product. Firstly, you have to know product  photoshoot what you need to make or do some research online to start pulling together images, which are along the lines of what you want to achieve. Obviously you don’t want to rip anyone off (please don’t just copy an image exactly!), but it’s a useful place to start. Think about backgrounds, props, layouts and combinations of products.

fotosolution-Tips-To-Create-Perfect-Apparel-Product-Photography-03


Create a shot list

Normally, you think that create a shot list is unnessary element but if you make this, it will be useful for your job. A shot list will help photographer note down the products you need to photograph and make sure to include any details if there’s certain parts of your product you really want to show off. You could even sketch out some of the shots if you have a specific idea in mind. Think about where the images will be used and what for, including group shots, and images for your social media profiles.

Background

Choose suitable background options they already have, or order specific coloured paper or textured surfaces ahead of your shoot. Think about what you want to use as a base or background for your shot, or try incorporating your brand colours. As long as it doesn’t distract the eye from your product, it can really help to create the feel for the shot and echo what your product is all about.

Choose Kind of Products

Garment or Apparel

fotosolution-How-To-Prepare-For A-Perfect-Product-Photoshoot-01


Your products should look their absolute best in your images. It’s an unfortunate fact of life that clothing can become wrinkled, creased, and begin to look worn from storage and transport. Preparing garments to be photographed is a crucial starting point for photographing apparel, yet many photographers skip this step and rely on Photoshop to fix wrinkles, stains, and other visible defects. Apparel should be shot on a model or mannequin to demonstrate shape. Use clips and pins to create a flattering fit. In addition, you should create a 3D effect known as the “invisible mannequin.”

This allows you to display your product with its natural shape and fit, while avoiding the distraction of a mannequin.

Jeweleryproductphotography31

If you’re shooting jewelry, polish and renew it. Style your product in a manner that is both useful and appealing to customers. You don’t overcomplicate with props; many products look their best on a plain white background, and using unnecessary props will distract customers.

Footwear

Like as shooting jewelry, you should spend time to clear and polish footwear before shooting. Check laces and straps for damage, and replace if necessary. Fix anything you can fix.

Create the illusion that footwear is being worn. Communicate shape and help boots stand alone by stuffing them with tissue paper or crumpled paper, or tie dental floss to shoe straps to hold them up in the frame.

Furniture

Clean and polish your items with multipurpose cleaner or furniture polish. If it’s secondhand, repair any damages – but be honest in your product listing. Find a spacious area with ample light and either a white or neutral background. Instead of wasting time adding props to style your product, you should focus on taking quality shots from multiple angles of the product itself.

Gather Prop

In the process of shooting product, you have to choose the right props for your photographs can be tricky, but consider including items that help tell a story, or ones that inject a pop of colour. The more props you have to choose from during your photoshoot, the better.

Times

Time spent on preparing your product will save you time in DIY post-production processing, as well as increase the overall quality of your product photography. If you want to save even more time and money.

Do you choose your own beautiful product you believe in. Lets spend a litte times to read upper guides and prepare your products with care. We believe that everyone else will see what you see.

Thanks for attention!

Categories
Support Tips & Tricks

Learn How To Remove Background From Images

You know what one of the most important photo design is?. When you shot product photos, you want to upload it on your online shopping or your personality pages, you need to ensure that the quality of images is completely good especially background removal. As we know when you are trying to shot something , some unwanted elements may be present in the background you’re using . Sometimes, the images may have reflections or shadows that you don’t want. That’s  reason why you should remove the background to enhance its quality. Also a clear background will highlight the details of your image. So, wondering how to remove background from images? Looking to cut out the background from an image, but aren’t quite sure how to do it? Well, no matter if you have Photoshop or not, you’ve come to the right place. Below is some guide what help you learn about background removal.

How To Remove Background From Images

Using Photoshop Elements 12

Some of the tools using photoshop element 12 are background eraser tool, magnetic lasso, selection brush, and magnetic eraser tool.  You can use one of them to remove background from images. Firstly,  you will open the image in Photoshop, create a duplicate layer of the background to be on the safe side. After, you use the “Layers” panel to select the layer within which you wish to erase the background. Then select the Background Eraser Tool from the Toolbox and Tool Options Bar. You can use “Brush Settings” button in the Tool Options Bar to set your brush tip options as needed. In the Tool Options Bar, you can set the “Limits:” option to the preferred setting: “Discontiguous,” which erases the sampled color anywhere it appears within the brush, or “Contiguous,” which erases areas that contain the sampled color and are connected.

For the “Tolerance” setting in the Tool Options Bar, set a lower number to limit the erased color to only pixels similar to the selected ones, or a higher number to erase a broader range of similar colors. Once you have the settings on this tool set as needed, just click and drag in the image or layer to remove the background pixels.

Remove Background from Pictures using Corel Photo-Paint

Another photo editing software you can use to remove background from your product images is Corel Photo-Paint 9. You can use one of four tools of Corel Photo – Paint 9 for background removal, including: transparent color selection tool, path tool, channel mask,  scissors tool.

Transparent Color Selection Tool

It is similar to the background eraser tool found on Photoshop. This tool is very easy to use. The transparent color selection tool samples a color and replaces it with transparency anywhere it appears in your image. It differs from Photoshop’s background eraser in that you need only click once and the color is removed everywhere in the image. You do not need to click and drag with the tool, but you can click multiple times to remove several colors. When the transparent color selection tool is active, you can adjust the tool options from the property bar. In addition, you can use the transparent background image when you’re uploading product photos on to your online store. On the other hand, you can also replace the transparent background with another custom background of your choice.

Path Tool

Path Tool is Corel’s response to Photoshop’s pen tool. You can use this tool to manually trace the product’s outline to clip it out of the background.

Channel Mask

This background removal technique can be used with other methods for refined results. Before you use this technique to remove backgrounds from the picture, you should breakup the image into different color channels. You can easily do it using the split channels to RGB option available on the menu. The image is split into 3 color channels – red, blue and green. Use the channel that contains the highest details as the image mask to remove the background.

Scissors Tool

Like as the magnetic lasso tool on Photoshop, the scissors tool help you cut out the product image from the background. This technique will prove to be more effective, if the product photo has a regular outline. If you’re not very experienced in using either of the photo editing software, then you can rely on online background removal tools.

Combinations of these tools and techniques already offer users a wide range of easy, precise, and serviceable ways to remove backgrounds and isolate objects. You can use all upper tools to create perfect product photography. Now, let’s get started.

Check the tutorial video to have amazing experiences!

Thanks for watching!.