One of the most unexpected side effects of photography is noise, which gives your photos a low-quality appearance. It can damage an image’s sharpness and even make it hard to distinguish its original colors. Fortunately, there are many ways to remove digital noise in Photoshop. When removing noise from an image in Photoshop, you have to be careful. It is so that you can avoid applying too many effects that could distort the image or aggravate noise. Today, the Fotosolution team will show the reader how to reduce noise and make a picture clearer in Photoshop via Camera Raw.
What is the Noise?
Noise is an unwelcome interruption that sounds like a “hiss” in the background in audio signals such as music, podcasts, or transmissions. You don’t want to hear that at all. In the same way, noise in photography refers to visual distortions that appear as minute-colored specks, dots, or pixels in your image, giving the photos a grainy appearance. One of the main reasons for noise in photographs is a high ISO.
With each new generation of camera bodies, ISO performance gets better. You might be able to shoot at ISO 800, 1600, 2500, or even 5000 depending on your camera before you start to see the grain in your pictures. Even then, you may only see it after zooming into the photo. And not all noise is undesirable. If you want your image to look vintage, grain is fine. The majority of black and white photographs also look excellent with some grain. However, excessive digital noise detracts the viewer from the subject and gives the image a fuzzy, blurry appearance. There are a couple of different types of noise.

Type of Digital Noise
There are two types of digital noise: luminance and color noise.
Luminance Noise
The most typical sort of digital noise is luminance noise. In your image, this form of noise appears as sand grains. Some pixels appear brighter than others when you zoom in. Luminance noise affects the brightness of pixels, but it doesn’t harm their original colors.
Color Noise
Chrominance noise and chromatic aberration are other names for color noise. Color noise is what you see when isolated pixels stand out with a color like red or green.
To prevent this problem, you can take some steps, such as minimizing your ISO while taking pictures. When you aren’t given the option to do that, Photoshop will thankfully save the day.
How to Reduce Noise in Photoshop via Camera Raw
The Camera Raw Filter is one option to remove noise from your images. Now we will start
- Opening the desired image, duplicating it, and making it a smart object are the first steps in the editing process.
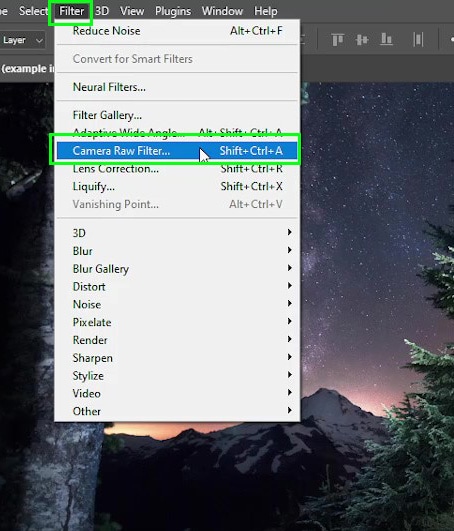
- Go up to Filter > Adobe Camera Raw filter.
- Set the zoom to 100%
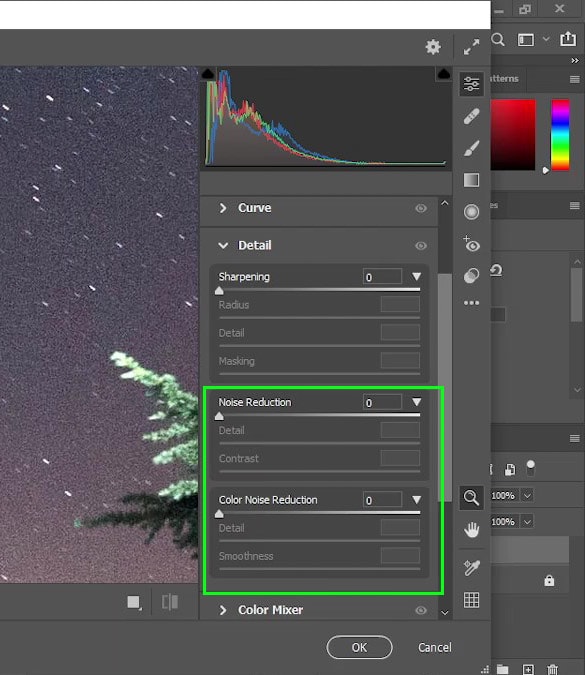
- Click ‘Detail’ on the right side of the panel.
- Move the ‘noise reduction slider to the right until you see the noise is gone. Don’t increase it too much because it might bring noise back. Moving the ‘contrast’ slider to the right brings the contrast back because losing contrast is another drawback of reducing noise.
- Move on to the color noise reduction section. The ‘color noise reduction’ slider allows you to reduce the color noise itself. The “detail slider” restores the features that are lost when the color noise is removed. On the other hand, the “smoothness” slider is an addition to the “color noise reduction” slider.
Using the noise tools in the Adobe Camera Raw filter to remove the noise from your image is easy in Camera Raw. With this tool, you can reduce luminance noise and color noise. If you need any help, please contact with Fotosolution team via: sales@fotosolution.com – Mrs. Sofia Giang. Our team will help you process and send the best quality images for you. Thank you so much!