Do you know how to shoot a beautiful product photography?. how do you feel about perfect product photography?. If you want to refer to reach to product photography, let’s discover this article: DIY guide to beautiful product photography.
A beautiful product photography may be worth a thousand words. It is sure to improve your customers’s shopping experience and increase your eCommerce sales. In fact, Showcasing your products with high-quality images will help you gain the best result for your business project. And a big part of having an attractive website these days also means having high-quality, beautiful product photography.
Before you give up on your product images, refer some guides to awesome product photography for your eCommerce store.
White Background

Background is one of important factors in an image and choosing suitable background is a deciding element to make beautiful photos. Moreover, the background is of fundamental importance in the composition of the image emphasizing the subject, improving the photography. If not adequate, it may cause irreparable damage to the image, making it chaotic.
For great photos, you need to create what’s known as beautiful and clear background. Simply, this is a white backdrop that sweeps from the vertical to the horizontal surface. Using white background, you don’t need to make any brightness and contrast adjustments. Because the sweep will reflect white light onto your product. Dark colors absorb light, so shooting against a dark backdrop will not give you a well-lit product image.
Or if you choose to remove the background, it’ll be a lot easier to do if the product is on a plain, white background. Let’s choose white background to make your product become more striking in photography.
Using Photography Equipment
Photography equipment is one of important and necessary parts to make beautiful product photography. The first equipment you are interested in that is camera. There are many kinds of cameras that help you shoot great photography, and DSLR camera is one of great choice for photographer.
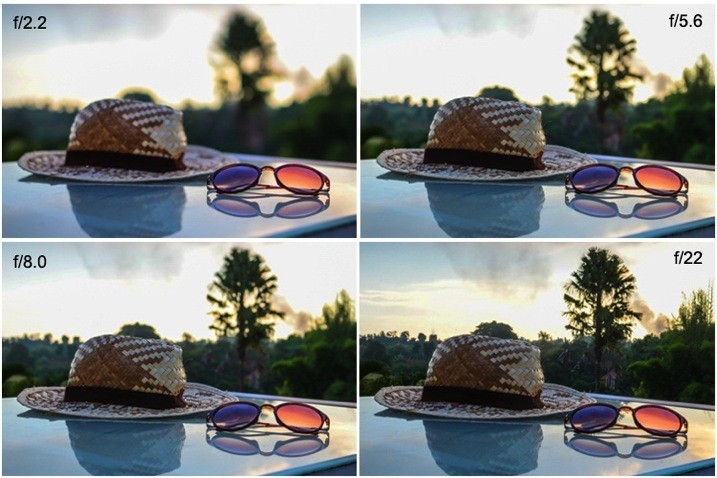
With DSLR camera, you can use the right aperture for the right shot. A wide aperture like F2.8 or F4.5 will narrow your depth of field, leaving parts of your product out of focus. A small aperture like F8 or F11 will give you a wider depth of field, keeping your entire product crisp and in focus.
In addition, keep in mind that don’t use a wide angle lens. You will distort your product. Besides, you can use other equipment such as: smartphone – is one of useful devices for your project.
You are interested in: “How To Take Camera Setting for Brilliant Product Images“.

Tripod
The quality of image can be affected by your tripod. Why are tripod?. When a camera has a slow shutter, you can’t hand hold it or the subject will be blurry. Tripod is mainly answer for you. When you take a photos, you’re going to set your camera to a very small aperture so that you can have the most depth of field your camera is capable of.
Thus,you’ll need to use a tripod to stabilize your camera and easily duplicate the same shot for each of your products.
Lighting
The key to amazing product images is your lighting. If you don’t have great lighting, you won’t have great photos. There are two kind of lighting that photographers use to capture beautiful photos: natural light and artificial light. When you use an artificial light source, these can affect directly your product’s color, while using natural lighting for product photos preserves the natural color of the product.

An useful advice for you: Say to turn of your camera’s in-built flash because if you are not a person who have the photography skills to manipulate the flash. You’re not going to get great results using it. So, what are the advantages of natural light and artificial light?.
As far as we know, artificial light is constantly available throughout the day and night. This allows you to skip planning your shoot around factors like the time of day and the weather has no effect on you. Based on the specific type of artificial light you select, you can even mimic sunlight or moonlight in your shots.
Natural lighting is easy and cheap. A set-up near a window is your best option, because you need to use the sun as an indirect light source. In general, morning light is bright and has less color, while afternoon and evening light often has a warm undertone. In addtion, it brings out greater contrast in your images. You can always neutralize the image and make it cooler in post-production if want a cool, dark image.
You are interested in: ” What do you choice: Natural Light v.s Artificial Light?”
Below are video that guide specific how to create a beautiful product photography.
Great Product Photos from Etsy on Vimeo.
Closely, it is easy to take your own products with 4 guides how to create a beautiful product photography. Let’s post an image of your setup and a final image so everyone can see what you did. If you have any questions or concerns, please do not hesitate to contact us today for a free consultation.
