Categories
Support Tips & Tricks

DIY Guide to Beautiful Product Photography

Do you know how to shoot a beautiful product photography?. how do you feel about perfect product photography?. If you want to refer to reach to product photography, let’s discover this article: DIY guide to beautiful product photography.
A beautiful product photography may be worth a thousand words. It is sure to improve your customers’s shopping experience and increase your eCommerce sales. In fact, Showcasing your products with high-quality images will help you gain the best result for your business project. And a big part of having an attractive website these days also means having high-quality, beautiful product photography.
Before you give up on your product images, refer some guides to awesome product photography for your eCommerce store.

White Background

fotosolution-diy-guide-to-beautiful-product-photography-01

Background is one of important factors in an image and choosing suitable background is a deciding element to make beautiful photos. Moreover, the background is of fundamental importance in the composition of the image emphasizing the subject, improving the photography. If not adequate, it may cause irreparable damage to the image, making it chaotic.

For great photos, you need to create what’s known as beautiful and clear background. Simply, this is a white backdrop that sweeps from the vertical to the horizontal surface. Using white background, you don’t need to make any brightness and contrast adjustments. Because the sweep will reflect white light onto your product. Dark colors absorb light, so shooting against a dark backdrop will not give you a well-lit product image.

Or if you choose to remove the background, it’ll be a lot easier to do if the product is on a plain, white background. Let’s choose white background to make your product become more striking in photography.

Using Photography Equipment

Photography equipment is one of important and necessary parts to make beautiful product photography. The first equipment you are interested in that is camera. There are many kinds of cameras that help you shoot great photography, and DSLR camera is one of great choice for photographer.

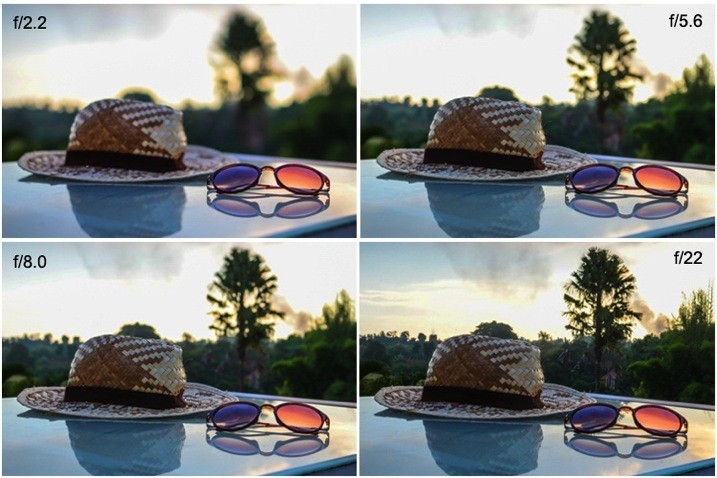
With DSLR camera, you can use the right aperture for the right shot. A wide aperture like F2.8 or F4.5 will narrow your depth of field, leaving parts of your product out of focus. A small aperture like F8 or F11 will give you a wider depth of field, keeping your entire product crisp and in focus.

In addition, keep in mind that don’t use a wide angle lens. You will distort your product. Besides, you can use other equipment such as: smartphone – is one of useful devices for your project.
You are interested in: “How To Take Camera Setting for Brilliant Product Images“.

fotosolution-diy-guide-to-beautiful-product-photography-03

Tripod

The quality of image can be affected by your tripod. Why are tripod?. When a camera has a slow shutter, you can’t hand hold it or the subject will be blurry. Tripod is mainly answer for you. When you take a photos, you’re going to set your camera to a very small aperture so that you can have the most depth of field your camera is capable of.

Thus,you’ll need to use a tripod to stabilize your camera and easily duplicate the same shot for each of your products.

Lighting

The key to amazing product images is your lighting. If you don’t have great lighting, you won’t have great photos. There are two kind of lighting that photographers use to capture beautiful photos: natural light and artificial light. When you use an artificial light source, these can affect directly your product’s color, while using natural lighting for product photos preserves the natural color of the product.

fotosolution-diy-guide-to-beautiful-product-photography-02
An useful advice for you: Say to turn of your camera’s in-built flash because if you are not a person who have the photography skills to manipulate the flash. You’re not going to get great results using it. So, what are the advantages of natural light and artificial light?.

As far as we know, artificial light is constantly available throughout the day and night. This allows  you to skip planning your shoot around factors like the time of day and the weather has no effect on you. Based on the specific type of artificial light you select, you can even mimic sunlight or moonlight in your shots.

Natural lighting is easy and cheap. A set-up near a window is your best option, because you need to use the sun as an indirect light source. In general, morning light is bright and has less color, while afternoon and evening light often has a warm undertone. In addtion, it brings out greater contrast in your images. You can always neutralize the image and make it cooler in post-production if want a cool, dark image.

You are interested in: ” What do you choice: Natural Light v.s Artificial Light?
Below are video that guide specific how to create a beautiful product photography.

Great Product Photos from Etsy on Vimeo.

Closely, it is easy to take your own products with 4 guides how to create a beautiful product photography. Let’s post an image of your setup and a final image so everyone can see what you did. If you have any questions or concerns, please do not hesitate to contact us today for a free consultation.

Categories
Tips & Tricks

Tips To Create Perfect Apparel Product Photography

What do you do when you go to shopping or purchase product? Look at the outfit’s colour, feel its fabric, checkout its prints and styles and then try out if it fits you? But if your customers visit your online store, they will not be able to do all this, so what will they do before buying your product. The first important factors what your customers will attract is product image or apparel product photography. High quality product photography is essential for apparel ecommerce. For many customers, your product images will determine whether or not they buy your product?.

One effective technique is by posting attractive apparel photographs on your online store. From product photography of the apparel to removing the background from the apparel photograph, there are loads of things you should do to enhance your quality product photograph.

You can shoot photographs flat or drape them over a mannequin to give a 3D effect. Many online apparel stores display their outfits flat. While this look is great for tees, baby outfits and lingerie, this technique may not be very effective when you’re displaying dresses or gowns. That’s reason why your products should look their absolute best in your images. It’s an unfortunate fact of life that clothing can become wrinkled, creased, and begin to look worn from storage and transport. Clothing samples face a particularly rough time of it, as they often cover a lot of miles and may not have been perfectly constructed to begin with. Besides, you can always use post processing techniques to remove the creases and the other elements, for best results remove those annoying creases even before you photograph the clothing product.

Choose accordant garment to be photographed. It is a crucial starting point for photographing apparel, yet many photographers skip this step and rely on Photoshop to fix wrinkles, stains, and other visible defects. Don’t do that. Photoshop isn’t magic: it takes time and expertise to master advanced editing techniques, and excessive editing risks compromising image quality.

Try to capture your garment in a state as close to perfect as possible and use Photoshop only to add final touches and color correction. Avoid harsh backlighting and other setups that cast shadows on the surface of the object. Keep the lights on the same side of the object as your camera, or slightly off to one side. In addion, during photograph accordant garment, we should pay attention to the light conditions. Flash or bright light can create a glare on the product, and the original colour of the apparel will not be clearly visible. Use soft boxes and umbrellas to diffuse light and soften it. Set the umbrella at around 45 degrees, so the light falls on the shoulder and spreads down the model enhancing the aspects of the apparel.

fotosolution-Tips-To-Create-Perfect-Apparel-Product-Photography-03


Now that you’ve got the outfit ready and the lighting setup, check out the background. Ensure the background is plain and clear, so your outfit is clearly displayed. In our opinion, you should use a white background, which is a recommended practice and even required by some marketplaces. You can take it a step further and completely eliminate possible distractions by removing the background. Removing the background will allow you more flexibility in web design and modestly decrease file size.

Preferably use a wide angle lens, which will allow you to cover more space. Set the camera high using a tripod for best results. The stability will eliminate camera shake and ensure your shots are consistent, while also freeing you to use your hands on other tasks. You don’t need to spend a lot of money on a tripod, but it’s essential that you use one. Morever, you should shoot the outfit from multiple angles, so you can show different views of the product on the webpage. Alternatively, while post processing, these multiple views can be stitched together to create a 360 degree view, an option that most online stores are going for now. Customers will be able to trust their impressions of the product if it’s backed up in multiple photographs from multiple angles.

After you’ve shot as many pictures of the clothing product you want, it’s time to place it under the editing scanner.This photo editing tool offers plenty of options to edit photographs before you post them online.

Color is an essential feature of post processing. careful attention to white balance, some colors—like neons, reds, and pinks—are difficult to photograph correctly in camera and often need to be tweaked in Photoshop. Let’s ensure that the colors of your garments are accurate. The bottom line is that you want the customer to see exactly what they will receive in the mail should they order your product. There are a number of ways to tweak colors, so get to know Photoshop’s offerings and choose your favorite tool. After you have fixed the colors, make sure to convert your images into SRGB format to make sure that different browsers, computer screens, and websites won’t change the accurate colors that you worked so hard to create for your customers.

Images have to be resized before they’re posted on the website. You can blow up the picture or reduce its size to create a thumbnail image. If you’re preparing a product catalog, then all the images should be cropped to the same size. Each ecommerce site has its own clothing optimal image size. If you’re planning to showcase your apparels on these marketplaces, then you should ensure that the apparel product image meets those specifications.

Mannequin or invisible man effect is another technique that a lot of online stores are using to display apparel. When you photograph clothing, you can use a mannequin or choose  a model who wear accordant product and help your product become more prominent.

Good apparel photographs will give your online store customer a great feel of the apparel, so they will be convinced of the quality and apparel style. Attract more customers to your online outlet with effective apparel photography and image editing. These some simple guide will get you well on your way to creating professional and consistent images that really make an impression with prospective customers. Hope that they will be useful for you.

Thanks for watching!.