Categories
Support Using Guide

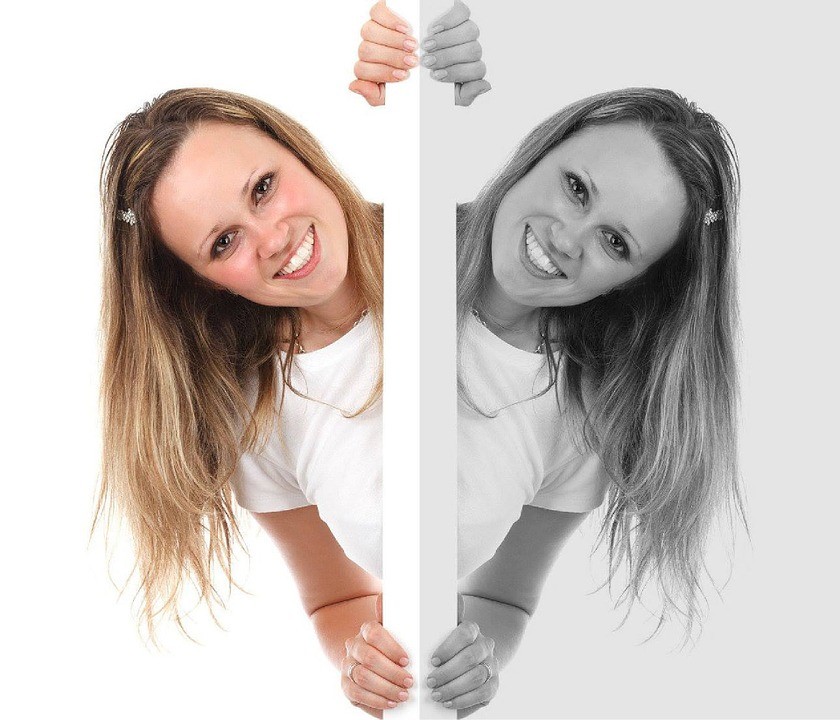
How to create A Mirror Image Effect

Learn how to easily create a mirror image effect with Photoshop, turning one side of the image into a mirror reflection of the other!. Photoshop is one of useful tools to support image editing for photographer, designer and web company. It provides users with an easy-to-use, creative platform for adding effects and re-touching images.

fotosolution-How-to-create-A-Mirror-Image-Effect-01

And today, in this tutorial, we will show how to create a mirror image effect in Adobe Photoshop. This version of our Mirror Image Effect tutorial has been fully updated for both Photoshop CS5 and Photoshop CC (Creative Cloud).  Besides, if you’re using an earlier version of Photoshop, you can still follow along with this version.

Creating a mirror image effect is not difficult if you are familiar with Adobe Photoshop. Before having a concrete tutorial, we will show you some basic steps including:

  • Open the image that you want to give a mirror image effect in Photoshop.
  • Duplicate your original image layer.
  • Drag the duplication of your original image next to the orginal image.
  • Select the duplication and click Edit, go to Transform and click Flip Horizontally.
  • Your image now has a mirror image effect.

Now, let’s get started to own a mirror image effect through tutorial video below.

Based on: Blue Lightning TV

Categories
Support Tips & Tricks

How to make best selections tool in Photoshop

Let’s express your ability – simple cut-outs and masking task in Photoshop through three basic techniques below. As far as we know, basic cut-outs and masking task are your essential ability for designers. And you can everything more esier with three techniques what we share. In this post, I’ll run through three basic techniques for creating simple selections. Next to, you cover the layer mask options and how they work a little more in depth.

Here are: magic wand, pen tool and path selections, colour range tool and layer masks for creating simple selections tool in Photoshop.

Magic Wand

The Magic Wand is considered as key golden and the simplest way to make simple selections tool in Photoshop.  Using the Magic Wand Tool allows you choose areas of similar color. The region to be selected may be a single continuous shape or multiple separate areas.

fotosolution-How-to-make-best-selections-in-Photoshop-01

You can adjust to the Wand tool and then up the tolerance to 30 and click on the white area to make your selection. Now choose “ Shift+cmd+I” to invert the selection and click the ‘Add layer mask‘ button at the bottom of the Layers panel to mask off the product from the background.

P/s: Magic Wand choose pixel through colour and rhythm.

Pen tool and path selections

When you zoom into the bottom of your selected image, you can see the shadows have not been masked off from the background. Talking about more precise selections, Pen tool is surely a great choice for your project.

fotosolution-How-to-make-best-selections-in-Photoshop-02

First, let’s open by selecting the Pen tool and begin clicking it, holding and dragging to create paths and curves until you feel pleasure. Then, you click on the original point to close the path. And then, you can navigate to the Paths panel, “cmd+click” the path you’ve just created and a selection will be made.

Colour range tool and layer masks

The Colour Range tool is particularly best for selecting large areas that containing a similar tonal range. It’s is simple to navigate to the select menu and click to launch the Colour Range panel. Now grips  your image and you’ll notice an eyedropper appears. Choosing on the area you want to make a selection of the image within the panel will change.

Using the Colour Range tool allows you choose how you want to sample the colour on your subject. Then let’s click on the “Select list” and try one of the colour options.

There’s the option to increase the intensity of the selection using the ‘fuzziness’ slider. You can set range to 20% and Fuzziness to 100 to begin. There are also a number of standard options to choose from the drop-down menu, such as mid-tones, highlights, shadows and skin tones.

With a selection of just the colour, adjustment layers such as Hue and Saturation can be added via the Layers palette. Notice how the adjustment layer uses the selection for its mask, meaning that you can change hue of this colour only for a creative effect.

Here are three techniques that help you create and make simple selections tool in Photoshop. Do you have other techniques to make quick selections?. If you have other questions or know other tips, let’s share your experiences in the comment below.

Categories
Support Tips & Tricks

Tips to Improve Portrait Photography

Portrait photography is one of the most amazing topic that many readers are interested in. If you are new photographer, learning how to professionally capture portrait photography is one of the most important skills you can develop.

Do you know how to improve portrait photography?. Here are a few of Tips to capture best portrait photography.

Lighting is golden key

Lighting is one of best factors to describe and embellish faultless portrait photos. And the best light to shoot portrait is Rembrandt lighting. Rembrandt lighting use to capture photos in studio to increase the brightness of subject, especially it help you create holograms.This technique will create clear triangles on subject’s cheek. Keep in mind that let’s buid a 45-degree angle to straight line that link between cameras and subject.

fotosolution-Tips-to-Improve-Portrait-Photography-01

It’s that shoot portrait photography in studio, so if you take the portrait in natural light, how about that?. Shooting outdoor portrait photography, you have the best chance of getting a great look with the natural colors and skin tones. However, shooting outdoors may be tricky, because it’s difficult to control the light in most situations. Make sure that you don’t pose the subject right in front of the sun. This may cause unwanted brightness or deep shadow. Shooting in mid-day also should be avoided as much as possible. For best results, position the subject in such a way that sunlight falls on the face from the side. You may also use reflectors or an external flash to light up some parts of the face.

Building comfortable space

Background plays a vital role to a portrait. As you know, portrait is all about someone’s face. So it is important to have a background which is not interfering with the subject.

fotosolution-Tips-to-Improve-Portrait-Photography-02

Let’s build a comfortable space for taking portrait photography. You can use a long lens with long focal distance ( about 75mm) to create comfortable feeling for subject.

Focus aperture

A wide open aperture with a lower number will blur the background and make the subject stand out. A smaller aperture with a higher number will make the whole scene come into better focus. Typically f/2.0 to f/5.0 is good for portraits.

Get high or get low

Taking a portrait is not always shooting at the eye level. Positioning the camera high or low while keeping the focus on the eyes brings out interesting features and adds different flavors to the portraits. So make the model sit, stand up, climb up to the stool or ladder or stairs and shoot.

fotosolution-Tips-to-Improve-Portrait-Photography-03

Adjust Head and shoulder

As shooting subject, you need to attend head and shoulder of subject. Let’s tilt your head from time to time to limite to just our of chin and forehead.

Angle and Pose

Pose and the angle of the body and face play a key role. Looking straight at the camera with motionless expression can be boring. Try to flare up your portraits with some twist. Maybe it is an inviting smile, a sexy expression, a flamboyant look, tilting the chin down or up, turning the head back while walking forward, or sitting and looking up.

fotosolution-Tips-to-Improve-Portrait-Photography-04

Editing photos before posting

Let’s check out and remove unwanted detail after shooting portrait photography. Therefore, you should take time to edit photos through some digital software such as:  Photoshop and Lightroom to have best portrait photography.

Do you have other tips to improve portrait photography?. If you have other questions or know other tips, let’s share your experiences in the comment below or contact us: sales@admin.admin.admin.admin.admin.admin.fotosolution.com to get more information.

Categories
Support Tips & Tricks

10 Best Photoshop Resouces

Are you interested in Photoshop resources?. Do you want to improve Photoshop as well as your image editing skill?.

As far as we know, Photo editing software Photoshop is great part of choice for many designer and artists. Photoshop can be used for almost every little task that involves graphic design and your web design company, regardless of who it is, uses it for at least some of their processes. There are many Photoshop resources that help you refer and grips with the image editing software.

Adobe

Adobe is a great tool of choice for many designer especially for beginner. It provide many tutorials and excellent videos for beginner. It will help you learn basic lesson related to image editing software.

fotosolution-10-Best-Photoshop-Resouces-01

Pixel2Life

Pixel2Liffe is a giant tutorial search engine on the internet, which is intended for graphic designers and programmers. It has an immense choice on Photoshop training with literally hundred of tutorials to choose from. The site also features a really useful sidebar of sub-categories. It will support you to look for lessons in the effects you want to wind up.

fotosolution-10-Best-Photoshop-Resouces-02

PhLearn

PhLearn is an amazing and free online Photoshop resource. It provides various high quality photography and Photoshop instruction. One of impressive thing as use PhLearn is some image and joke that come on the screen. The special thing will help keep the viewer’s attention. Do great informative and flexible entertaining attract you?.

fotosolution-10-Best-Photoshop-Resouces-03

Envatotuts+

Envatotuts+is a useful blog that offers some of the best Photoshop tutorials. The site has a large collection of tutorials covering many different areas, including 3D, illustration and text effects to name but a few.

fotosolution-10-Best-Photoshop-Resouces-12

Photoshop tutorials on DeviantArt

There’s a excellent range of Photoshop tutorials on online art community DeviantArt. They are seven different categories, including a beginner and web design company. It’s considered as special thing that help you find the specific tutorials you’re interested in. This Photoshop resource provide not only useful and interesting lessons for beginner but also tutorial system that you can submit. Let’s check the site for terms and conditions.

fotosolution-10-Best-Photoshop-Resouces-05

Photoshop Roadmap

Photoshop Roadmap is also flexible site what shares tutorials on Photoshop, as well as Photoshop brushes and plugins. These Photoshop tutorials are attached to categories like Animation and Interactivity and Photo retouching.

fotosolution-10-Best-Photoshop-Resouces-06

PSD Vault

PSD Vault is a greate Photoshop tutorial site – best suggestion for designer and web design company. It focus on writing about things such as designing a floating Eiffel Tower in Photoshop and creating a vintage car poster. They also regularly give away design-related freebies.

fotosolution-10-Best-Photoshop-Resouces-07

Photoshop Essentials

If you’re a newbie who familiar with Photoshop lessons especially Photoshop Essentials, which has easy to follow, step-by-step style training. It offers lessons on everything related to Photoshop from basics to intermediate including photo editing and retouching, text effects and more. The site is clean, innovative and easy to use. It also has helpful sidebars highlighting the latest and most popular tutorials.

fotosolution-10-Best-Photoshop-Resouces-08

Pluralsight

Pluralsight has an immense range of tutorials that help you learn, master and discover the creative lessons of Photoshop. To register Pluralsight site that you need to access the majority of the training. However you can also sign up for a free demo account, where you’ll find a list of free Photoshop tutorials at your choice.

fotosolution-10-Best-Photoshop-Resouces-09

Tutorial9

Tutorial9 is an amazing resource for Photoshop tutorials, all of which are entirely free. It contains 30 pages of training available so you are easy to look for something of interest. There is also a search option. You can filter your options to find the newest tutorials submitted by either Tutorial9 itself or submitted by other users.

fotosolution-10-Best-Photoshop-Resouces-11
Do you have other Photoshop resource that could improve and enhance your image editing skill?. If you have questions or know other best Photoshop resource, let’s share your experiences in the comment below.

Categories
Support Tips & Tricks

How to use Patch Tool in Photoshop

If you are photographer, designer who always use Photoshop technique to create best photos, certainly, you don’t feel of unfamiliarity with Patch tool. Patch tool is one of the best tools Photoshop has to offer. It is popular and nice tool, so, why should you use and choose Patch tool in Photoshop.

This tool is easy to use and with each version of Photoshop, it has gotten ever better. As far as we know, Patch tool is part of the headling brush set of tools. The Patch tool is used to repair larger area of an image or get rid of any distractions and blemishes. In addition, you can also use it to duplicate parts of your photos. Using the Patch tool, you can save your time when trying to make some adjustment to your image.

The Patch Tool was introduced into Photoshop at the same time as the Healing Brush. Like that Healing Brush, it matches the texture, lighting and shading of the sampled pixel to the source area. But instead of brushing like Healing Brush, it is used to choose defined areas. Therefore, the Path Tool will help you create a photos more natural than the other tools.

In today’s subject, we will show you:

How to use an amazing Patch Tool in Photoshop.

  • Step 1: Choose your image what you need to the aim of Patch Tool: Open-> Image File.
  • Step 2: Select The Patch Tool and draw an area around your selection. After dragging mouse over to better skin and let’s go.
  • Step 3: Move the cursor over the selected area and drag it to the left, right or in any direction. If you don’t feel happy with your previous done step, you can use Ctrl+Z or use Layer Mask to hidden them.
  • Step 4: Reduce circles under eyes

Having shadows round one’s eyes is one of basic disadvantages that have directly affected to the result of images.  To fix this issue, you can choose area – the circles under eyes and replace it with beautiful skin area.

However, you should use Fade patch tool to increase the effect of image, this will make your photos more natural and more truly.

Click Edit-> Fade patch selection. This window will pop up and move the slider to fade the patch selection. Let’s press Ok when you research your desired result.

  • Step 5: Keep your eyes bright

After removing the circles under eyes, you can keep your eyes bright to make your photos more stunning. First, let’s create a new layer and add Layer Mask. Then, choosing Dodge tool and make sure your exposure that is set between 30-35%. Then, take a large brush and sweep over the eyes just, including the brow area. In other words, if you want to duplicate your layer, it’s simply that add a layer mask in case you want to tweak your dodging.

In the case, the part of eyes or eyebrow are too bright, you can adjust them by using Layer opacity or Layer mask to balance.

  • Step 6: Check out and layer transplant

You should check out your images after finishing. If you want to add the other details for image, you can create back-up layer by click History->Layer Palette and create a new snapshot for your images. After, you can join layer in the effective way.

You are interested in: Fotosolution.com/How to use the Patch Tool in Photoshop

How to Use the Patch Tool in Photoshop – Video Tutorial from Yanik Chauvin on Vimeo.

Finally, The Patch tool is one of the perfect tool in Photoshop. It support your digital image in the most amazing way.  We hope you found this article useful. Do you use the Patch Tool in Photoshop?. Please let me know in the comments below.

Categories
Support Tips & Tricks

What is Adobe Photoshop Lightroom?

Have you ever heard about Adobe Photoshop Lightroom?. As far as we know, product photography begins under the cameras but it only finished after post – processing step. And Adobe Photoshop Lightroom is a gold key for your product photography.

fotosolution-What-is-Adobe-Photoshop-Lightroom-01

Adobe Lightroom is the DIY or budget-conscious product photographer’s best friend. It can be used to both streamline your workflow during the shoot, and to quickly edit images in bulk afterwards. In addition, Photoshop Lightroom helps you import, organize, management and find your images. Especially, it is photo management and photo editing, combined into a single tool.

In fact, Adobe Lightroom retains your original images and keeps a record of your edits, then applies them when you export your images. You can come back minutes, hours, days, months, or years later and reverse the edits.

When should you use lightroom?

First, you take photo a raw photos and import your photo in Adobe Lightroom. Keep in mind that adobe lightroom is a raw file editor so you don’t need Adobe Camera Raw.

Using Adobe Photoshop Lightroom will a perfect choice that help you carry out basic photo editing. Lightroom’s task is that cropping, white balance, exposure, histogram adjustments, tonal curves, black and white conversion, spot removal, red eye corrections, gradients, local adjustments, sharpening, noise reduction, lens profile corrections, vibrance, and saturation.

fotosolution-What-is-Adobe-Photoshop-Lightroom-02

If you’re a beginning photographer, you’ll most likely be satisfied with these features. Because it is also much easier to use than Photoshop.

In fact, Photoshop and Lightroom are great software packages that have the ability to bring out your post processing creativity. Especially, as you are getting started with photography, Lightroom is the best way to begin.

Do you prefer using Photoshop or Adobe Lightroom?. Here are some interesting sharing about Lightroom that help reader have best look. Finally, just choose the right tool for your photographic needs on a project.

If you have any opinions as well as any questions concerned about this subject, let me know your though in the comment below.

Categories
Support Tips & Tricks

Mistakes Photographer Make That They Should Avoid

Photoshop is one of an essential tool that photographer use to highlight and turn into perfect artwork. We have all been there. We have discovered some new tool and technique. Using Photoshop can help your image become amazing image, we are doing it to everyone, but we’re really doing ourselves more harm than good. Also, we need to use Photoshop in the most effective way and avoid the mistakes especially photographers.

In this tutorial, you’ll learn common mistakes photographer make and why you should avoid it.

Creating to Many Layers

Creating to many layers will one of reasons that obstructed the success of your artwork. Too layers make you no focus on main layer, this will create big limitation for your plan. In some cases, getting more granular about your editing can be useful, but more often than not the sign of an amateur who doesn’t know how to properly use adjustment layers and Smart Objects. Approving the first mistake, you should learn to group them or how to use Smart Object organise.

fotosolution-Mistakes-Photographer-Make-That-They-Should-Avoid-01

Not Using Smart Object

Smart Object is a perfect tool that support your image to become more stunning. For example, with Smart Object, you can perform nondestructive transforms. You can scan, rotate, skew, distort,….or warp layer without losing original image data. Or when you covert a new layer to Smart Object, you can easily replace it content. Also, if you don’t know the benefit of Smart Object and take advantage of them, it is big mistakes for you. You need to understand that Smart Object is one of Photoshop’s most powerful and valuables features.

fotosolution-Mistakes-Photographer-Make-That-They-Should-Avoid-02

Using the Wrong Document Setting

When it comes to resolution, pixel dimensions matter… DPI does not. DPI will only affect your printed image. Also, if you are planning to print, stop converting your image to CMYK before printing. Your printer probably has it’s own custom color profile that will produce more accurate results than Photoshop conversion. In other words, DPI doesn’t make a difference if you don’t print it, don’t convert CMYK. Let’s your printer it.

Unnecessary Luminosity Masking

Light is an important element to highlight your image. Light helps to create a particular mood within the photograph and can bring emphasis to key elements within a frame. In addition, light can help create depth and textures in an image by creating a mix of highlights and shadows.

fotosolution-Mistakes-Photographer-Make-That-They-Should-Avoid-03

If the ability to affect Shadows, Highlights, and Midtones individually is built into a tool, use luminosity masking is great choice. Many of Photoshop’s filters and effects will let you specifically target highlights, shadows or midtones anyway.If you forget to use luminosity masking for your project, let’s stop wasting time and use the build-in masks.

Overprocessing

The need of HDR is in the growing use of panoramic images. An HDR panorama will provide more immersive detail, providing detail observable to the human eye in the real-life scene that would otherwise be lost by traditional photography.

So, let’s stop with the plastic frequency separation, overcooked HDR and ridiculous vibrance levels. No matter how advanced a Photoshop user, are immune to making post-processing mistakes.

Here are some sharing information about mistakes Photographer make that they should avoid. What mistakes have you made with Photoshop that you’ve ended up regretting?. Let’s us know and show show off some of your own failures in the comment.

If you have any opinions as well as any questions concerned about this subject, let me know your though in the comment below.

Categories
Support Tips & Tricks

How to make HDR images in Photoshop

Creating HDR images is typically contained a quite time-consuming workflow that consist merging, tone – mapping and post processing, possible spanning several different software program. To generate HDR images as you would expect, smoothyly and professionally, Photoshop will brilliant tool that help you make great HDR images.

Below we show how to make HDR images files from your bracketed images in Photoshop. Hope that you will find it interesting.

fotosolution-How-to-make-HDR-images-in-Photoshop-01

Step 1 : Launching Photoshop and opening bracketed photos

Using the data images for creating HDR images, one of the useful images sources are that from bracketed photos. Therefore, you have the option of opening bracketed images or select automatically all open merges to merge into HDR images instead of navigating and selecting them yourself. Two of ways will help you save much time.

Step 2: Choosing file images to realize HDR images

Choose File -> Automate-> Merge to HDR pro are three basic manipulation as make HDR images. After completing three options, you will see the appearance of the Merge to HRD pro dialog box. Let’s use this dialog box to add your source images.

fotosolution-How-to-make-HDR-images-in-Photoshop-02

Step 3: Choosing source images

As you opened the images and saw the Merge to HDR pro dialog box, you press “ Add open files” button. In case, the image doesn’t choose, click File-> Automate-> Merge to HDR pro and Merge to HDR pro dialog box shown, let’s click “browse” -> File images-> press choosen images. In other words, as you press “ Browse”, navigate to the folder that include the bracketed photos and select them.

fotosolution-How-to-make-HDR-images-in-Photoshop-03

Step 4: Select the Attempt to automatically align source image

After finishing the choice of images from bracketed photos, the next step you can realize are that click “ Attempt to automatically align source image”. This option help you align details in images and is especially useful for hand-held brackets. However, in case, you take the pictures using a tripod, you might not need to align the source of image.

Step 5: Click “ OK” to continue

Photoshop merges the files into an HDR images. After pressing “OK”, the Manually Set EV will be displayed in Photoshop. This Manually Set Ev box will allow you adjust and check the exposure value of images. Enter the correct camera parameters in the Exposure Time, f-Stop and ISO or choose EV and enter the exposure value in the EV box, then click OK.

When finished, the Merge to HDR dialog box will appear with a new form and you can see some of parameter in the right screen.

Step 6: Select the images and custom

Let’s select image you want to remove from the preview from the under image and select them again to add them back.  This allows you to change the balance of the HDR file toward under- or overexposure. You can see some of parameter under big image through “-“ or “+”. You can custome this size of image you want.

Step 7: Choose approriate Bit/Channel from the Bit Depth drop-down list

To hold up the most flexibility, you should choose approriate bit/channe. This allow you to save the resulting HDR file. If you set it with 16 Bit/Channel or 8 Bit/Channel and click OK, Photoshop automatically starts the HDR conversion process and reduces the bit depth of the image. We recommend you that you should use 32 bit/channel, it will help you retain the bit depth of image. If you don’t need to save the HDR file, selecting the bit depth saves time.

fotosolution-How-to-make-HDR-images-in-Photoshop-04

Step 8 Drag the set white point review to alter the image’s exposure

After choosing 32 bit/channel from the bit depth drop-down list, you will see “set white point review” part. This part will allow you review and finalize image’s exposure during HDR conversion.

Step 9: Click Ok and save file HRD images

Click “Ok” to complete HDR image. Choose file and save images are the last mission for your project. Note that Photoshop support many different HDR file types, including the standard Radiance and OpenEXR formats.

Finally, we can affirm that Photoshop are invaluable support tool for your images project. Today, some steps help you create great HDR images. Let’s start now and own HDR images file yourself. If  you have questions or concerns, please do not hesitate to contact us today for a free consultation. Interested in hear your thoughts in the comment below.

Categories
Support Tips & Tricks

How to Set Up Smart Object in Photoshop

Smart object is one of essential tools that always use to create Mock-up product and edit image for photographers. It is considers as a work that is indispensable in the process of their working. However, we do not always feel happy about this work or even, sometimes we have all felt the frustration of editing an image with many problems like either in Light-room or Adobe Camera Raw (ACR), only to remember that we forgot to adjust the white balance, or tweak the sharpening after we’ve spent hours of editing the image in Photoshop. So, today, we will bring to readers some basic tips: how to set up smart object in Photoshop, it help you improve these difficulties in your work.

With the recent introduction of Linked Smart Objects in Photoshop CC, Smart Objects have become much more powerful, and useful. This give you greater flexibility in your editing workflow inside Photoshop. In addition, the big reason for converting to smart objects is that you’re able to retain the original size of the image. If you don’t convert to a smart object, pixels will be lost when scaling up and down. Using or set up Smart objects is not too difficult because simply, you can create a Smart Object when opening your image from Lightroom or ACR into Photoshop, and you can also create Smart Objects later on in your editing process, which can be very helpful – especially when you are applying a sharpening or other filter. Below are some basic tips help you know how to create Smart object in Photoshop.

Smart Objects can be created in a number of ways, and typically, the type of Smart Object you create depends heavily on how and where you create them. Normally, the easiest way to create a smart object, right click on the layer and select “Convert to Smart Object.”

How to set up Smart Objects_admin.admin.admin.admin.admin.admin.fotosolution.com

Creating Smart Objects in Lightroom

Adobe Photoshop Light-room (Lr or LR) is a photo processor and image organizer developed by Adobe Systems for Windows. It allows viewing, organizing and retouching large numbers of digital images. Light-room’s edits are non-destructive. So, how to create Smart Objects in Light-room?.

First, let’s open Light-room and choose an image that you want to edit. Then, you go to the top menu and click: Photo > Edit In > Open as Smart Object in Photoshop…or you also click on the image you want to open in Photoshop. Then select Edit In > Open as Smart Object in Photoshop…

Linked Objects

Linked objects can be extremely useful tool for when you need to reference and update multiple documents at once. If a change is made on the original document, it will be applied to all of the linked documents when saved. All you have to do is go to File – Place Linked. Choose the file you’d like to use, and hit place. And the results is that your original image’s changes will appear on all of the linked files. That’s simple and helpful for your work.

A few notes with Smart objects

Creating a Smart Object in Photoshop, you have to open the image in Photoshop as a Smart Object, this will hep you have the same editing abilities in Photoshop.

If you have made adjustment layers with masks applied to them, we would suggest that you do not crop the image through the Smart Object. We think that you should crop all images before opening in Photoshop, or after you are finished in Photoshop.

Check out this video guide related subject: How to setup Smart Objects in Photoshop!

Smart Objects is one of the tool that is easy to make, and offer a massive amount of flexibility. If you are a person who always use Smart objects or need to Smart objects for your work, welcome to visit our site. This page will help you more understand about Smart Objects as well as it is useful lesson to improve and apply for your effective work. Or, if you have other way to create Smart Objects in Photoshop, let’s share with us in the comment below.

Thanks for watching!.

Categories
Support Tips & Tricks

How to make Beauty Retouching Photoshop Tutorials

Beauty retouching is one of the most popular application  areas in which Adobe Photoshop that contribute to make beautiful images. The basic problem with most of the Photoshop techniques we’ve experimented with over the years (burning & dodging individual pores, Surface Blur filter, Dust and Scratches filter, etc.) is they waste times but the effect of images is not good like they expected.

In this article we are going to show you a beauty retouching techniques we regularly use that results in beautiful, smooth skin that still looks totally real. Beauty-retouching is a quite deceptive art. This will help your image become more stunning but no less real photos.

Let’s challenge yourself with beauty retouching application now and below are How to make beauty retouching Photoshop tutorials attached video tutorials.

Beauty Retouch

Beauty Retouch from Lindsay Adler on Vimeo.

  • Step 1: Choose one favourite photos that make beauty retouching. You should use a high – quality image and especially a close up face photography.
  • Step 2: First, we can begin with the basic skin retouch by using Spot Healing and Patch tool. The first step is that click double Ctr+J and give the name for two new layer with name “ Blur” and “ Texture”.
  • Step 3: Starting with “Blur” layer by choosing Filter-> Blur-> Gaussian blur and choose approriate number for Radius. Next, press “ Texture” layer and choose Filter->Other-> High Pass and click “ Ok”.  Then pressing “ Normal” and click “ Liner Light” that is one of important elements for beautiful images. We’re now set to smooth tones in the skin and start removing blemishes.
  • Step 4: Press “ Image” -> Apply Image, this box will be appeared including necessary information. Choosing Layer “Blur”,  Blending “ Subtract”, Scare “ 2” and Offset “158”, then click “ Ok”.
  • Step 5: Smoothing Skin for image by using Lasso Tool to delineate the points on the skin to edit. You can use Zoom tool to avoid omission of limited points.
  • Step 6: Now is time for final skin color. Edit and improve the colors on your image as much as you can with curves and hue/saturation corrections tools.

This tutorial is all about beauty retouching and how to use adjustment layers, lighting, dodging and burning, and frequency separation to create stunning skin tones and textures for a true beauty photography retouch. We hope that this article will a great lesson for your Photoshop learning. Let’s post an image of your setup and a final image so everyone can see what you did. We would be really grateful if you upload and share your photos in comment below.