Categories
Support Tips & Tricks

Mock-Up Technique and Basic Things You Should Know

Mock-up technique and use Mock-up for photographers, designer as well as business become popular methods. Today, we will show mock-ups technique again and basic things of its you should know. Hopefully, this article will bring to reader a clear and deeper look about using mock-up.

As far as we know, mock-up is a scale or full-size model of a design or device. Especially, it is used for teaching, demonstration, design evaluation, promotion, and other purposes.

Software UI mock-up allow users to range from very simple hand drawn screen layouts, through realistic bitmaps, to semi functional user interfaces developed in a software development tool. Normally, we always use this technique to create devices mock – up and items mock-up. Using mock-up technique is a great opportunity to present your product. In other words, you can present your brand, badge or logo design as well as features of your product in a photo-realistic way.

A successful and selling product on the market requires many elements including images and quality of products, and one of the basic elements is presentation. Good presentation is a half success for your product. Moreover, Mock – up technique will help you achieve this target. These mock-up is a great way to show your client what their future product will look like. In addition, they help you save time and make your brand look like eye candy and more professional.

There are many ways to create mock-ups like: create mock-up from scratch, use Smart Object, Photoshop Action,…. Thus, this article will show brieftly about using Smart Object to create mock-up.

How to create mock-up

  • Step 1: Open Photoshop software and choose image file and create new layers
  • Step 2: Use rectangle tool to draw on the screen of devices or items what you wanna choose.
  • Step 3: Click right mouse and press ” Convert to Smart Objects” on Layers Pannel

How to use mock-up

  • Step 1: Open the other layers with images was taken or available.
  • Step 2: Paste that images into Smart Object when you open new layers, save layers and you have mock – up product.

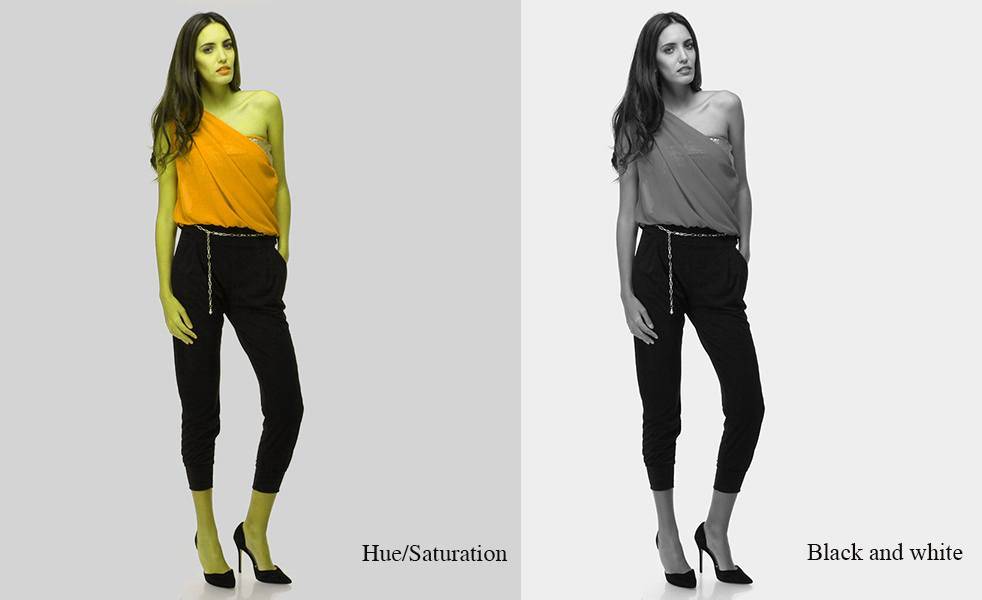
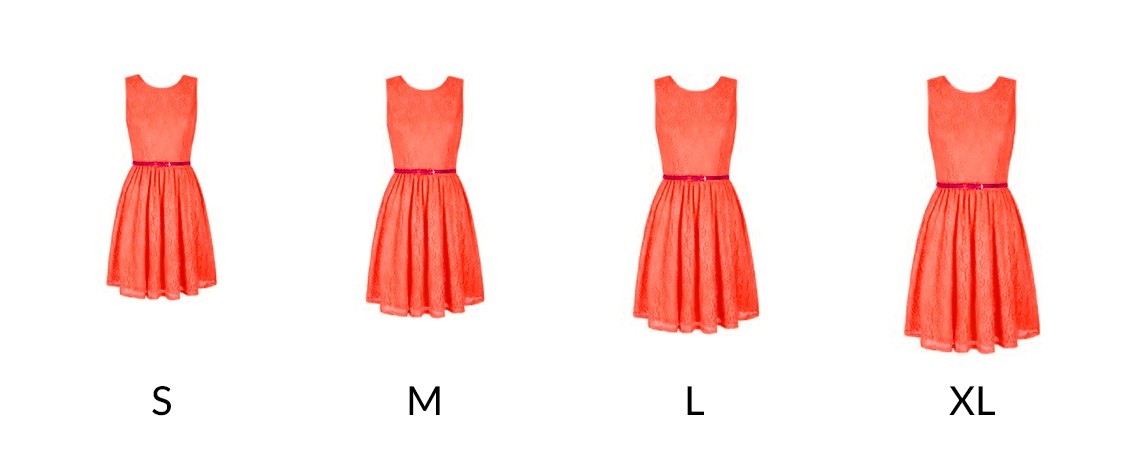
Besides, you can easily change label and colors to make it your own when using mock-up technique.

Below are video that guide specific how to create product mock-up you can refer.

It’s simple and easy to create and use mock-up technique. Let’s post an image of your setup and a final image so everyone can see what you did. Or if you have any questions or concerns, please do not hesitate to contact us today for a free consultation.

Categories
Support Tips & Tricks

3 Ways for Converting to Black and White Using Photoshop

Colors are one of the most important factors what affect direly the quality of images and effective way to make your images become more nominate. If you own your online store, the first important factors what will attract your customer is product image or apparel product photography. High quality product photography is essential for apparel ecommerce. And main color will necessary elements what contribute to the success of the pictures.

If you are a huge fan of color. You like bold colors to create a mood in your images, and often use the meaning behind colors to reinforce the message you want to convey. Sometimes though, you want to get rid of the colors to draw the viewer’s attention to your compositional lines, to textures, or to make a contrast. To do so, you may want to turn a color picture to black and white, in order to see what works best.

Black and white background are the standard backdrop that is commonly used in product photography. It creates a high energy, happy, and distraction free scene, perfect for pictures of your friends and family. These are because black and white background makes the product more visible and clear than any other color.

If you’re looking for premium quality Photoshop Photo Effects or Photoshop Actions, then choose from our collection of creative options. You can also get color images converted to black and white on our website.

Converting to black and white digitally has a number of advantages. With film, the black and white conversion essentially happened at the time of shooting. If you wanted to change the nature of the black and white conversion, you could only do it by placing a colored filter on the lens. For instance, you can make blue skies much darker by using Photoshop. Here are that we will start with a color photo and converting it to black and white in Photoshop, you have complete control over the conversion.

Way #1: Channel mixer adjustment layer

First, you can go to your layer panel and click on Channel mixer or you can also go to Layer -> New Adjustment Layer -> Channel Mixer

fotosolution-3-Ways-for-Converting-to-Black-and-White-Using-Photoshop-06

Why do you choose channel mixer?. Because simply, using channel mixer you can do more than just saturation your colors. You can get great results sorting by color channel. This will modify your input and output levels.

fotosolution-3-Ways-for-Converting-to-Black-and-White-Using-Photoshop-08

Converting black and white background, you can get lighter or darker tones, you can also play with your constant overall tone. You can choose and use each channel and see what you like the most. For example, you can play with green channel in a natural picture, therefore highlighting your subject.

Way #2: Using Black and White Adjustment Layer

When working with black and white you cannot see different adjustments at once. To keep several adjustments visible, you can create a door layer or a separate layer on which the adjustment has been applied directly to the image. It is simply, you can press Shift + Option + CMD + E, and the door layer appears. This will combine all visible layers into one.

You can then combine with a black and white adjustment layer. First, you go to Layer > New Adjustment layer > Black and white. Then, choose the different values for each color to adjust the tones as you wish in your image.fotosolution-3-Ways-for-Converting-to-Black-and-White-Using-Photoshop-07

Secondly, let’s add a layer mask to each one, and paint on the mask or the part of picture that you want to hide by using black, this will help you reveal the layer underneath. Paint with white or layer mask is white by default to reveal the selected areas of the top layer.

Or the different way is that you create only two types of black and white and make it easier to apply selectively the different effects. At the end, you have a mix of different contrasts in your image, and can apply those contrasts as they best suit each area where you want to drawing the viewers’ attention. There are so many ways to create a black and white images in Photoshop.

Way #3: Use the Hue and Saturation Tool

This method gives exactly the same result as converting to black and white. The only advantage is that it’s available as an adjustment layer, and can be used as part of a non-destructive editing process.

To make this, you can use Photoshop CS 3 and Photoshop Elements:

You go to Layer > New Adjustment Layer > Hue or Saturation, click “ok” and move the saturation slider all the way to the left (-100) and press ‘OK’

Advantage: Quick and easy and can be applied as an adjustment layer in both Photoshop CS 3 and Photoshop element.

fotosolution-3-Ways-for-Converting-to-Black-and-White-Using-Photoshop-12

Below are tutorial video that help you review easily. Check it out and have amazing experiences!

There are many ways to convert black and white. To have many interesting experiences, you can spent much times to experiment with these different methods when deciding how to approach black and white conversion. Do you have other methods to convert to black and white using Photoshop?. Please share your experiences in the comment below.

Thanks for watching!.

Categories
Support Tips & Tricks

How to make the color correction in Photoshop

Color correction is one of the important factors affect directly the result of images. If we have two pictures: white and black pictures and pictures with prominent color, which one do you prefer?. Beautiful images with stunning color will surely be a wonderful choice. So, color correction an image is one of the most common uses of Photoshop. How to make the color correction in Photoshop. If you don’t know the way about the color correction in Photoshop,  here some quick tips show you different ways on how to color correct on image. Let’s get started.

Color Balance Adjustment Layer

To get started, you should open an image that you think has a color board. After, you choose layer-> new adjustment layer-> color balance, this gives you information about the pixels in your image. Using the adjustment layer is the best way that it can either remove adjustment or edit the adjustment at the later time.

You will see the appearance of color board to choose, then, color balance box will appear to support your work. Before applying the color balance adjustment layer, I think that you should make a copy of the background layer, then turn off the background. Then, choose the Color Balance adjustment layer option in the Adjustments panel.

Color Balance Adjustment Layer

Selecting the slider that has the tint color and move it away from the tint color. For example, since the image has a yellow, you want to move the cyan or yellow slide towards cyan to remove the yellow tint. You may also want to adjust the other two sliders to get the color you want for the image. Let’s click on double right arrow at the top right of the panel to finish with the adjustment.

If you want to change the different color, you can always go back in and make adjustment to the color balance properties by clicking on the layer thumbnail. Besides, you can use Gradient adjustment layer to make prominent color.

Curves

With some photographers, curves in an image will an intimidation factor, it will affect directly the quality of image. Don’t worry about this, we will help you adjust the curves. To adjust the curves, you have to click on the Curves Adjustment layer in the Adjustment Layers panel. You will see the appearance of  Curves Proprieties Layer.

fotosolution-How-to-make-the-color-correction-in-Photoshop-03

Notice the drop down option next to the RGB channel. Not only can you change all channels at one time (your image is a combination of red (R), green (G) and blue (B) channels), you can also change the individual channels. If you reviewed the Color Balance Adjustment Layers above, you are also aware of the ‘opposite’ colors of each of these individual channels. The original curve is a diagonal line from bottom left to top right. If you want to effect the reds in the darker areas, I adjust the line towards the bottom left. If you want to effect the red in the lighter areas, you can adjust the line towards the top right.

If you want to remove some of the cyan introduced when we adjusted the Red channel, select the blue channel and drag the middle of that line down slightly. You can continue to adjust the curves in the various channels till you have the color you desire.

Increase Contrast

Using increase Contrast technique will a perfect choice that help your image more prominent. To crease contrast an image, you can use Levels Adjustment Layer. First, choose layer-> new adjustment layer->levels.

fotosolution-How-to-make-the-color-correction-in-Photoshop-05

The Levels properties panel shows a histogram. This is a quick visual that shows the range of tones in the image. This particular histogram shows a lack of light or white areas. The data on the histogram doesn’t extend all the way to the right, nor is it all the way to the left.

Click and drag the white arrow adjusts the light or whites area of image to the left until it under the right edge of data of the histogram see setting in above image. Click and drag that black arrow adjusts the darks or blacks to the right until it is just under the left edge of data of the histogram.

Auto Color

Auto color is considered as the quickest way to color correct an image, if you need to something quick, use auto color to solve all problems.

Choose Image->Auto color from the main menu, this technique will determine what needs to be adjusted and perform the color correction for you. However, this technique have also some disadvantages and one of them is that you are depending on Photoshop to determine the best color adjustment.

Here are four tips to color correct in Photoshop. We hope you found it interesting. Do you believe that If you have any questions or concerns, please do not hesitate to contact us and comment below this post.

Thanks for reading!

Categories
Tips & Tricks

Using 3D Effect For Ghost Mannequin Photograph To Improve Sales

If you own store online and you try to think what do your customers do when they go to shopping online or purchase product online?.  Surely, they will attract is product image or apparel product photography what is considered as the first factor. High quality product photography is essential for apparel ecommerce. For many customers, your product images will determine whether or not they buy your product?.And to shoot beautiful images for your store online, you always use mannequin or model to showcase the unique shape and fit of each product. However, it isn’t always effective to actually show the model or mannequin in every image. So, you can shoot photographs flat or drape them over a mannequin to give a 3D effect.

Today, we will use the mannequin to showcase product. Using mannequins for your product images is an efficient and cost-effective way to promote your products. However, mannequins can be distracting, so a great alternative is to create a ghost mannequin effect for your product images. To shoot beautiful mannequin images, small tips for you: using 3D effect to sell more. So, how to create 3D image with the ghost mannequin technique?.

Firstly, you need to capture a front and back view of your product being worn by your mannequin or model. After that, you should style and hang your product on a piece of white foam board and photograph both the front and back. To create perfect 3D effect, you should create a ghost mannequin effect what is actually quite simple given that you own the proper post-production software and that your products have been photographed correctly. You can also outsource this editing work to professional editors and get back your ghost mannequin images in 24 hours, ready to sell. Below are these basic tips to create 3D effect for ghost mannequin.

Step 1: Open your files in Photoshop and create layers

First, you will need to open the mannequin image and the top-down image in Photoshop. Choosing your mannequin image and create a new background layer. Fill that layer in with white; it will help you complete overall background  It’s also helpful to label your layers.

Step 2: Use a Selection Tool to Select the Product in the Mannequin Image

fotosolution-Using-3D-Effect-For Ghost Mannequin-Photograph-To-Improve-Sales-02


After, choosing the product in your mannequin image. You need to zoom in tight and choose your favorite tool. There are 3 simple tool: quick selection, lasso or magic wand what help you accomplish your desired selection. Remember that, in most cases, when you shoot, you can remove the mannequin easily by using a white background because of the color separation between the product and the background.

Step 3: Refine and place your mask

If you have selected the entire product, refine your mask so that it is nice and tight, eliminating all of the background and mannequin by using the Refine Edge tool in the Select menu. Click OK in the Refine Edge dialogue box and place a mask on your shirt layer. The result is good and you can see your product floating freely on the white background that you created in the beginning.

Step 4: Rinse and repeat previous steps with the top-down image

Next, it’s time to switch gears and repeat Steps One, Two and Three on your top-down product image. You can feel bored when do these step again, but these is very important for your work; photographing the product inside-out will allow you to show the inside back of the dress, completing the mannequin illusion. Create a new layer, select out the product, and create and refine your mask.

Step 5: Combine the images

Cleaning masks and dragging the mask from your top-down image over to the image of your ghost mannequin product image. Organize the layers so that the top-down image is lower than the mannequin image. Then, adjust the positioning of the top-down layer and adjust its perfect proportions behind the mannequin layer.

Step 6: Remove unnecessary parts of the top-down layer

At this point, it’s a good idea to “hide” your mannequin layer and brush out the unneeded parts of the top-down layer. It’s important to remember to remove that piece in the top-down image because it’s already in place in the mannequin shot. Once you’ve done this, double check that your layers are clean and that nothing is out of alignment.

Step 7:  Add Shadow and Save

Finally, add a shadow between the two layers to create the product some depth, and save a copy of the Photoshop file with all of the orginal layers. When you’ve saved the layer file, flatten or merge all of the layers together and save the image again as a different file. These will help you can make image look professional and realistic. If the editing job is done well, you will end up with an amazing 3D effect, these will improve your product presentation and help you increase sales for your online store.

With 7 basic steps you can see how to create your beautiful images with 3D effect. Using 3D effect for ghost mannequin photograph will help you improve product presentation and help you increase sales on your online store!.