Categories
Support Tips & Tricks

Tips to Improve Portrait Photography

Portrait photography is one of the most amazing topic that many readers are interested in. If you are new photographer, learning how to professionally capture portrait photography is one of the most important skills you can develop.

Do you know how to improve portrait photography?. Here are a few of Tips to capture best portrait photography.

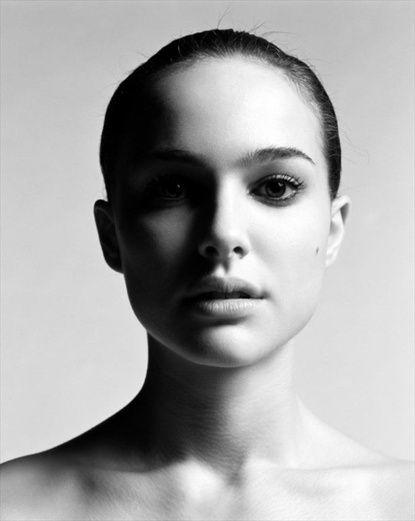
Lighting is golden key

Lighting is one of best factors to describe and embellish faultless portrait photos. And the best light to shoot portrait is Rembrandt lighting. Rembrandt lighting use to capture photos in studio to increase the brightness of subject, especially it help you create holograms.This technique will create clear triangles on subject’s cheek. Keep in mind that let’s buid a 45-degree angle to straight line that link between cameras and subject.

fotosolution-Tips-to-Improve-Portrait-Photography-01

It’s that shoot portrait photography in studio, so if you take the portrait in natural light, how about that?. Shooting outdoor portrait photography, you have the best chance of getting a great look with the natural colors and skin tones. However, shooting outdoors may be tricky, because it’s difficult to control the light in most situations. Make sure that you don’t pose the subject right in front of the sun. This may cause unwanted brightness or deep shadow. Shooting in mid-day also should be avoided as much as possible. For best results, position the subject in such a way that sunlight falls on the face from the side. You may also use reflectors or an external flash to light up some parts of the face.

Building comfortable space

Background plays a vital role to a portrait. As you know, portrait is all about someone’s face. So it is important to have a background which is not interfering with the subject.

fotosolution-Tips-to-Improve-Portrait-Photography-02

Let’s build a comfortable space for taking portrait photography. You can use a long lens with long focal distance ( about 75mm) to create comfortable feeling for subject.

Focus aperture

A wide open aperture with a lower number will blur the background and make the subject stand out. A smaller aperture with a higher number will make the whole scene come into better focus. Typically f/2.0 to f/5.0 is good for portraits.

Get high or get low

Taking a portrait is not always shooting at the eye level. Positioning the camera high or low while keeping the focus on the eyes brings out interesting features and adds different flavors to the portraits. So make the model sit, stand up, climb up to the stool or ladder or stairs and shoot.

fotosolution-Tips-to-Improve-Portrait-Photography-03

Adjust Head and shoulder

As shooting subject, you need to attend head and shoulder of subject. Let’s tilt your head from time to time to limite to just our of chin and forehead.

Angle and Pose

Pose and the angle of the body and face play a key role. Looking straight at the camera with motionless expression can be boring. Try to flare up your portraits with some twist. Maybe it is an inviting smile, a sexy expression, a flamboyant look, tilting the chin down or up, turning the head back while walking forward, or sitting and looking up.

fotosolution-Tips-to-Improve-Portrait-Photography-04

Editing photos before posting

Let’s check out and remove unwanted detail after shooting portrait photography. Therefore, you should take time to edit photos through some digital software such as:  Photoshop and Lightroom to have best portrait photography.

Do you have other tips to improve portrait photography?. If you have other questions or know other tips, let’s share your experiences in the comment below or contact us: sales@admin.admin.admin.admin.admin.admin.fotosolution.com to get more information.

Categories
Support Tips & Tricks

5 Basic Types For Portrait Photography Lighting

Finding 5 basic types for portrait photography lighting. First, light is one of the important elements in all photos. Whether a grand landscape or an intimate portrait, light always play the essential role to make the success or to break your images. So, it is important you should know that understand the different types of lighting and how to make the most out of each. Here we will show you 5 basic types for portrait photography lighting. Hope that you find it interesting.

Split lighting

First, we will present readers split lighting. What is the split lighting?. Like its name, split lighting splits the face exactly into equal halves with one side being in the light, the other in shadow. Basically, this light is often used to create dramatic images for things such as a portrait of a musician or an artist. However, it tends to be a more masculine pattern so, it is usually more appropriate on man than for women. Using split lighting for your artwork, you should put the light source 90 degree to the right or the left of subject or possibly slightly behind the subject. Hence, this will depend on the face of subject in picture.

fotosolution-5-Basic-Types-For-Portrait-Photography-Lighting-01

Let’s check how the light falls on them and adjust correctly. Besides, you should note that if place the light too close, then you’ll end up losing the side lighting effect. Or, if you can’t adjust the light source, you can adjust the direction that turn of the object.

Loop Lighting

Loop lighting is made by creating a small shadow of the subjects noses on their cheeks. In addition, it is one of the most used lighting set up for portrait photography. Creating loop lighting, the light source must be slightly higher than eye level and about 30-45 degrees from the camera.

fotosolution-5-Basic-Types-For-Portrait-Photography-Lighting-02

Rembrandt Lighting

Rembrandt lighting is named after Rembrandt , the well-known Dutch painter. He was famous for his low key and high contrast lighting style. It is identified by the triangle of light on the cheek. Unlike loop lighting where the shadow of the nose and cheek do not touch, in Rembrandt lighting they do meet which, creates that trapped little triangle of light in the middle.

fotosolution-5-Basic-Types-For-Portrait-Photography-Lighting-03

To set up a Rembrandt lighting set up, first place a key light at about 45 degrees from your subject and slightly above the subject’s head. As the subject faces the camera, you need to make out position the light:the right or the left angle. Thus, this will allow you to see the small triangle of light on the opposite side of the subject’s face.

Butterfly lighting

Butterfly lighting is  named for the butterfly shaped shadow that is created under the nose by placing the main light source above and directly behind the camera. It is most often used for glamour style shots and to create shadows under the cheeks and chin. Moreover, it is appropriate to older subject because it help photographer blur the wrinkles of object.

fotosolution-5-Basic-Types-For-Portrait-Photography-Lighting-04

To create this lighting, you should set up light that is positioned right in front the subject but at a steep angle facing down, therefore creating a shadow right underneath the subject’s nose that resembles a butterfly.

Broad Light

Broad lighting is when the subject’s face is slightly turned away from centre, the side of the face which is toward the camera that is in the light. This type of lighting makes a person’s face look broader or wider. This can be used on someone with a very slim face to widen it.

fotosolution-5-Basic-Types-For-Portrait-Photography-Lighting-05

All you need to do is to have your subject face away from the light, which most of the times is positioned at 45 degrees from the subject. Or in other words, you should put broad lighting illuminates the largest part of the face showing.

Here are 5 basic types for portrait photography lighting that give photographer many choices. Let’s try them out on different subjects and choice one of them that is appropriate to your style. Got any of your own favorite portrait photo tips to share with other readers? We’d love to hear about them in the comments section below.