Categories
Support Tips & Tricks

6 Easy Product Images Ideas To Help Increase Drive Sales

Sharing this article: 6 easy product images ideas to help increase drive sales and let’s say your thought in the comment below. As we know, to choose and spend money for all product is not difficult problems. Besides how much money you have, much or less, we can not deny that the quality of images and product have essential role for customer’s decision. And the quality of product images or beautiful images is one of the first factors what attract customer’s attention and keep custormers.

Normally, using high- quality product images will determine the value and trustworthiness of business, influences the decision. In addition, it help you increase or decrease the drive sales. Eyes-looking imagery bumps off consumers’ confidence and could easily drive them elsewhere. Surelly, beautiful product photography will mean the truly unique product shots if you know them. Simply, those commonly featured in full page ads or catalogs for top brand. Additionally, they are synonymous with one thing: high quality images.

No doubt, every photographer understands the basics and the importants to great product photos. An interesting product photography can make change the amount of pocket money in your hand. It also create the difference between multiple sales and zero sales. Especially, this is true for retailers that distribute their products on sites like Amazon – a prominent sites for the success.

Now, Are you ready to step into the world of unusual, outstanding and professional product photography?. Congratulation, you’ve come to the right place . Today, this article shares five easy procduct photography ideas to how to use the power of unique and vibrant product photography. Now, let’s get started!.

Use photo editing softwarephoto-editing-software

Photo editing comes in handy to pop out your products on the screen. Moreover, a typical improvement to photos is to bump up the colours by increasing the saturation and contrast, make the whites brighter and shadows more black through slightly upping the highlights and shadows. Beyond, you can also change the colour temperature if the image is still too blue or orange or grey.

Product and brand analysis

What’s your target audience? What makes your product tick? What are its best features? Does your brand or product have a style? First, Brand is indispensable soul of every product. Seconds,  they will help you determine the feel and look of your images. Don’t hesitate to focus on the uniqueness of your products. For example, Reloved Vintage uses the tagline ‘Hand-painted furniture and vintage homeware’. Therefore, these some important elements what contribute the success of images as well as drive sales of product.

Use Macro ShotsHow_to_set_up_a_tripod_tips_DCM121.advisor.tripod_walk4

When used, macro shots should probably be integrated with typical product photos. They come in handy as a great asset to multiple images used for, say, a feature page in an eye-catching ad poster, or a page in a catalog. However, keep in mind that your lighting must be phenomenal to bring out even the tiniest details.

Photo Manipulation

For a stunning product shoot, some manipulation using a digital photo editing service is required. If you find photo manipulation tricky, you need to hire the services of a graphic designer or artist to help you. Besides, Remove Background site is one of the renowned companies in photo manipulation and can help you manipulate your photos in an outstanding way.

Turn off Flash

Next, use natural light and shadows to light the subject. A camera’s on-board flash(especially with smartphones or point and shoot cameras) often creates poor lighting and over exposes the subject.

Use an Interesting Background

You don’t have to stick to the plain background rule to direct the focus to the product. Hence, let’s stage unique props and background with your main product in the foreground and create a more interesting and captivating product.

You are an intelligent businessman, you want to earn much money and increase drive sales every months, every years. So, choose one of easy upper tips to improve the quality of product images as well as contribute the success in your bussiness.

Categories
Tips & Tricks

How and When to use Light Tents for Small Product Photography

Beautiful image is an important factor to decide the success of effective sales. But to pass these, it is not easy as we think. Today, we will present you one of useful tips and show you a simple way to a use light tent for soft. If you just own normal product photograph, it is difficult to receive the good result especially when you want to sell online, we should require the high quality product photos. Such product photography may seem simple to take, but this technical type of photography is much harder to do well than you might think. That’s why there are professional photographers making good money shooting top-quality product photography.

A good picture will help sell your product photograph more easily. There are many ways to handle image but one of the easiest is to use a light tent. so, what is light tent?.

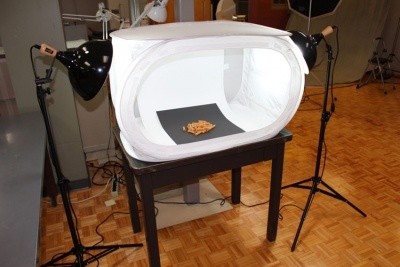
A light tent or light box is a contraption with translucent sides that diffuses light coming from different sources. This makes your image nearly shadow-less lighting against a simple and solid background. You can choose and purchase a light ten to build and handle your own product photograph. However, before using light ten for image, you should know when to use light tent?.

The light tent is one of familiar items what amateur and professional photographer always use when shooting product. Using the light tents photography will help them take professional digital photos of products and items easier. Moreover, it will support them filter the light from the source, creating a very even, almost shadow-free light across objects inside the tent. The light tents photography helps to decrease harsh shadows and reflections on shiny objects, such as metal or glass, and gives a clean, crisp backdrop to all items. Its special nylon fabric diffuses the external light, softens shadow, and reduces glare to create the perfect result.

For example, if you want to shoot a shiny items, you should use light tents photography because it will help you eliminate lots of bright reflections. Thus, light ten is useful way help you handle image and the light’s quality of image.

Next, we will present you how to use light tents for small product photograph or how to use effectively the light tents photography?.

Firstly, you should prepare and erect your tents carefully, then place your items inside your tents and in the exact center. Place the lights so the illumination is even. You can try to get a look you want before shooting seriously. For instants, you can also experiment with pointing the lights slightly at an angle, rather than straight on at the tent. You need to pay attention to move carefully subject because directing forward or backward will be affect and change the light and the shadow. Be sure to leave space between your subject and the walls, so that you can zoom in or position your camera to see only the backdrop and not any edges.

fotosolution-How-and-When-to use Light Tents-for-Small-Product-Photograph-01

In addition, the ambient lighting can affect directly when shooting. You need to choose the exact time because when shooting midday in diffused indoor light and shooting at night with only the lights themselves for light, it can happen many differences. Let’s avoid direct sunlight shining in or at your tent, as it will be difficult to balance such a powerful light source.

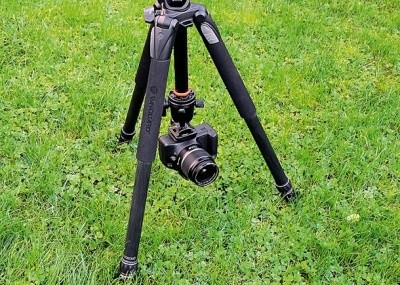
You should use a tripod  because this allows you use a low ISO and small aperture. Moreover, it will help you get sharp and detailed pictures.

Secondly, you learn way to set up the camera. It is best to use manual exposure and set an exposure that is approximately one stop brighter than the meter suggests to allow for the large expanse of white in the background. In fact, photographs often utilize wide apertures and selective blur to make them look more appealing, while product shots of crafts and handmade goods look best with a narrow aperture to keep the entire item into focus. Thus, you can set up the camera securely on the tripod and use either the 2-second timer or a remote shutter release to ensure that you tripod remains steady.

fotosolution-How-and-When-to use Light Tents-for-Small-Product-Photograph-03

In shooting process, you can draw some things to consider the exact distance, such as:

– Use white backgrounds, you may get better results around +1;

– Use black backgrounds, you will get better results around -1.

– If a full stop is too dark or too light, try a half or a third of a stop

Thirdly, way to choose best lighting for product photograph. The best results will be obtained by using three external lights with daylight florescent bulbs. However, you can use light with light tent to ensure white balance. If you use a light tent, you should place the two main lights directly on either side of the light tents photography. Besides, you can also set the white balance manually by shooting a white card and calibrating from that image. Finally, use your histogram as a guide when processing and limited use white background to ensure the best quality of pictures. Let’s check the exposure for each setup by taking the shot.

To summary, to get a perfect and consistent white balance with this setup, you should turn off the room lights and draw the shades to eliminate other light sources. This lesson will guide you some way to use a light tent photograph effectively, you can refer. If you have any questions or concerns, please do not hesitate to contact us and comment below this post.

Thanks for reading!

Categories
Blog

Learn how to avoid Fake Smile In Your Photograph

Learn how to avoid Fake Smile in Your Photograph will a main subjects in our post that we want to present. As far as we know, a beautiful and natural smile is one of the most attractive expressions of the human face, and the most successful factor to make great image of photographers, we love them because this factor brighten up our pictures with warmth. So, to avoid Fake smile in your photograph is one of the important elements.

W’ve been talking so far about a genuine smile, because a smile can also be deceiving. We humans have developed the ability to fake smile when we want to pretend that we’re happy or friendly, even when we’re not… and this happens a lot in front of the camera. A genuise smile make your photograph become more natural and more vivid and create the attraction for viewer. But a fake smile is completely different.

So, what is the different between a genuise and fake smile?.

A genuise smile is a natural smile when you feel comfortable and happy and willing to express yourself while a fake smile is social smile when people are nervous or uncomfortable and being polite. In general, a fake smile will give off a low-power impression of the person in the image.

Fake Smile, Genuine Smile

You can realize easily a genuise smile through their eyes what are considered as the window of the soul. Smiling eyes are relaxed, with raised cheeks, and a nice tension appearing on the side of the eyes. They help viewers may feel the honesty of a smile. A fake smile  you will not see any action in the upper cheek and eye areas. It looks more like a grin than a smile. So, the expression of contempt is often mistaken for a smile.

The next step, how to creat a real smile in your photograph?

If you are a portrait photographer, your job is not only to make a beautiful image, but also to be inspirational people, helping your model relax into the right emotion. If your subject is uncomfortable, you’ll most certainly end up with a fake smile or worse and lose the warmth and honesty that comes from a genuine smile. So, let’s create great inspiration for your model to help them express the most honest emotion and the result is a genuise smile in product photograph.

Fake Smile, Nature Smile, Real Smile

If your model do not have the emotions for your product, what should you do?. We will give some basic suggestions for photographer.

You can get your subject to genuinely smile is to help them connect with a real feeling of happiness. Asking them to think of something, or someone, they love allows them to connect with a genuine feeling of happiness or tell them a funny story, or a joke, and that can work really well. Let’s try to create any scene to build true feelings.

Attention: the point of view about genuise smile between women and men is completely different. It is the important factor you should know. Women are attracted more to photos of men smiling, but men prefer more serious photos of other men. You can determine this view to choose suitable subjects as well as types of customer who your product photos mentioned.

Today, we present you some basic way to avoid fake smile in your photograph as well as how to create a genuise smile. We hope that you are satisfy with this lesson. If you have any questions or concerns, please do not hesitate to contact us and comment below this post.

Thank for watching!.

Categories
Tips & Tricks

How to use product photograph on effective Ecommerce sites

Ecommerce is more and more popular and develop in modern social.And Ecommerce product photography is one of the aspects of web design that enhances the value and raise the effective sales. And for store online, the best way to attractive many customers is the quality of images. Everyone complety understand that beautiful and high – quality pictures is one of the important factors for the success of website.

In this post, we will show you how ecommerce sites can use images and improve the effective sales.

Choose suitable size

fotosolution-How-to-use-product photograph-on-effective-Ecommerce-sites-01


The size images is one of important factors what we need to attent. If pictures are too small, our customers is difficult to find the beauty of product. If pictures are too big, the interface of the page will be affected. Therefore it’s important to make sure your pictures have a proper size to achieve great quality, high resolution images. In this era of technological development, almost people are using mobile phones and tablets than desktops to surf the web and relish the attributes of online stores. These will help people save much time and can use and check web at everywhere. And simple that just a smartphone what can provide you with high resolution images instead of using expensive digital cameras.

Zoom functionality

You can adjust images as well as the suitable size by using zoom tool. Detail is important, and zoom tools allow shoppers to gain a better impression of how a product looks. And it means a lot to your customers and is the great way help your customers understand more and know many informations of product.

fotosolution-How-to-use-product photograph-on-effective-Ecommerce-sites-02


Alignement

Creating align your product photograph  what help you improve and develop your ecommerce site. You will need to decide on alignment standards for your apparel photographs. Having the same alignment and white margin on product images, creates visually consistent product category pages, and results in a better shopping experience.

Below are 3 kinds of alignement including: top alignement, center and bottom alignement.

Background

Background is one of important factors in an image and choosing suitable background is a deciding element to make beautiful photos. The background is of fundamental importance in the composition of the image emphasizing the subject, improving the photography, or if not adequate, it may cause irreparable damage to the image, making it chaotic.

Suggestion: You should use white background what will make your product photograph become more natural.

Colors

The color is another important feature during the online shopping experience. You should make sure your images show the correct color in order to show your customer exactly. Your product photograph will become more attractive if you add color into images. However, you need to use accordant colors to not fail product. Avoiding to using neons, reds, and pinks—are difficult to photograph correctly in camera and often need to be tweaked in Photoshop.

Choosing angles position

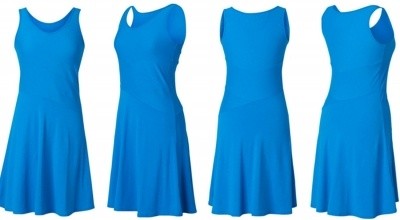
Choosing the camera angle is a important parts when you take the product photos with natural light. A photo can look much better just by approaching it in a different angle. Doing so can also help your customer understand the size of the item, and allow them to better visualize product details such as extra pockets, interior lining, special thread, etc. To cover a product well, shoot the front, back, diagonal, bottom, top, interior, and details of the product.

Shadow

fotosolution-How-to-use-product photograph-on-effective-Ecommerce-sites-03


Adding shadows to product images is one of the greatest examples what help you can do to achieve great results. When we add the shadow in product photograph, this will create a powerhouse effect. Shadows can obscure a beautiful product and make product photography look unprofessional. However, we should know the difference of shadows on a product and shadows cast by a product. There are numbers of different shadow types that you can use such as: drop shadow, cast shadow, natural shadow, reflection shadow. To understand more each types, you can refler: how to add shadow to your product photograph. Let’s choose these options to find the look most suitable to your product and site.

The number of images

Beautiful quality image can be decided the big success for sales but having a small thing what we always forget or miss, is the number image that you update your shopping online. If we just update one or two images of each product is simply but these are not enough to give customers an accurate feel for the cost-effectiveness and quality of your inventory. Therefore, it’s important to give customers as much information as possible about each product by uploading at least 3 images per product—and preferably 5-10. You should shoot photograph with many angles of your products as possible. The more images of your product that you upload, the more the customer will come to understand about the product.

Finally, there are essentials ways help you learn how use and optimize product photograph on Ecommerce sites. Our team can also help you optimize your image editing workflow such as: how to remove backgrounds, clip, crop, align, and retouch your product imagesand will save you a significant amount of time and money in the process. If you have the demand, let’s contact with us and give feedback for us.

Thank for watching!.

Categories
Tips & Tricks

How to Align Your Product Photos You Should Know

Beautiful image is one of the most importants factors to decide the success of store online. So, choosing suitable image and editting it require high accuracy. If product photography is wrong and  inaccurate alignment, these can be affected directly the result of  your product. Thus, one thing remains clear that consistency is key in product photography. By developing alignment guidelines and incorporating them into your apparel photography workflow, your images will become more attractive. Below are the basic steps how to align your product photograph  what help you improve and develop your ecommerce site.

Setting correctly alignment

Firstly, you will choice a alignment standards for your apparel photographs. After, you can attent some factors such as: aligment, cropping and proportition before update these images in your ecommerce site. Talking about how to align your product photograph, we can determine the size of image.

fotosolution-How-to-Align-Your Product-Photos-You-Should-Know-01


The size of image can determine through the specifications of your specific website that you will choice to sell your ecommerce products.  This may range but most commonly will start no lower than 1000px by 1000px at 72 dpi. Normally, your images will be larger than this straight out of your camera, which it should be. Let’s check with your ecommerce platform and determine the marketplaces where you will be selling your products before you start setting your image guidelines.

Secondly, to arrange all products  perfectly, you also know what is the product that will be featured on the e-commerce page?. All product have the different ways on setting alignment. For instance, if you want to have the appearence of your product on website is perfect, footwear and purses is two of typical examples, you can set up them aligned towards the bottom of the frame of your image, these making everything look lower in the image but when matched up on your website and consistently laid across your site, the appearence of your product will look more prominent and more useful. Apparel on the other hand may need specific attention to detail when aligning to make sure that your product images are accurately centered across but are aligned top to bottom as well.

Thirdly, you should choose position for your product such as: align at the top, the center or the bottom.

How to creat an aligment templateclick_create_new_alignment_template

It is important things for creating an infographic that you should choose to align exactly your images to ensure consistently these infographics on all images moving forward. Using your guides tool within Photoshop while setting up your image file is the best way that help you realize this way. You need to set spaced 2 inches from each side top to bottom and centered within the frame. the position the product within the frame what you created,  aligning the top or bottom of the product to the guidelines of the height. It is best to not put your product to fall outside of these infographic giving your product enough room to breathe and space for it to live.

Choosing photograph for your product

Now it’s time for you to photograph your product or products by utilizing the method you have chosen for your images. There are different methods of styling for your apparel product images. Photographing a garment on a mannequin or a model is the best way to demonstrate shape and fit, while also encouraging customers to visualize themselves wearing it. If you hire a model for store online, you will lost much money but using a mannequin, you can save much better.

After you complete image gallery on website, you will need to apply your alignment standards to your images during the post-production process to make your images web-ready. If you have any questions or concerns, please do not hesitate to contact us and comment below this post.

Thank for watching!.

Categories
Tips & Tricks

Attention: 7 Basic Mistakes in Product Photograph You Should Avoid

Product photography or apparel photograph is one of the most important factors to improve the sales online and keep the customers. High quality product photography is essential for apparel ecommerce. For many customers, your product images will determine whether or not they buy your product?. So, we will discuss the most common mistakes in product photograph to help you improve your apparel photograph and avoid them to create stunning inventory images!.

Miss 1: Not Utilizing A Mannequin or Live Model

Many apparel photographers shoot product photograph by using mannequins or live models. Choosing mannequin or live models who wear your garments – your product is the intelligent way to present product to customers the most authentic way. Normally, they simply lay clothing flat or photograph it on hangers. But they never know and understand that it is big mistake what can be affected directly to the results of sales. Photographing a garment on a mannequin or a model is the best way to demonstrate shape and fit, while also encouraging customers to visualize themselves wearing it.

fotosolution-Attention-7-Basic Mistakes in Product Photograph-You-Should-Avoid-04


If you hire a model for store online, you will lost much money but using a mannequin, you can save much better. As we know, when it comes to fashion ecommerce, displaying your clothing in a more realistic form is of more importance to your target customers. Since your customers can’t try on your apparels, and naturally they are more hesitant if they can’t picture how the piece will look on them. Using mannequins are an affordable alternative and easy to work with. Take time to style your product on the mannequin; if your garment looks too big, try fitting it closer to your mannequin by pinning it and tucking it until it fits properly. Present your products by using mannequins will allows you the opportunity to create a classy post production technique called the ghost mannequin effect and display it in the most realistic form.

Miss 2: Not Utilizing Enough Light

You should avoid to making product images look dingy and underexposed. One of your biggest with an online apparel retailer is bright lighting . Great apparel images are produced when lighting flatters your product. Shiny products like jewel, glass or metal can be tricky to photograph owing to their highly reflective nature. All your product is different and having the right lighting will allow customers to appreciate the unique facets of your garments. The darker the lighting situation, the poorer the image quality—and poor image quality will not flatter your products and vice versa.

Suggestion: You should put your item in place where has lots of windows and a reflector panel made from foam board.

Miss 3: Not Preparing the Garment Carefully

fotosolution-Attention-7-Basic Mistakes in Product Photograph-You-Should-Avoid-02


Preparing garments to be photographed is a crucial starting point for photographing apparel, yet many photographers skip this step and rely on Photoshop to fix wrinkles, stains, and other visible defects.You should complete your product with some close-ups of the feature you wish to emphasize on. Tags, patterns, buttons, stitching— any detail you think makes your garment to stand out, focus on it. So, you can check and prepare the garment carefully to ensure the quality of images as well as the effect of your product.

Miss 4: Not Using Suitable Color

Color is an essential feature of post processing careful attention to white balance, some colors—like neons, reds, and pinks—are difficult to photograph correctly in camera and often need to be tweaked in Photoshop. Let’s ensure that the colors of your garments are accurate. The bottom line is that you want the customer to see exactly what they will receive in the mail should they order your product. There are a number of ways to tweak colors, so get to know Photoshop’s offerings and choose your favorite tool. After you have fixed the colors, make sure to convert your images into SRGB format to make sure that different browsers, computer screens, and websites won’t change the accurate colors that you worked so hard to create for your customers.

Miss 5: Not Ensure The Number of Image

As you know, when you go to shopping or purchase product? You can look at the outfit’s colour, feel its fabric, checkout its prints and styles and then try out if it fits you after choosing product. If you buy the product online, image factors is one of the first elements to keep your’s leg. Beautiful quality image can be decided the big success for sales but having a small thing what we always forget, is the number image that you update your shopping online. If we just update one or two images of each product is simply but these are not enough to give customers an accurate feel for the cost-effectiveness and quality of your inventory. Therefore, it’s important to give customers as much information as possible about each product by uploading at least 3 images per product—and preferably 5-10. You should shoot photograph with many angles of your products as possible. The more images of your product that you upload, the more the customer will come to understand about the product.

Miss 6: Not Using Correct Cameras Setting

Using epic images to showcase your products can make the difference the quality of product. So, you want to take camera setting that perfect product photography—sharply focused and perfectly lit so as to attract the attention of customers. Because it is simple thing that if you choose wrong camera settings and these can drastically reduce that quality. You should check and use correct cameras setting.

Camera mode

Once you have your camera, tripod and product in place, you can start by selecting your camera mode.  Most cameras offer a variety of settings but I usually stick to using three modes: Manual, Aperture priority and Automatic. As you can see, image taken with my manual mode looks much more pleasing to the eye. This is simply because you can be able to control all your image settings without worrying about the camera using the wrong automatic settings like aperture, flash, shutter speed etc.

ISO Settings

ISO Setting is one of the important factors to perfect product images. Now, let’s select our ISO setting based on the light in our studio.  As a general rule, the better the light in the room, the lower your ISO value needs to be.  By adjusting your ISO setting just right, you will be able to produce crisp and clean photos.

fotosolution-Attention-7-Basic Mistakes in Product Photograph-You-Should-Avoid-03


I would recommend first setting your ISO at 200 and using the viewfinder to evaluate its effect on the product image. If the image appears too dark, increase the ISO value to a setting that is more suitable. If your studio or space is too dark for shooting, raise the ISO value to a range between 600-1400.

ISO measures the sensitivity of the image sensor which takes your image. The lower the number the less sensitive your camera is to light and the finer the grain in your images. This means your image will have less grainy ‘noise’ or what I like to call speckles!  Higher ISOs are generally needed in darker situations unless you are using a tripod.

Aperture

When you choose aperture, you’ll be putting up your exposure settings. For a home studio, f16 is considered ideal as you’ll need to have the whole product in focus so as to shoot clearer photos for your customers. The rule of thumb recommends the use of Aperture settings of more than f11 to ensure nearly (if not the whole) product is in focus. In essence, the higher your aperture gets the better for your images. If for some reason your camera will not reach as high, the highest aperture your camera will allow is perfect or you can even try the auto settings!.

White balance

It is a vital element of outstanding product photography. Be sure to adjust the white balance settings on your camera. Although many cameras will come with pre-program options or presets you need at least one custom white balance option. This means that the camera can “read” and self-adjust itself to be able to take pictures under many light conditions. This feature is very important. White balance means that the camera needs to adjust itself to the ambience light you are using, to give you accurate and true colors of the items being photograph. There are many different types of light sources, but the most common are tungsten, fluorescent, LED, and natural sunlight. Let’s choose suitable white balance to make your perfect product.

Miss 7: Not Editing Properly

After all is done and your images are safe in your website or your shopping online, you can edit the images you would like to upload to the web. To keep all images consistent in relation to one another and cut back your post-processing time, make sure to develop a standard set of specifications for both shooting and editing. You can check all acrops, alignments, colors, cropping and backgrounds identical from image to image in your inventory.

Finally, we have shown 7 most common mistakes in apparel photography, you have the opportunity to correct your workflow and get back on track to creating wonderful product images for your customers. Hope that you have valuable lesson after reading this post and good luck!.

Categories
Creative

5 New Year’s Resolution For Your Ecommerce You Need To make in 2016

It’s a new year, which means it’s time to start new habits, new beginning that will make you as well as your business become better. It’s the beginning of a new year with many big targets that means it’s an opportunity to better themselves through New Year’s Resolutions. Setting the big goal for New Year is also a good opportunity for growing businesses. Resolutions for businesses are an opportunity to start the new year with many lucks as well as a new knowledge of understanding about all aspects of your business.

If you own a shopping online, you have many big targets for your business in New Year but you don’t know want to start from there. Below are five useful resolutions about your ecommerce store that help you start easily giving for great results.

Optimise your siteoptimize-thumb

There’s no doubt that online store entrepreneurs are always check and observe the number of visitors or customer traffic to their websites and improve more potential customers to click the buy button or choose their product. If you can optimise your website achieve the no.1 resolution for your online shop this New Year, then you can expect to grow your business more rapidly and great results for your budget. To optimise your website is not simple action. You can attend many importants factors  including the design, images, product descriptions, website speed, sales funnel, product images, user flow, content as well as your site’s mobile responsiveness which effect directly effective your page.

In fact, you cannot tackle optimization of your site at once. So, you can focus on a given area of your ecommerce store to improve. Let’s choose central goal to optimise your site.

Suggestion: Optimise your customer’s mobile experience or mobile commerce is one of the important elements what you can care. You were wondering about your choice, mobile commerce will great suggestion for you.

Update Interesting ContentInteresting-content

Quality content is one of the important elements to decide the success of your sites. Good content will perfect narration for buyer who can know and understand the information or details about your product. If you provide useful in-depth details and great imagery will build confidence and trust that will captivate them into making the right decision. Furthermore, quality content creates a continuous communication between your consumers and brand. You provide them with valuable information or knowledge that offers them a solution to their problems. With valuable information, their customers completely trust you and choose your ideal destination. So, we can confirm that fresh quality content will hep you increase your sales because it encourages your visitors to stay on your page for longer hence building more customer loyalty and trust.

Improve Your Product Photograph

Ecommerce is more and more popular and develop in modern social.And Ecommerce product photography is one of the aspects of web design that enhances the value and raise the effective sales. Everyone complety understand that beautiful and high – quality pictures is one of the important factors for the success of website. Online sales website is an typical example. In this era of technological development, almost people are using mobile phones and tablets than desktops to surf the web and relish the attributes of online stores. These will help people save much time and can use and check web at everywhere.

Using high- quality product images will determine the value and trustworthiness of business. influences the decision as to whether to choose or not and especially increase or decrease the drive sales. Eyes-looking imagery bumps off consumers’ confidence and could easily drive them elsewhere.

To undersand and know more about improving your product photograph, you can refler: 6 Easy Product Photograph Ideas To Help Increase Drive Sales.

Building and Optimizing Email MarketingOptimizing-Your-Email-List-Building

Email marketing is great suggestion and I think that a lot of people have ‘sending regular newsletters’ on their list of the new year’s resolutions. If you are a talent businessman, you won’t want to lose your fans and followers in your sites after ending a perfect year and in new year, you want to improve and increaser multiplied number of customers. So, using email marketing and buid your mailling list is effectively ways what you need to make now. After building your mailing list, you can start sending emails once a week to inform your customers who are too engaged to click on to your store about new products, resources or blog posts from your business. Everything from your shopping cart, order confirmation email, shipping confirmation email, and customer feedback emails – all of them have the potential with the right amount of thought to be a major online marketing tool for your business. If you have not used email marketing to drive engagement, you can start buidling a mailling list now.

Using Social Media Marketing to Drive Sales

Social media is the collective of online communications channels dedicated to community-based input, interaction, content-sharing and collaboration. Using social media is the most effective marketing for your sales. It’s worth noting that customers alway use social media to search for products are more likely to buy through the social media buttons and hence,If you own online store, you also want to keep many customers and make your first online sales so, you should not miss out on these exciting opportunities if you want to keep many customers and increase effective sales. You can refler some channel of social media such as: Facebook, Twitter, Youtube,…. through 5 ways to make your first online sales. There are giant social media platforms what brought to life buy able buttons this past year.

If you have a plan for New Year’s resolution, you can refler 5 methods for your ecommerce business. If you know differents useful methods, let’s share your resolutions with us. Or if you are wondering about next planning for New Year, try 5 our new year’s resolutions for free now.

Categories
Tips & Tricks

6 Creative Ways To improve Your Digital Photography

As we know, digital photography play an important role to create the success of your sites or your shopping online. Why is digital photography important and how to revamp your digital photography?. Try to think that if you shoot a normal picture not digital photograph, it is not difficult to make that picture become more special before the eyes’s customers. But if you use the diverse photo effects and next gen tools, you can transform your pictures into stunning pieces of digital art.

Think about it. What are your photos really telling viewers? What is photo clarity and revamping and how do you achieve it?. How has the evolving digital world changed things for photographers?. Welcome to our site – it is great choice to answer every questions.

Create the light your photos by using the sun

sunlight-in-your-home

A best product photograph need to use many differents elements and natural lighting is one of essential factors to creat the success of product photograph. When you use an artificial light source, these can affect directly your product’s colour, while using natural lighting for product photos preserves the natural colour of the product. So, natural lighting complements products photos really well. Using the sun for photograph is considered as the most truely natural lighting for your product. It is one of the best lightings for great shots with fine details and splendid colors. However, the light changes from hour to hour and day to day. You can choice the suitable light for your product.

Choosing camera position

TStripod2

Choosing the camera angle is a important parts when you take the product photos with natural light. A photo can look much better just by approaching it in a different angle. Move your camera in relation to the subject and zoom in or out to change the composition.

Using watercolor effects

Colors is one of essential factors to make the paintings stand out. Watercolor effects is useful way what painters choose for their artwork. Photos can be revamped or recreated into luminous and soft watercolor digital photography. With various tools to choose from, you can easily create a watercolor effect to create photos that are uniquely yours..

Using the flash effect

The flash is a great tool to improve your digital photography. But how to use the effective flash is not simple. You need to keep a right distance when using the tool. It can’t be too near or too far. Often, a digital camera flash has a range of about 3 meters. If the flash is too far, your photos will be too dark. But if your flash are too close, your product photograph may be affected.

Use a Coloring Book Effect

This is an extremely fun and creative way to revamp your overall imagery. The best thing about photo editing and retouching tools is that you can use it on multiple images, allowing you to create a cool coloring book effect that helps reduce your photo to a simple but unique photography.

Make Your Photo a Digital Painting

You can use the scale space algorithm to reduce details excess in your photo or image and this will help your product photograph become more realistic. You can also break the basic preset rules by customizing various features to suit your taste when turning your photos into digital photography.

These amazing suggestions help you improve and revamp your digital photograph. 6 creative ways  remove image backgrounds to create digital artwork by allowing users to edit and cull their photos with a digital revamp. So, you are sure to incorporate layer masking techniques and blending modes to achieve a great effect. We hope that they will satisfy for your product photograph. Let’s share your experiences with us by comments in our site.

Categories
Tips & Tricks

The Important of Background To Make Beautiful Photos

Background is one of important factors in an image and choosing suitable background is a deciding element to make beautiful photos. The background is of fundamental importance in the composition of the image emphasizing the subject, improving the photography, or if not adequate, it may cause irreparable damage to the image, making it chaotic.

Most beginning photographers know to watch out for lamps or other objects seeming to grow out of people’s heads, but there is more to good captures than just avoiding the basic traps. Here are some ideas for interesting background ideas, help you make amazing photos.

Bokeh technique

Bokeh is a popular photography technique with photographer. It help you create an in-focus subject and a blurry background, and it is very easy to realize. It is used frequently for close-ups of flowers, or really anything small and detailed. You need many digital point and shoot cameras what have a Portrait setting. You will need to make sure there is space behind your subject and if the background is too close, it will still be in focus.

Acess to your subject, or you can also use the zoom button. Don’t forget to focus  your subject, and that there isn’t anything else between you and the subject (grass, sticks, etc.). if you do not pay attention, your intended subject will become the background and get the bokeh. Then take the photo, and checks at different angles to be safe. It’s not hard, and you’ll get the hang of it if you practiced hard.

Colours

Eye – Catching colours is an effective way to help your product photograph become more perminant. You can impale the backdrop with natural materials or with some coloured netting, and thus are able to choose a colour to work well with the colours your subject. It is not too hard but it requires a lot of effort and especially those looking for a “studio” style wildlife photo, it can look very nice. Sometimes it occurs naturally, and you simply need to try and post yourself so that a natural patch of colour appears behind your subject. Such colours could be created by flowers, bushes or trees. Any large patch of colour that is very out of focus will merge into one nice blend of colour.

Sometimes you can get the same effect from an extreme close. Use the MF setting and turn off the flash. You will get as close as possible to your subject. The less flat your subject the better, so you can get some parts in focus, with others blurred. Using a flash too close will excess the subject, but if you have enough ambient light it will be more effect.

The most important thing is to always be looking for something different. Don’t be hesitant to try different angles or lighting to make perfect background for your photograph.