Categories
Tips & Tricks

How to Remove a Background in Photoshop

You don’t need to spend lots of money to add a lovely background to your shot. With a few clicks in Photoshop, you can quickly transform the background from boring to amazing. Or If you don’t have times to process them, visit the Fotosolution team and meet Sofia Giang ( sales@fotosolution.com) I will help you remove the background in Photoshop.

Remove a Background in Photoshop with the Pen Tool

The Basic Steps:

  • Open photo in Photoshop
  • Unlock the layer
  • Use a quick tool or can make a pen tool (here we use Pen Tool)
  • Click Remove Background to mask the background
  • Make any adjustments to the mask with the Brush and Refine Edge Brush tools
  • Ok

It is one of the simplest ways to remove the background of your image in Photoshop. In other words, it is the tool most advanced users prefer using when removing the background from an image. In the next section, the Fotosolution team will share how to remove the background in Photoshop with the Pen Tool

Step 1: Open the photo and unlock the layer

Open your image in the Layers panel by clicking on File-> Open and unlock the layer.

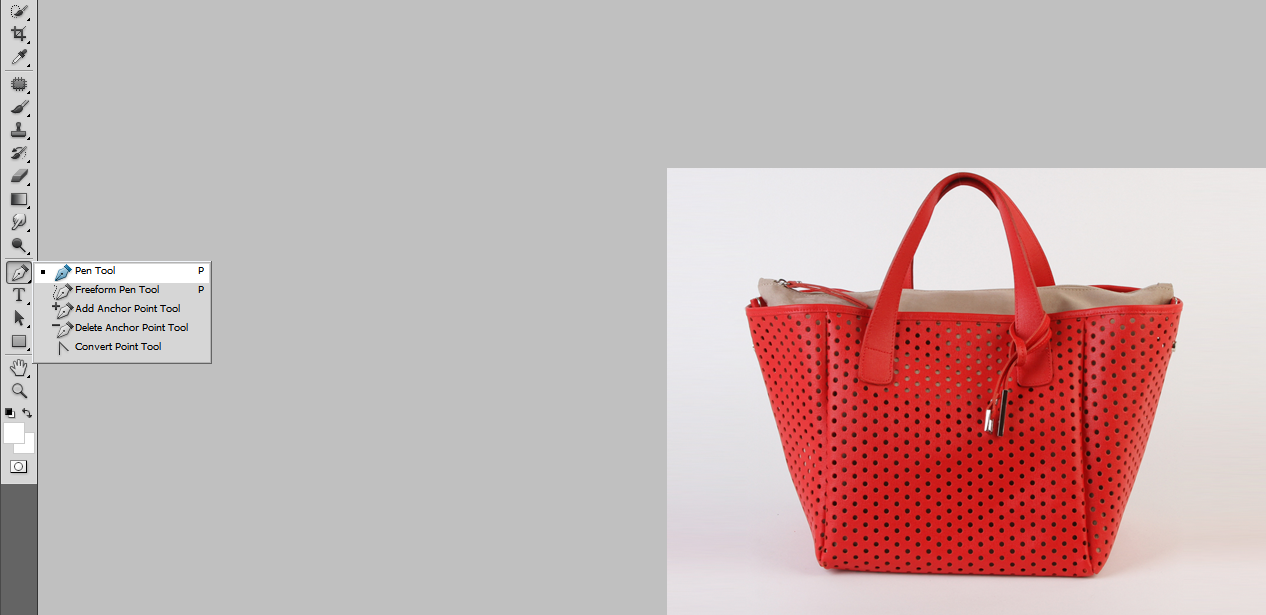
Step 2: Pick the Pen Tool

From the side menu, let’s select the Pen Tool. We’re going to apply this to get rid of the background in the picture. It’s simple to identify the Pen Tool icon.

Step 3: Draw a Path

When you have chosen the Pen Tool, you can now draw a path around the image to select it. First, zoom in to your image. Click anywhere on the edges of your subject to create your first anchor point. Please be patient as this takes some time. If you accidentally add an anchor point, you may also take it out.

Step 4: Convert Path

The next step is to convert the path you drew with the Pen Tool to a selection. Right-clicking the path in the Paths Panel will allow you to do this. Now click “ Make a selection

If you are working with a selection, you might want to increase the edge feathering because sharp edges can look unnatural, especially against a bright background.

Step 5: Click Remove Background to mask the background

Photoshop will automatically identify and create a mask to hide the backdrop from your subject. If you’re satisfied with the image, you can stop here; otherwise, you can carry on to the next stage to make any necessary edits.

Step 6: Make any adjustments to the mask with the Brush and Refine Edge Brush tools

First, let’s choose the mask icon. You can find it below the Properties header. Next, you click the Select and Mask and choose the Refine Edge Brush tool. You can use the Refine Edge Brush to soften the edges of the mask.

When you’re done making adjustments to the mask, click OK.

There are several ways you can use an image with a transparent background. And Pen Tool is one of the best choices to apply and remove background in Photoshop.

The Fotosolution team has experienced – editors who will help you process and save valuable time with the best Prices. Let’s meet Sofia Giang ( sales@fotosolution.com) to serve the best way for your product

Categories
Support Tips & Tricks

How to remove background with Adobe Photoshop Tools and Techniques

Remove the background from an image can be a really complex task but it is effective way to boots your sales. Did you know that a photography or a picture would be so much more attractive, look sharper on your website if one could simply remove the unwanted  background from the image. Using background removal not only brings the focus on the subjects but also follows you to easily post the image anywhere on your page.

Here, high-end photo editing tools and techniques has a number of useful tips to remove background from an image. One of the most popular photo editing tool are Adobe Photoshop. It is easy to use and understand. Today, we take you through the process of removing the background from an image using Photoshop to help you overcome the challege as well as own high- quality image product.

fotosolution-How-to-remove-background-with-Adobe-Photoshop-Tools-and-Techniques-05

Magic Wand Tool

The Magic Wand Tool is considered as best tool as you want to cut out the background and leave the image. So, how to use magic wand tool for background removal?. It’s simply that all you need to do is click on the Magic Wand Tool and based on the differences between the subjects and the background, this tool will automatically select areas for removing background. Especially, after cutting out the background, you can add any background color you like behind a picture. This will help you enhance the images and look flawless.

fotosolution-How-to-remove-background-with-Adobe-Photoshop-Tools-and-Techniques-01

Eraser Tool

Background Eraser Tool will one of great choices if you have tricky task for your images with complex background. This tool samples the color at the center of the brush and then deletes pixels of a similar color as you paint. This tool allows you to remove the original background from a photo and turn it transparent so you can place your photo on a new background, or place it into an altogether new photo. Besides, it help you change the color you like. Below are some illustrations to support you on removing background.

fotosolution-How-to-remove-background-with-Adobe-Photoshop-Tools-and-Techniques-03

Magic Lasso Tool

Magnetic Lasso tool is a very simple and easy-to-use tool available in the Lasso category. This tool will help you manually select certain parts of the image by drawing a rough outline around it. Besides, you can create a selection around the subject and complete it by clicking the starting point of the selection.

fotosolution-How-to-remove-background-with-Adobe-Photoshop-Tools-and-Techniques-03

Pen Tool

One of the most commonly used methods to remove background is with the Pen tool.

fotosolution-How-to-remove-background-with-Adobe-Photoshop-Tools-and-Techniques-04

This one of the easiest and simplest way to generate a high quality finished edge of a product. You will be surprised how easy it is to remove the background from image by using this technique. This tool not only help you remove background from the image, but also support you to add any background you wish.

Removing backgrounds in Photoshop can be quite difficult, and it completely depends on the image. However, with the aim of Photoshop tool, these will help you edit photographs and easily remove the background. If you don’t have the time or inclination to manually edit photographs, you can always make use of online background removal service providers.

Let’s share your experiences and your thought in the comment below.

Categories
Support Tips & Tricks

The Importance of Clipping Path You Should Know

Clipping Path is a famous aspect of graphic design and as well as an essential part of Photoshop. Nowadays, images of the product online is a major advantage in the outcome of the revenues company markes, these images need to be edited before they can be uploaded on main website. And it is one of important elements to edit beautiful images.

It is a closed vector path that is selected with the Photoshop pen tool and removed from the background. Keep in mind that shooting these images, there are number of editorial tasks that you need to know and realise. There are 5 uses of clipping paths including: remove background, image manipulation, color correction, devide products and recreate graphics and logos.

Using this technique is to offer high quality images for presentation purposes. First, when you remove background of image, this will help you create a better visual experience of the customers of your sites. Good images will support your customers focus more on the product that you want to present and sell. This postive point will contribute to increase your sales.

Clipping Path

Seconds, using clipping path for colour mask and colour correction will help your images become more attractive and more stunning before eyes’s customers. When photos are shot, the camera’s flash will not distribute light equally around the pictures, this can make your pictures crude, less attractive.

Using clipping path, separate colours and portions of an image or product can be adjusted to match the preferred colour or brightness of other parts of the image or product easily. This will help you balance the brightness and contrast adjustment levels, carves level, colour balance.

Thirds, when you need to manipulate image, clipping path is a great ideal. Simply, when you take your product with mannequin or a model who wear your product. You want to remove mannequin or model because they are not suitable for your image or are not beautiful.

Summary

It is easy to manipulate image with clipping path. We will make it beautiful for matching with the product image. Removing mannequin from the image will help visitores have a special and sympathy look for your online product.

Here are brief presentation about clipping path technique that allow reader to have basic look about it. There are many interesting things related to clipping path we need to interest in. If you have amazing sharing about clipping path or have questions or concerns, please do not hesitate to contact us today for a free consultation.

Categories
Tips & Tricks

Your product photos become perfect with white background and nice shadow

fotosolution-remove-background-with-original-shadow-and-reflection-shadow-05

Reflection shadow

fotosolution-remove-background-with-original-shadow-and-reflection-shadow-04

Original shadow

fotosolution-remove-background-with-original-shadow-and-reflection-shadow-03

Reflection shadow

fotosolution-remove-background-with-original-shadow-and-reflection-shadow-02

Reflection shadow

fotosolution-remove-background-with-original-shadow-and-reflection-shadow-01

Tie with nice drop shadow